Overview
Welcome to the documentation for the Divi Mowing child theme! On this page, you will find all the steps you need to set up and use our template. Please be sure to follow all of these steps and access the additional resources as needed.
Overview Video
This video provides a brief summary overview of the written steps outlined in the document below. You are welcome to follow the video and written steps together.
1. Prepare Your Divi Site
Install And Activate Divi
Before you begin, make sure you have the Divi Theme by Elegant Themes installed and active. This is necessary since our product is completely based on Divi.
Disclosure: The link to Elegant Themes is an "affiliate link" which means if you click on the link and purchase anything, we will receive a commission.
2. Download Divi Mowing
After completing the purchase, download the child theme file to your computer. The zipped folder ends with ".zip" at the end of the filename.
Purchased From Pee-Aye Creative
If you purchased the product here on our website, you can download the file from your Account page at https://www.peeayecreative.com/account/ or click the download link in your purchase confirmation email and save the file to your computer.
Purchased From Divi Marketplace
If you purchased this product from Divi Marketplace, log into your Elegant Themes account members area and looks for your marketplace purchases. From there you can download the child theme file.
3. Install The Child Theme
4. Import The Demo Content
Review The Import Items
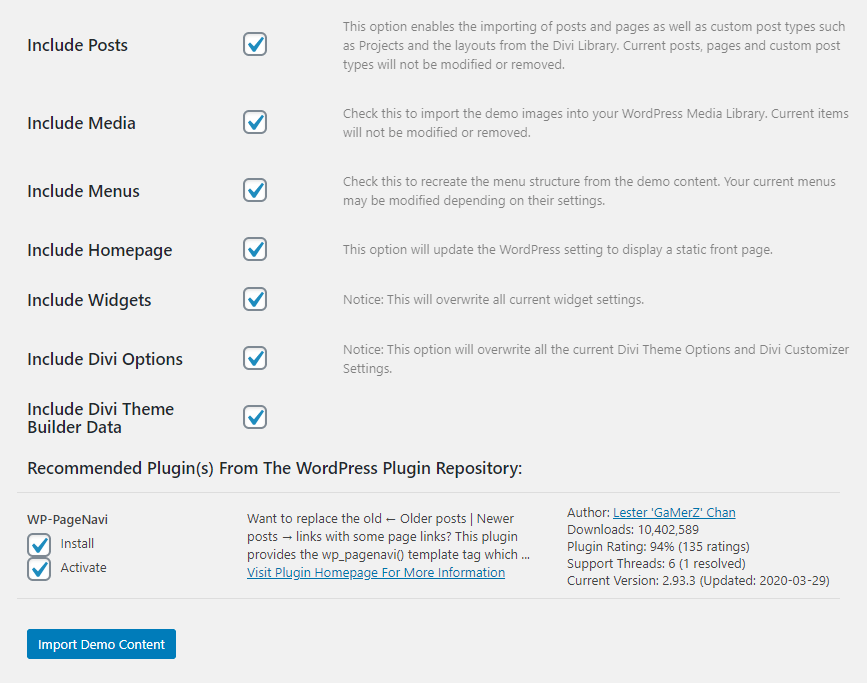
Next, you will see a list of options that are checked by default. These selected items will be imported, installed, and assigned on your website.

For a new website installation, we recommend keeping everything selected. This will enable you to instantly have a site that is structured and set up exactly like the demo site. Please consider reviewing this to fully understand what is included in our product and being imported.
Child themes like this are designed for fresh installations of WordPress. If you already have an existing website with any content, pages, menus, styling, etc. on your site, you will want to proceed with caution and pay close attention. The import process will technically not override any existing pages, but it will create some confusion and add everything as new content in addition to anything already existing. To avoid any issues, simply deselect any items that you don't want to import or assign.
Run The Import Process
After reviewing the selected items carefully, you may proceed with the import process. This process may happen quickly or take up to a few minutes, depending on your hosting server speed and internet connection. When you are ready to import the demo content, click the blue Import Demo Content button to proceed. Some visual indicators will show a readout of the progress.
Review Success Screen
After the import process has completed, a success message will appear stating "Import Process Completed."
One important and potentially confusing thing here is a red button that says "Remove Demo Content & Import Functions." Don't worry, this will not remove the demo content! This means it will remove the code function itself that was used to run the import process. Since the code needed for this process has already served its purpose, it can be removed.
Save Permalinks
At this point, it is recommended to go to your WordPress permalink settings at "Settings>Permalinks" and click the blue "Save" button. This is needed any time you make major changes to your site structure in WordPress.
5. Customize Your Site
Review Your Site
The import process is completed, and you can go review the frontend of your website. Your site should now look exactly like our demo site.
Replace Content
Now you can go through your site template and rewrite the text and replace the placeholder images with your own images.
You may customize anything on the site including the logo, images, color schemes, fonts, layout, etc. Divi makes it super easy to do all of this, but some the styling you see is from the CSS file.
Photos & Resources
Photos
Our demo uses some stock photos, but it would be illegal for us to include those or give them to you as part of this product. Instead, we have replaced those stock photos with placeholder images. Actually, we do not recommend using stock photos on your site. Instead, you should take and use original photos anyhow, since it has been proven that stock photos are not considered trustworthy or helpful for brand. Your customers want to see your own photos.
However, we like to go the extra mile, so if there are some photos you like on our demo that you want to use, you can still do that by using the links below in the toggle. We tried to use either free or inexpensive stock photos for your convenience.
Photos Used In Demo
https://pixabay.com/en/lawn-care-lawn-maintenance-643557/
https://pixabay.com/en/lawn-care-lawn-maintenance-643559/
https://pixabay.com/en/lawnmower-gardening-lawn-mower-384589/
https://pixabay.com/en/rush-meadow-ornamental-grass-spring-348481/
https://pixabay.com/en/back-yard-grass-vinyl-fence-nature-250890/
https://pixabay.com/en/grass-lawn-green-mown-mowed-220465/
https://depositphotos.com/search/mowing.html?qview=73589077
https://depositphotos.com/search/lawn-mower.html?qview=25288565
https://depositphotos.com/23088166/stock-photo-lawn-service-equipment.html
https://depositphotos.com/search/leaf-blower.html?qview=7022469
Free Custom Icons
Our child theme includes 16 custom designed icons. These icons are included as PNG files that match the color of the demo. We also included the vector files so they can be customized in a vector editing program to match your own branding.
Free Style Guide
We also include a complimentary style guide for the template. This simply shows some of the color scheme, fonts, and styles used in the demo.
Existing customers can download the icons and style guide here.
Theme Builder Templates
Overview
Whenever you activate the child theme and import the demo content, it automatically creates a variety of Divi Theme Builder Templates located in the Divi>Theme Builder area. These templates are each assigned to different pages, posts, post types, archive pages, categories, etc. The Theme Builder is a very helpful feature of Divi, so it is highly recommended that you get to know how to use it. If you are new to the Theme Builder, don't worry, our guide here will help explain what each of the templates is used for in the child theme.
You can edit any of the templates by clicking the little pencil icon. This opens up the template, and you can customize it to your liking using the Divi Builder.
Default Website Template
This is the first template, and it applies across the entire site. You will notice there are Global Header and Global Footer layouts included in the template. Because they are global, these header and footer layouts apply everywhere on the site, unless they are overridden by another individual template.
All Post
This is the template that is assigned to all the blog posts on the website, which means when you view a blog post, it will dynamically show the design and the layout from this template. Dynamic Content is used to show the post title, meta, content, etc.
All Category & Tags Pages
This template applies to all the blog post category and tags pages. If you click on any blog category or tag link, you will come to a page that dynamically shows blog posts in that particular category or page.
Children of Specific Pages: Services
This template is assigned to individual services page, the ones that are sub-pages of the main services page. In WordPress, you have the ability to set the parent page when you edit one of the child pages. Just go to the right side and choose the Services page as the parent inside the Page Attributes area. So all the pages which have the services page as a parent will be assigned with this particular template. Using one dynamic template like this allow you to keep consistent page designs for all the services pages.
All Project Category Pages
Similar to the blog post categories, this template is assigned to all the project category pages. This used a Portfolio module to display the projects, and any project category that you click on will dynamically display projects within that category.
404 Page
When by mistake or by any chance, the user clicks or enters a URL link that is not valid or existing on your website, then that user will see a 404 error page. This template is used to give some information and direct the user to other valid pages on the site.
Search Result Page
When the user searches something on your website by using the search module or the search widget, then this is the template that controls the design of that search results page where the user gets redirected to.
Getting Help & Support
Changelog
2.1
-completely redesigned and optimized header Theme Builder template
-added a new 404 page Theme Builder template
-added new search module to blog sidebar
-added a new search results page Theme Builder template
-updated the sidebar on the blog posts template
-updated overlay color on projects request a quote row
-updated overlay color on projects grid hover
-fixed issue in Divi with the the post content width
-adjusted left margin on the side-by-side buttons on home page
-removed unused css classes in menu
-fixed some spelling typos in the demo
-rewrote various text copy in the demo
-cleaned up the Divi Library layouts
-cleaned up the media library
-cleaned up demo blog categories and tags
-cleaned up all css

2.0.1
-updated scripts.js file to solve gallery issue with WordPress 5.6
-fixed gallery lightbox arrow icon, padding, and close x position
-updated CSS to fix optin form responsiveness
-removed unused CSS in home page settings
-fixed responsive layout issue on services page
-updated the blog grid styling

2.0.0
-total redesign

1.0.1
-fixed bug with 1-2-3
-added php function to enable larger gallery module image resolution

1.0.0
-initial release