Overview
Welcome to the documentation area and getting started guide for the Divi Taxonomy Helper plugin! On this page, you will find all the steps you need to set up and use our plugin. Each step provides a summary of information related to that step in the process. You will also notice links to separate documentation guides in the steps below. Please be sure to follow all of these steps and access the additional resources as needed.1. Install Divi
Our Divi Taxonomy Helper plugin is a 3rd party addon for the Divi Theme by Elegant Themes, so having Divi installed and active is a prerequisite for installing and using our product.Disclosure: The link to Elegant Themes is an "affiliate link" which means if you click on the link and purchase anything, we will receive a commission.
2. Login And Download Divi Taxonomy Helper
After completing the purchase, log into your account from the top right corner of the website. You can access your downloads by clicking on the "Orders" tab and then the "View Order" button, or by clicking on the "Downloads" tab. Click on the plugin name to download the plugin and save the file to your computer.
Divi Marketplace Customers: If you purchased this plugin from the Divi Marketplace, you can download the product from your Elegant Themes members area.
3. Install The Plugin
Now that you have Divi installed, and the plugin downloaded, you are ready to install the Divi Taxonomy Helper plugin. Installing our plugin works the same as installing any other WordPress plugin. From your WordPress Dashboard, go to Appearance>Plugins>Add New and click on Upload Plugin. Locate the plugin .zip file on your computer, which selects the file to up, and click Install Now. Once the file upload is finished, you can click on Activate.NOTE: Installing or updating this plugin may require you to clear your cache before the settings take place. This may include your browser cache, any caching plugin, and possibly even your CDN if you are using one.
4. Add Your License Key
After installing and activating the plugin, the next step is to add the plugin license key. This allows your site to communicate with our servers to ensure that you get automatic updates and support.
Single Product Customers: You can find your license keys by going to the "Subscription" tab in your account and clicking the "View Subscription" button. On the next screen, click the "License Keys" button.
Membership Customers: The license keys are at a different location for Divi Adventure Club members. You can find your license keys by going to the "Order" tab in your account and clicking the "parent" order (the first one when you purchased the membership). Click on the "License Keys" button on the parent order.
For both single product or membership customers, this will bring you to the page where you can view, copy, add, deactivate, and delete license keys. Please check our full license key guide for more information.
Divi Marketplace Customers: If you purchased From Divi Marketplace, then there is no license key to add. Updates and support for the plugin are validated using your Elegant Themes account, so just take a moment to be sure you have the proper Username and API key credentials added in the Divi> Theme Options> Updates tab in your website. Note that there is no additional license key to enter for this product, it is handled entirely by your Elegant Themes account credentials. You can refer to the Divi Marketplace Customer FAQs for more information.
5. Enable The Taxonomy Term Images
Once the plugin is installed and active, it adds several new features to your Divi website. Each of these new settings and features will be explained clearly in the next steps, so we recommend following along on this page as well as reviewing each of the individual decimation pages.
To start, go to the backend of your WordPress Dashboard to the Divi>Theme Options. There you will see a new tab added by our plugin called Divi Taxonomy Helper, with setting toggles below that are used to enable the new taxonomy term image. Each of the setting toggles should be enabled by default for all the taxonomies on your website, but it’s a good idea to be familiar with where these settings are located so you can enable or disable them as needed in the future.
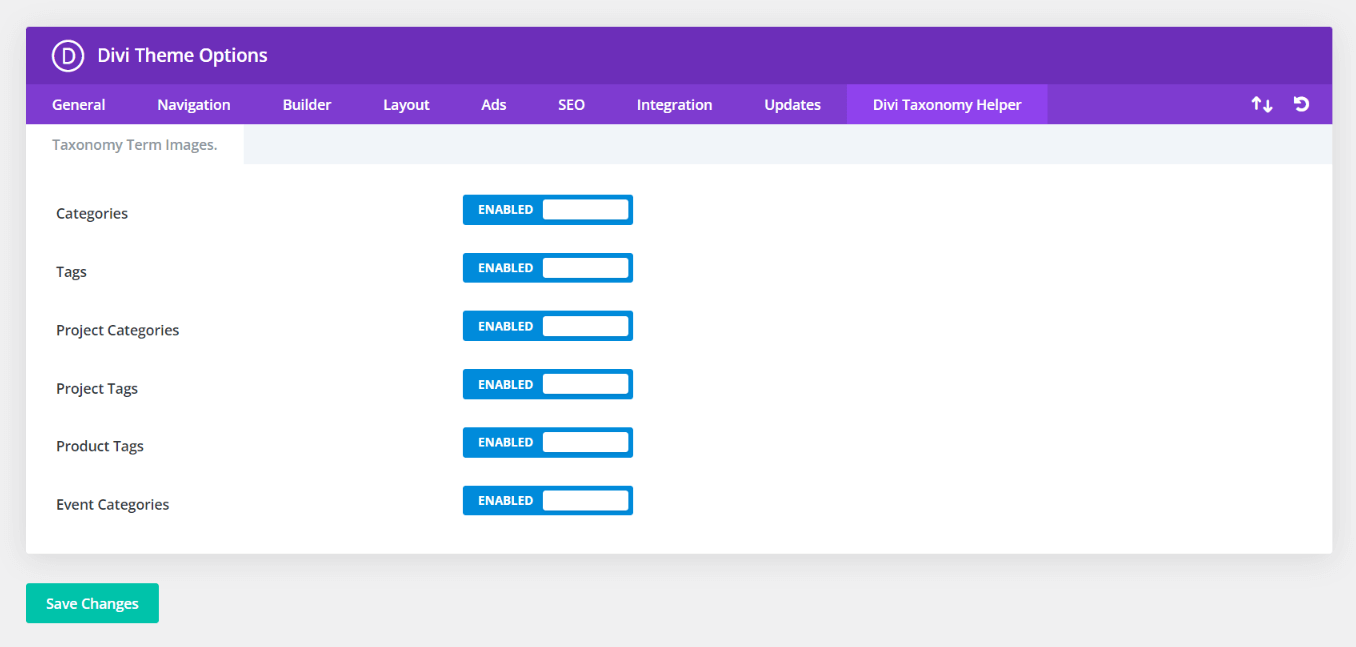
These settings allow you to add image support for whichever taxonomies you choose on your website. The plugin automatically supports any other taxonomy, such as Post Categories and Tags, the built-in Projects post type Project Categories and Project Tags, as well as other plugins such WooCommerce Product Categories and Tags, The Events Calendar Events Categories, LearnDash Course, Topic, and Lesson Categories, custom taxonomies, etc.
6. Add Images To Taxonomy Terms
Next, use the WordPress admin menu on the left side to navigate to the taxonomy where you want to add images. For example, hover over “Posts” and click on “Categories.” This brings you to a list of all the blog post categories on your site.
Click on the edit button to open the settings for each category. At the bottom, you will see a new Thumbnail setting has been added by our plugin. Simply click on the Upload/Add Image button, and select an image that represents that category from your Media Library or computer.
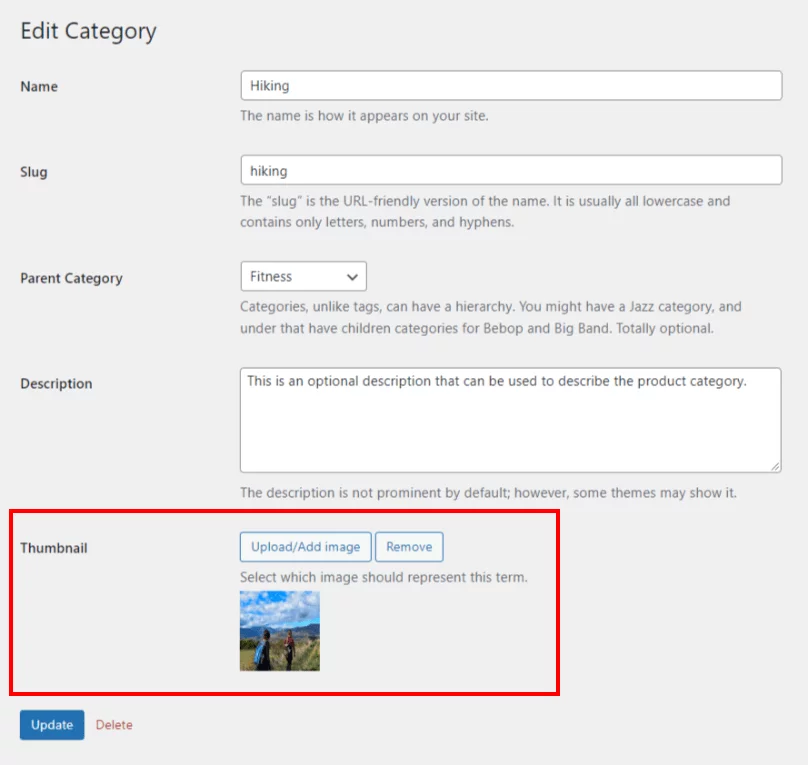
Please reference our full guide on How To Add Images To Taxonomy Terms for a video and more information about how to do this.
7. Add Images To Theme Builder Templates
Our plugin provides support for adding these taxonomy images in the Divi Theme Builder templates. This is actually a very important feature, allowing you to use dynamic content to set the featured image as the background of the header section or in a regular image module. This is perfect for creating category templates, such as an All Categories page using the taxonomy term image as the featured image of the template.
Please reference our full guide on How To Use Taxonomy Featured Images In Divi Theme Builder Templates for more info about why this is needed, what it does, and how to use it.
8. Add The Taxonomies Module
This plugin includes a new custom Divi Taxonomies module, which you can find in the Divi Builder. Everything about the module works just like any other Divi modules, so it will be very easy to use for anyone already familiar with how Divi works. In fact, the module is very similar to the Blog module, but display taxonomies instead of posts.
To add the new Taxonomy module to your layout, go to the Divi Builder and click the gray plus button. The quickest way to find our module is to use the search bar and start typing “tax…” and you will see our custom module which is named “Taxonomies.”
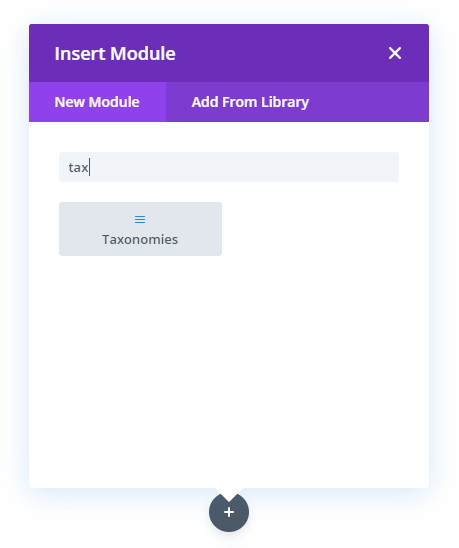
Once you add the Taxonomies module to your layout, you will have many options to choose from for setting up the content and design. The module includes many settings and features for choosing which taxonomy terms to display, choosing their order, and the number of columns. There are settings to choose to show or hide the title, images, icons, description, post count, and button.
In the Design tab, you will find everything you need to customize and style this grid of taxonomy terms. Easily style and customize the title, post count, and description text with all the standard font and text settings that you are familiar with in Divi. Adjust the spacing, colors, borders, and box shadows around and within the taxonomy terms, images, icons, and buttons. Everything you expect in a Divi module is here for your convenience.
Please reference our full guide on How To Display Taxonomies In A Module for more information about how to use and set up the module.
Plugin Updates
Any time we push out an update with new features, improvements, and bug fixes, all customers with an active license will see a notification in your WordPress dashboard. The update process is exactly the same for our plugins as it is for any other WordPress plugin. Learn more about product updates in our documentation. There are some important steps to take, including making a backup, testing on a staging site, and clearing your cache.
Blog Posts/Videos
Every time we release a major new update, we also create a written post and video highlighting all the new features. Be sure to keep an eye on our blog for all the exciting updates! You can check out the past updates on our blog as well.
Other Resources
This main page of our product documentation and the additional links provide everything you need to know to get started. But don’t forget to take advantage of our other resources as well. Take a moment to browse and reference all the documentation links. We want you to be able to easily find everything you could need, so we spend a lot of time continually updating everything for your convenience.
