Add More Context And Uniqueness To Your Menu
Sometimes you want to add extra text to menu time in WordPress on a second line, but there is no built-in way to do this. With this tutorial, I’ll show you how easy it is to add a second line of text to your menu using the Divi Theme. This can be a fun and helpful way to add more context to your menu links, and since this is unique, it will help your site stand out. You could add a callout, explain the link, or add a clever phrase. You can see how to do all of this in the video, and use the snippet below to style it. This would go great with some of our other Divi Menu tutorials!
▶️ Please watch the video above to get all the exciting details! 👆
Add A Second Line of Custom Text Below the Menu Links
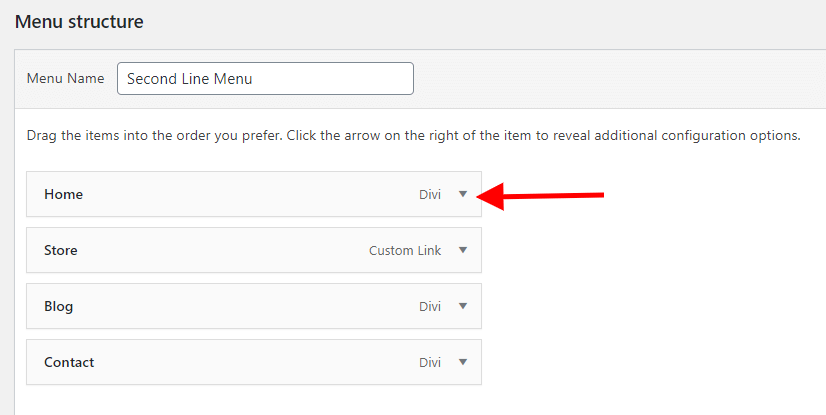
The first step we need to do to add text to our menu links is to edit the menu in WordPress. To do this, go to your WordPress dashboard to Appearance>Menus. Here you will either create a new menu or edit an existing one. Choose the menu you want to add the additional line of text to, and click on dropdown icon on the menu item to expand it open.

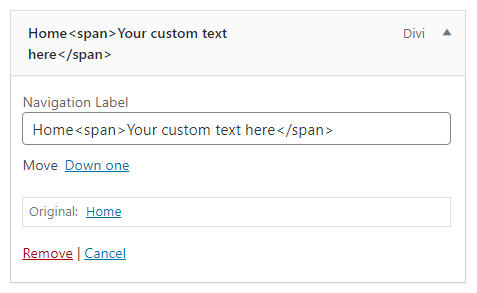
The next step is to add a span tag to the menu item.
A span tag is used to add a new inline element inside an existing element. So adding a span tag to the menu item creates a new separate part of the menu text for us to edit and style.
So here’s what you need to do to add a span tag and custom text to the menu item:
1. Add a new <span> tag after the menu item label
2. Write your custom second line text
3. Add a closing </span> tag
Here’s an example:
Menu Item<span>A second line of text here</span>
Go ahead and do this to any of the menu items where you want there to be a second line of text. If you are doing it to one, chances are you should do it to the others for consistency in style (watch the video for a good example).
Style The Second Line Of Menu Text
Now that the text is in the menu link, it looks bad (as expected because so far we only added more text to the menu item).

So we need to style it to accomplish two things.
First, we need to move the new text to a new line. We do this by making the <span> tag displayed as a block element instead of inline (this is CSS terminology, just ignore it if you are unfamiliar with it).
The second thing is to style the text if you want it to have a different font style, color, size, etc. from the the main menu item. We’ll do these things in CSS. We have provided an example below.
Where To Paste The CSS Code
1. Divi Assistant
If you are using our Divi Assistant plugin, simply paste the code in the CSS tab in the custom code window in the Divi Visual Builder.
2. Child Theme
If you are using a child theme, paste this code into the style.css file. If you don't have a child theme, you can generate a child theme directly on your site or download our free child theme.
3. Divi Theme Options Integration
Otherwise, paste this code in your Divi>Theme Options>Custom CSS code box.
If you need help understanding where to paste the code, please check out our complete guide about where to add custom code In Divi.
/*style the second line text span tag*/

.nav li a span {
	display: block;
	color: #aaaaaa;
	font-size: 80%;
	font-style: italic;
	letter-spacing: 1px;
	line-height: 1.7em;
}
Here’s how our example looks now:

From here you can modify this CSS snippet however you want. You can pretty much do anything you want to this. You can change the text color, change the font style, font size, align the text, add a border, or anything at all.


Cool idea!
Thanks Britt, glad you like it!
Nice! I found this cool idea on Divi Soup. I already did this on 2 websites and I bet I will use it again. When you need a few more words and save some space 👍
Great, yes this can be really useful for several different purposes!
Hi Nelson,
Really nice, but it doesn´t work for mobile?
Thanks
Hi Rafa, I’m not sure why it wouldn’t as the span is added to the WordPress navigation menu.
Desktop view
Tablet view
Please share the link to your site, that’s the only way I could check the code.
Hello. Many thanks for this tutorial. It has been very helpful. Yes, It’s not working on mobile on my site either – https://wickedspider.com/ . What would you suggest?
Hi there, I checked your link and it is working. Let me know if you need anything!
i do prefer this way
https://diviextended.com/how-to-add-description-to-menu-items-in-divi-theme/
Well then it’s great we have the freedom to choose isn’t it.
Legend! Thanks mate, been trying to figure it out for weeks. Thanks a lot. Keep up the good work. Subscribed to your channel!
I’m glad you like our tutorials Rus! We are definitely going to keep it up!
I’ve tested this using your exact CSS and the SPAN, but the SPAN section does not bump down onto the next line. Thoughts?
Hi Susan, I would need to see a link, can’t really guess about something like that 🙂
Hmm for some reason the text remains on online despite the Content: block; CSS. It refuses to wrap down.
Hi Earl,
I see that you got it working now, great!
Hi Nelson,
I have been following your YouTube channel for some time now and I’m really happy with your work and products. I decided to register today to be part of your community. Your tutorials are amazing. I like every single insight you have introduced. I have gained a lot from your tutorials. Please keep it up. I’m currently working on a couple of websites and you are my “supervisor” really.
Hi Tafo, that is so good to hear and I am thrilled that you can learn and benefit from the content here! Keep going and learning!
This is exactly what I was looking for!
But….Im trying to figure out the CSS so that the active link color applies also to the span…..
How do I do that?
Thank you!
Please paste the code given below in the Divi > Theme Options > Integrations > Head Panel and change the red color to the active link color:
jQuery(document).ready(function(){
/*here you need place the color that you want to give to the span when the Menu item is active in place of red*/
jQuery(“.nav li.current-menu-item a span”).css(“color”, “red”);
})
Make sure to place the code inside the script tags.
Let us know how it goes. 🙂
Nothing changed…..here is what I put in:
jQuery(document).ready(function(){
jQuery(“.nav li.current-menu-item a span”).css(“color”, “#e09900”);})
Could you please share the URL of the page for me to investigate further?
https://aninstructionalquest.com
My goal is that active link has both lines gold instead only top line.
Thank you for helping me!
Ah, I saw the issue. The code is actually correct, but the selector’s and color’s quotes are getting uploaded differently in WordPress comments. Please go to this link and copy the code from there and use it: https://www.codepile.net/pile/1DpRV7OK
I have added the selectors for the dropdown as well to change the color of the span below the dropdown menu item. Please let us know how it goes. 🙂
Oh that is absolutely perfect! Thank you!!!
I am glad that the issue is resolved now. 🙂
Iv’e been searching everywhere for this! Thank you! I followed it to a T but still cannot get the text to show correctly :(. Any advice on things I could look into? I have the header style with the inline logo if that means anything. I did some testing and if I remove the logo it’s ok and works fine- but for some reason with it there it will not work.
Also bookmarking your blog and signing up for notifications because you have some really cool stuff here!
Thank you!
Hi Kristina,
I just checked the information that is in the guide and it is perfectly fine. I just checked your website and you haven’t added any span to the Menu items till now so I suggest you please follow the steps of the guide and then if you face any issue, share the URL and I’ll test that.
Let me know how it goes. 🙂
I would like to use this on my website, but the span text is on the same height as the menu item
check: https://bit.ly/2W6MDVw
what am i doing wrong here?
Hi Karel,
The code is working perfectly fine on my end. It would be great if you please share the URL of the website as it would be easy for us to investigate the issue.
The url was allready in the first post
check: https://bit.ly/2W6MDVw
Apologies for the confusion. Go to Divi > Theme Options > Custom CSS Panel and place the code given below:
.et_pb_menu--with-logo .et_pb_menu__menu>nav>ul>li>a, .et_pb_menu--with-logo .mobile_nav >ul>li>a {

    flex-direction: column;

    gap: 8px;

    display: flex !important;

}
Let me know how it goes. 🙂
That went perfect Hemant,
thanks for the help and support!
You’re Welcome. 🙂
Let me know if you need any further assistance.
Even using display:block; the second text remain in the same line
Hey Coil,
I cannot see any second text beside or under the menu item so could you please place that and let me know so that I can investigate the issue?
just quietly – thanks for this .. I found I had to add display:block to both the menu item and the span in css to get this to work.
I’m not using this on DIVI
Love this! Would be even nicer if we could get the second line revealed by hover. Any ideas on how to achieve that?
Sure, so this would be easy by simply adding the CSS selector “hover” to the code so that some specific property and value only applies when you hover. In this case the display property is the main thing, like display: none; regular and display: block; on hover.
This is awesome. Would you mind helping me with achieving this: I have two menu items and I want to show one line of text centered above those items. Looking forward to your help since you are my last chance to please my client 😀
Hi Jasmin!
Could you please share the URL of the page for me to investigate further?
Hi Team, thanks for all your tutorials. Really helps a lot!
For some reason it is working perfectly on the desktop, but not on mobile
Hi Richard!
Could you please share the URL of the page for me to investigate further?
I’m having the same issue, not working on mobile menu.
Here’s my url-
https://psallentes.bizarremeldert.be/home/
Hi Alex!
I’m not able to see any menu item which is rendering the HTML. Can you please let me know on which menu item did you apply the changes?