A Much Requested Solution Is Here!
Use Mailchimp Groups with Bloom Opt-In Plugin
After we released our tutorial on how to add Mailchimp groups to the Divi Option module, we had a lot of requests for how to do this with Bloom. Oddly enough, there are no tutorials on this subject and no documentation from Elegant Themes, so I decided to make a quick video and show you guys how to do this. It’s not super clear out of the box how to do this, and many people said it’s impossible, but once you see how I figured it out you will think it is easy. Alright, lets show you how to add Mailchimp groups to the Bloom Opt-In plugin by Elegant Themes!
Why Add Groups?
Groups let you categorize subscribers by things like interests and preferences. Your Bloom Opt-In subscribers can select Mailchimp groups for themselves, or you can put subscribers into groups without them knowing.
Groups are an easy way to add segmentation and personalization to your email subscriber list. This allows you to send emails to specific audiences who have specific interests, ultimately leading to a much higher conversion rate.
▶️ Please watch the video above to get all the exciting details! 👆
Step 1
In your Mailchimp account, go to “Audience”. Once you get to the Lists page, decide which list you want to add groups to and select it. Click on “View Contacts.”
Step 2
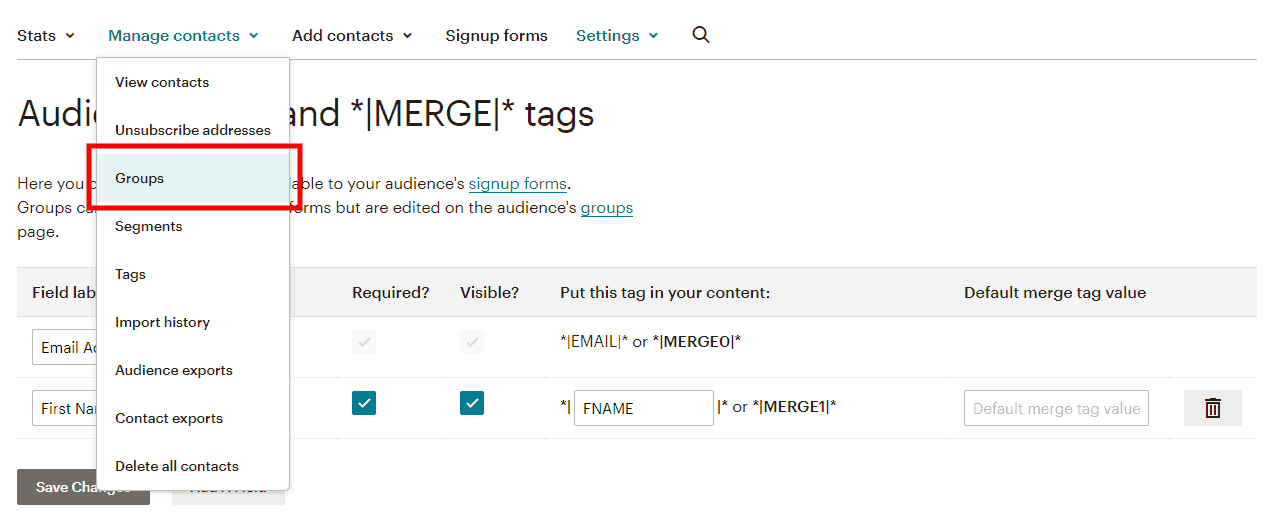
Under “Manage Contacts” and click on “Groups.” Then click the button to “Create Groups.”
Next, you will see a question, “How should we show group options on your signup form?” Go ahead and leave the first option selected since this will work best and is the option I’m going to be using in this tutorial.
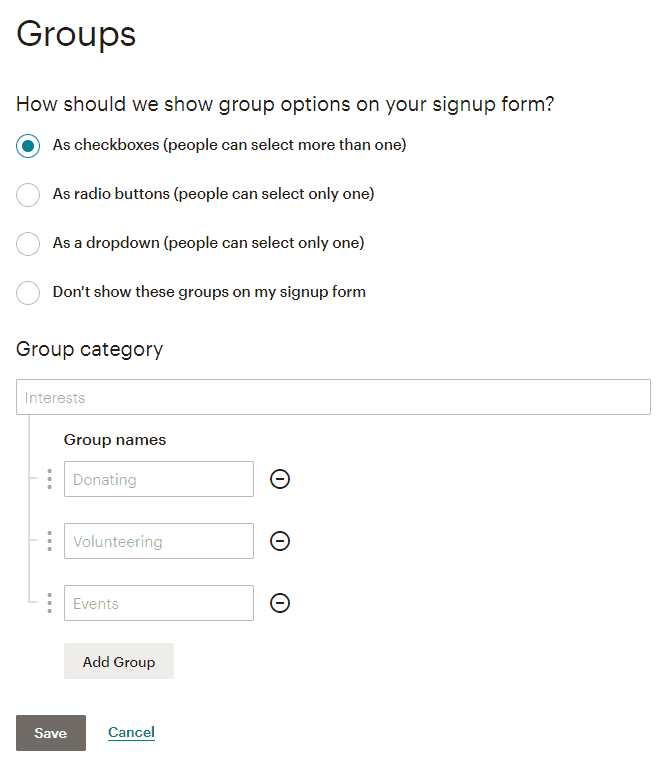
First, enter a name for the group category.
Under the category, enter at least one group name. Three come up by default, but you can add or remove them.
Hit the save button.
Step 3
Before we jump into Bloom, we need to double-check on something to verify the fields are showing correctly and to help you understand what’s going on here.
Once again in the audience menu, click on “Signup Forms.” Select the first one called “Form Builder.” Here you will see your form with the fields you chose in step 2 and the groups from step 3.
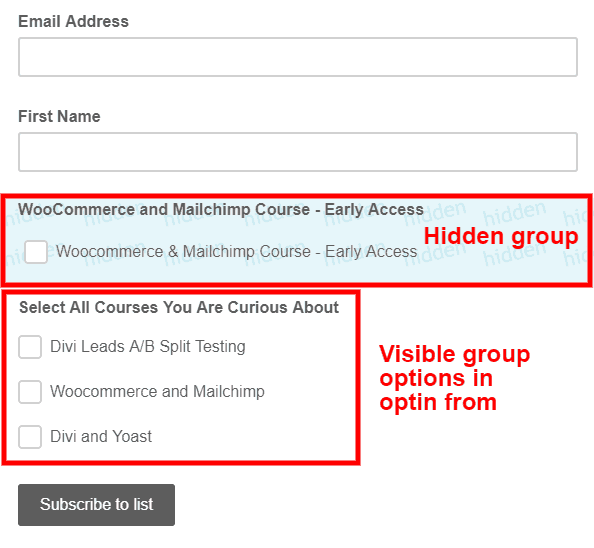
You will notice the group fields are visible by default. That is very important, and the MUST BE VISIBLE here in Mailchimp (we will hide this later with CSS on your website).
Step 4
Go to your website and go to Bloom>Email Accounts. The reason you are going here first is so that you can refresh your connection between Mailchimp and your website since you have added the group in Mailchimp.

Step 5
If you haven’t already, create a new popup style option in Bloom. The most important part here is adding the custom fields. So first of all, go into the optin design settings and toggle on the button to enable “Custom Fields.”
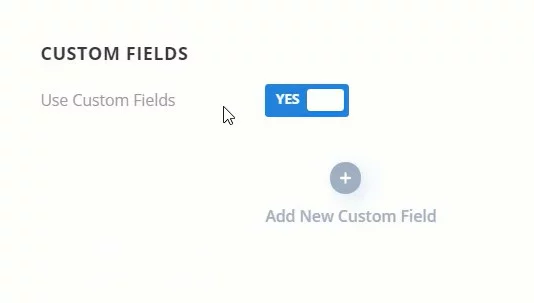
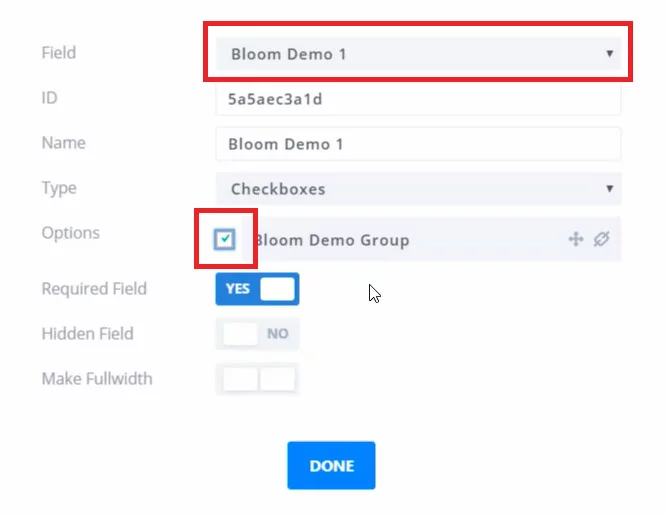
Create a new custom field. In the “Field” dropdown, choose the group category that we set up in step 2.
Also be sure to select and check the box beside the “Options,” since this is the actual Mailchimp group and it needs to be selected so that subscribers are automatically added to the group.
Step 6
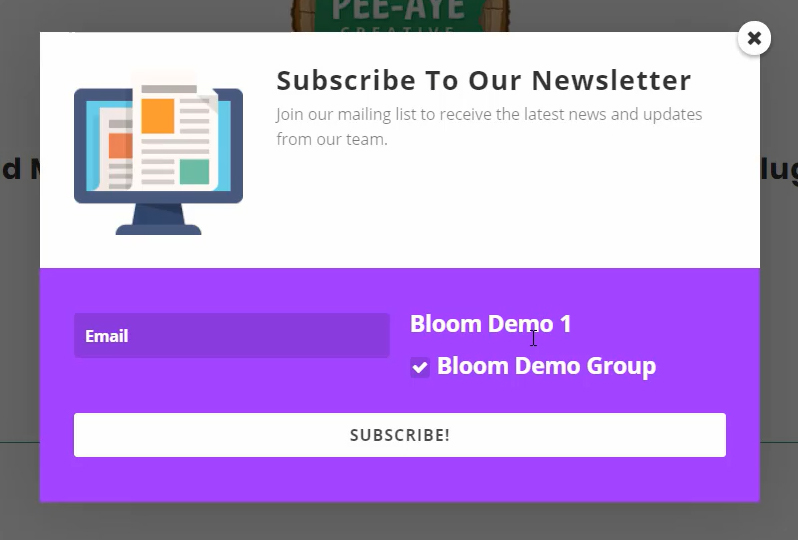
Now once you finish up the other design settings for your Bloom opt-in, we are ready to go! Let’s go take a look and see if the custom field shows up.
Step 7
Now let’s hide the custom field, since it is not necessary for the user to see that and could lead to confusion. We don’t want them unchecking the box, and we don’t really need them to know what group they are in. It also looks bad. So let’s get rid of it with some CSS. Copy and paste the following snippet into your Divi>Theme Options>Custom CSS Box.
.et_bloom_form_container .et_bloom_form_content .et_bloom_custom_field_options_wrapper {
display: none!important;
}
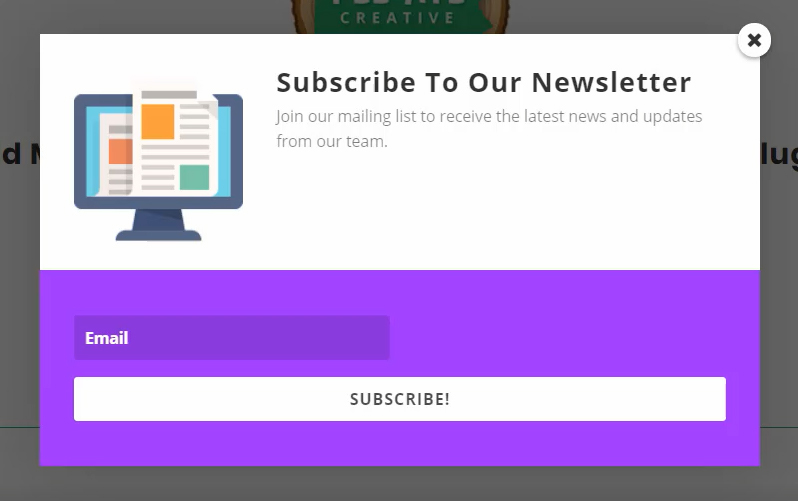
So then here you can see the CSS removed the custom field Mailchimp group.
Step 8
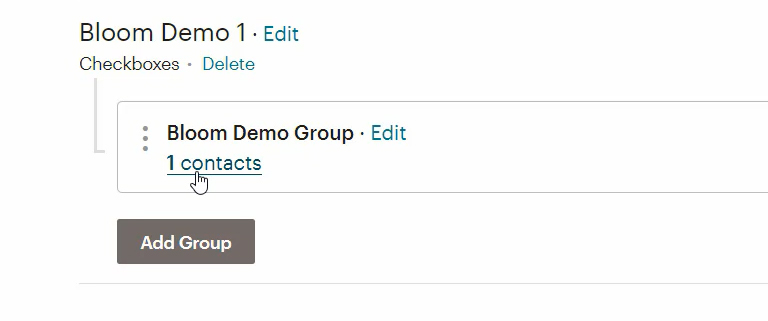
As a final step, go back to Mailchimp and confirm everything is working. Submit a test subscriber with the Bloom popup form, and then after a minute or two it will show up perfectly in your Mailchimp audience. To double check the group feature is working (which is the point of this tutorial), go to “Groups” and you will see the test email address. That’s it, you’re all set!




Hi Nelson, great tutorial!
One quick question – as this works perfectly is there a way to not disturb how to form look in mobile view as the Custom Hidden form takes a half of the pop up screen.
So it looks really not professional.
Hi Pawel, thanks so much! Sounds like you missed adding the CSS snippet to hide that custom field. Try that and you should be good 🙂
Hi Nelson, i didn’t unfortunately.
I will try to replicate the situation an show it to you.
But long story short, while the block is display:none – the email address field is shortened like on your screen https://292293-918754-raikfcquaxqncofqfm.stackpathdns.com/wp-content/uploads/2019/11/hide-the-mailchimp-group-custom-field-in-Bloom.jpg
Desktop view could be OK with that, but when you display it on mobile – it is a disaster.
So is there a way to have the fields hidden and the correct layout – pre-fielding ? 🙂
I’d assume you found a solution by now, but in case anyone else is wondering, also adding this CSS worked for me:
.et_bloom_form_bottom .et_bloom_with_custom_fields .et_bloom_fields p {
flex-basis: 100%;
}
The code worked for me too — very helpful! But I had to add “!important” after “flex-basis: 100%” to get the code to work.
So, does this put this information next to the person’s name under the Tag column? That’s what I’m confused about. If “Tag” is available under a column, why use Groups? And what if you just want the subscriber to come in with a particular “Tag” assigned to them?
Hi Tracy,
Historically, their was no support for Tags, and groups are the only method of any segmentation. However, if you have found some way to use Tags, please share 🙂
Interesting. So it’s not in Divi, but when I’ve used the Mailchimp for WordPress Plugin (MC4WP) on other sites, it is hard-coded into the setup that you can assign a tag. I wish I could figure out how to do it with Divi!
I wish too, but don’t waste your time trying – the reason I made this tutorial was because it’s the only solution know to mankind to get any sort of segmentation. 🙂
Thank you for this tutorial.
1. Everything worked up until actually being added to my mailchimp group or audience. When I tried the optin with a less-used email address of mine, it responded that an error occured with both attempts. Then I tried with my main email address which was accepted as subscribed. However, it is not on my Mailchimp list.
2. These is a bit of CSS code in the Theme Option area that solved a problem from years ago. I don’t actually know if I still need it, but nervous to delete it. Can I simply add the new CSS code after the code already in there? If so, is there a limit to how many I add?
3. Will this CSS code be used universally with all Bloom optins I create anywhere on my website? I have several different categories for optins.
Hi Claudio,
Just an FYI, you can test signups by putting +1 and +2 and +3 etc after your name in your email. Unlimited fun! So just use [email protected] etc. Anyhow, I’m not really sure, this tutorial is more for the Divi/Bloom connection rather than troubleshooting Mailchimp. Often it takes a few minutes for it to sync. Now sure if you have any luck now or not.
As for the CSS, my snippet will remove the custom fields, so if your other forms have those custom fields like in this tutorial then yes, it will hide them everywhere. As for CSS, you can add as much CSS as you want there in Theme Options. Most likely it is not the same code.
Hola Nelson, que tal? espero me puedas ayudar. Seguí tus pasos al pie de la letra y funcionó perfecto. Ahora bien, yo solía agregar un campo para que los suscriptores aceptaran las políticas de privacidad y también queda oculto con ese código… Como podría ajustar el código para que no me ocultara ese campo?
Hi Melanie,
I would have to see your site to inspect the code, without the snippet added. You can share that if you still need help with this!
Does this update a excising subscriber on mailchimp or does it “only” add new ones?
If he subscriber are on other groups in the same mailchimp list but not on this specific group for this pop up
Hi Rebecca, that type of thing is set in Mailchimp. You can set your groups to update previous subscribers.
Nice post Nelson. I’ve done this successfully, however, it appears that it only add’s new subscribers. If I have a test subscriber that is in another group, it doesn’t seem to update that subscriber. Am I missing something here? Would appreciate your thoughts on this.
Hi Tom, I just tested it on my site and it auto updates. I don’t remember if there is a Mailchimp setting or not, but it works for me!
Hi Tom. For the next person who comes across this. It does require a code change otherwise Bloom will not update Mailchimp correctly when an “existing subscriber” submits another opt-in form.
So if you use the workaround for mailchimp groups described in this post, it only works the first time the subscriber opts in.
This is not what you want.
You want the groups the be updated each time.
The files you need to change are
In my tests, only the MailChimp.php file in the Divi theme folder itself was used, but I’m listing both here for completeness.
The code you need to change is around line 323 and looks like this:
if ( false !== stripos( $result, 'already a list member' ) ) { $result = $err; if ( $user = $this->get_subscriber( $list_id, $email ) ) { if ( 'subscribed' === $user['status'] ) { $result = 'success'; } else { $this->prepare_request( implode( '/', array( $url, $user['id'] ) ), 'PUT', false, $args, true ); $result = parent::subscribe( $args, $url ); } } }This code checks if the user is already a list member and then ONLY sends an update request to mailchimp if the user is NOT subscribed at all. So group additions are not sent.
Change it
if ( false !== stripos( $result, 'already a list member' ) ) { $result = $err; if ( $user = $this->get_subscriber( $list_id, $email ) ) { // old code doesn't send the PUT request to mailchimp when custom fields are changed // we need to do this in order to use the mailchimp groups workaround: https://www.peeayecreative.com/how-to-add-mailchimp-groups-to-the-bloom-email-opt-in-plugin/ // if ( 'subscribed' === $user['status'] ) { // $result = 'success'; // } else { // $this->prepare_request( implode( '/', array( $url, $user['id'] ) ), 'PUT', false, $args, true ); // // $result = parent::subscribe( $args, $url ); // } $this->prepare_request( implode( '/', array( $url, $user['id'] ) ), 'PUT', false, $args, true ); $result = parent::subscribe( $args, $url ); } }Thanks so much for sharing this Greg!
My guess is if it worked for you without this change Tom, you were using an old version of the plugin before they implemented this check.
Hi Greg – I tried to use your code update and I got this from WordPress:
Error message: syntax error, unexpected end of file, expecting function (T_FUNCTION) or const (T_CONST)
Not sure what went wrong? Any advice? Not a developer! 😉
Hi Greg !
Thanks a lot for your article ! I used you code and instead of updating the contact, it makes the contact completly disapear in Mailchimp.They’re not even in the Archive anymore ! Any idea what I could do ?
Thanks for this Greg. This worked perfectly. A quick question that maybe you can provide some insight on. Would you update this file each time you update the Divi theme?
THANK YOU GREG! THIS WORKED PERFECTLY, YOU’RE THE MAN!
genius.
is it possible to change this in the child theme, so it is always updated?
thanks for taking the time to do this. Made it much easier!
That’s great, Joni! You are welcome and I’m happy to hear it was helpful!
Thanks for this post!! Your solution works perfectly! 😀
Hi Mike, I’m so glad you found this solution!
Hello,
I recently used your code to help mask the groups on one opt in form on my Divi site but when I’ve created a second group I cannot get the code to mask the group name(s) on the opt in form.
I have tried pasting the code in again on the Custom CSS box in Theme Options – but no success.
Can you please help as it is now driving me crazy!
Thank you!
Rana
Hi Rana,
I’d have to see the actual popup and inspect it and know which form fields to remove.
The popup is on the site now (you should have the URL) – Home Page and About – Do let me know if you find anything. And thank you.
Even though I have checked the box next to the email group in the custom field, it isn’t checking the box on the popup for that group. The groups are showing on the popup in the preview but it isn’t checking the group box that I need. Any ideas? I was able to hide the boxes with the code, just not check the group box. Thanks!
It’s very behavior as we are not able to replicate this on our end. Please provide the URL where you have placed the form so that we can check if it is working or not.
Great one! I
have a quick question.
I am using Bloom to create popup opt-in and once they subscribe, I would like to send automatic pdf download to them. I am connecting bloom with my mailchimp, how can I achieve this?
I see either show success message or redirect to new link but the problem with redirect new link is that it opens on same window.
Thanks
This is fantastic, thanks so much for the post!
Is there is a way to get Bloom to list the Mailchimp group checkboxes in a horizontal row, as by default it lists them in a vertical list, which takes up a helluva load of page space as I have six groups. Any ideas appreciated!
Thanks!
Hey Gavin,
I guess the issue is already solved. Please let us know if you know any further assistance. 🙂
One additional comment in regard to Greg Freeman’s post with modifications to the mailchimp.php file. I am not a programmer but I think I know what the issue is. Original code I believe checked to see if you were a subscriber. If so it did nothing. No updates sent to mailchimp. So if you add an “existing subscriber” to your list to a group or new group it would do nothing. The fix proposed sends an “update” to mailchimp to add the group check marked to the existing subscriber. The issue here is if you are using double Opt-in then it sets the subscriber status to “pending”. This results in a new email is sent out asking the subscriber to Opt-In. This will happen if that user is already subscribed to the existing group or is a new group based on what I can derive from the fix and what happens when testing. If the user opt-in via the email then the new group is added to the subscriber or any changes made to any other fields are also updated.
However, this is an issue. With a mailchimp status of “pending” this effectively removes the subscriber from the list altogether… unless they opt-in again via email.
So.. how then to handle those that are totally “New” subscribers to a list (never been in the list before or have unsubscribed in past with that email) vs. those that have subscribed and are already in the list (double opted-in already) but are now adding another “group”. To me it should be the following in the code.
1) Check to see if the user has there status of “subscribed”
2) IF “NO” then ADD that user and set status to “Pending”, which will cause the double opt-in email to be sent.
3) IF “YES” then UPDATE the existing user and set status to “Subscribed”, which will just add the new group to an already “subscribed” user and NO email or double opt-in is to be sent.
Other option for #3 is to set double_optin parameter to “False” when submitting updates for current subscribers, That would do the same thing, if I only knew how to do it 🙂
Ok so I played around with the mailchimp.php file. After adding in Greg’s changes, I can resolve #3 by adding the following:
$args[‘status’] = ‘subscribed’;
directly above the line:
$this->prepare_request( implode( ‘/’, array( $url, $user[‘id’] ) ), ‘PUT’, false, $args, true );
This forces the status to ‘subscribed’ for those that are already existing in the list and any double-opt in settings are bypassed. The Mailchimp record updates and no email is sent to subscriber to confirm.
I tested this out for both new and existing subscribers.
Thanks to others who posted in here. I was unable to get the code examples working the way I wanted so I modified it some more. I wanted it to create an opt-in form using the Bloom plugin (or Divi theme) and have it update a Group field in Mailchimp to trigger an automation but I didn’t want it to overwrite the first or last name fields in Mailchimp if the person already existed in my list. I updated the two files below although I think the Divi/core file is the one used for some reason.
wp-content/themes/Divi/core/components/api/email/MailChimp.php
wp-content/plugins/bloom/core/components/api/email/MailChimp.php
//REPLACE THE EXISTING WITH THIS CODE STARTING AROUND LINE 320
//MANY COMMENTS ARE INCLUDED TO EXPLAIN
if ( false !== stripos( $result, ‘already a list member’ ) ) {
$result = $err;
//The email address is already in the list
if ( $user = $this->get_subscriber( $list_id, $email ) ) { //Get the mailchimp users info
if ( ‘subscribed’ === $user[‘status’] ) {
//If the person is already subscribed then use their already exsting
//mailchimp name and ignore what was entered in the opt-in form so it
//does not overwrite but instead only updated other arguments like custom groups
$name = $user[‘name’]; //returns the mailchimp subs first name
$last_name = $user[‘last_name’]; //returns the mailchimp subs last name
self::$_->array_set( $args, ‘merge_fields.FNAME’, $name ); //sets the first name in the arguments sent to the api
self::$_->array_set( $args, ‘merge_fields.LNAME’, $last_name ); //sets the last name in the arguments sent to the api
$this->prepare_request( implode( ‘/’, array( $url, $user[‘id’] ) ), ‘PUT’, false, $args, true );
$result = parent::subscribe( $args, $url );
//$result = ‘success’;
} else {
$this->prepare_request( implode( ‘/’, array( $url, $user[‘id’] ) ), ‘PUT’, false, $args, true );
$result = parent::subscribe( $args, $url );
}
}
}
HOPE THIS HELPS OTHERS!
Curious auto why you wouldn’t want to update the first and last name? Is this cause your opt-in form does not ask for that info?
Nota programmer and was able to figure out how to make a minor change to help resolve the double opt-in issue. However, I am wondering if you know a way to use TAGS vs Groups in the coding. Tags are the preferred method these days over groups. Ideally Bloom should allow the ability to set tags, since they are unlimited. Without having a field in Bloom to set them I imagine this could be impossible but maybe there is a way to “fake it” by using the groups field in Bloom and redirecting that to a Tag in the coding instead. Otherwise have to use some 3rd party automation like Zapier etc to set tags based on groups. But again not ideal since you are limited to the number of allowed groups in Mailchimp.
Not a programmer and was able to figure out how to make a minor change to help resolve the double opt-in issue. However, I am wondering if you know a way to use TAGS vs Groups in the coding. Tags are the preferred method these days over groups. Ideally Bloom should allow the ability to set tags, since they are unlimited. Without having a field in Bloom to set them I imagine this could be impossible but maybe there is a way to “fake it” by using the groups field in Bloom and redirecting that to a Tag in the coding instead. Otherwise have to use some 3rd party automation like Zapier etc to set tags based on groups. But again not ideal since you are limited to the number of allowed groups in Mailchimp.
It’s frustrating that the Bloom plugin doesn’t allow you to add Tags to Mailchimp. Huge limitation. Adding to a group is the next best thing but Keep in mind that when you copy/paste the code above it will likely change all the commas ‘ to a different character which will not work. Best to find/replace these first in a simple text editor to single ‘ so that it’s in php style and runs the first try.
Hi there. Is there a way to only mask one custom field? I have two types of groups – one that needs to be hidden and one where the user must click the form off by themselves. However, when using the code it hides both of them.
There is always a way with CSS. Whether from the exact selector or from using nth-child(2) etc.
Hi Nelson! Great tutorial/blog… exactly what I was looking for.
You think you could elaborate on your reply? I have the same problem. I want a GDPR checkbox to appear, but the group checkboxes hidden. How can I fix this? Many thx in advance!
As Miriam stated, great tutorial; however, I need to show another custom field. Like the majority of people who view these tutorials, I’m no developer, so any help with the CSS code would be much appreciated.
Hi,
I am able to get subscribers into MailChimp with “Subscribed via Bloom.”
But the contacts are not added to the group, eventough I have “Selected” the group in Custom Fields in Bloom Design?
I used to use a plugin called Chimpy to add interest groups from Mailchimp in the signup form, but it was discontinued some years ago. Happy to have found your solution, especially as it is aimed at Divi builders like myself. I actually want my visitors to choose between the interest groups, so I leave them visible.
Very good!
I have discovered another modification that can be made to mailchimp.php to give you the ability to use groups designated as “Hidden”.
Thus in the original instructions for Step 2 all the way at top of this page, to use Mailchimp groups” in Bloom you can select the last option “Don’t show these groups on my signup form”
In addition, the “Hidden Field” toggle in Bloom itself is toggled on for this custom field so no CSS is needed to hide this field (Per Step 7 above).
So why would you want to do this? The main reason is a hidden group ands options selected will NOT show up on the subscribers preferences. On every mail chip email that is sent, the user has the ability to click the preferences link and would see ALL un-hidden groups and can then make changes to those options.
Before I indicate what modifications I made to mailchimp.php I want to make clear that anytime Divi gets updated it will most likely overwrite this file. So make sure you put a backup of this file somewhere like in your child theme folder and you should always test any new updates or changes to Divi or Bloom in a test environment to ensure your modifications did not get wiped out with the update.
While there are two mailchimp.php files (One found in Bloom Plugin Folder and the other in the Themes/Divi, the only one used is in Divi. This one to modify is:
wp-content/themes/Divi/core/components/api/email/MailChimp.php
Starting on line 130 in mailchimp.php you will find the following noted below:
if ( ‘hidden’ === $type ) {
// MailChimp only allows groups of type: ‘checkbox’ to be hidden.
$group[‘type’] = ‘checkbox’;
$group[‘hidden’] = true;
}
You then would modify to the following:
if ( ‘hidden’ === $type ) {
// MailChimp only allows groups of type: ‘checkbox’ to be hidden.
$group[‘type’] = ‘checkboxes’; //**NEED TO CHANGE FROM CHECKBOX TO CHECKBOXES***
$type = $group[‘type’]; //**NEED TO ADD THIS LINE HERE SO THAT THE CHECKBOXES WHEN SELECTING THE HIDDEN GROUP
$group[‘hidden’] = true;
NOTE: The last line in the above code did not change. However, I just wanted to point out that when testing that this line is what gives you access to the “Hidden Field” toggle in the ON setting. Thus, this eliminates the need to use CSS to hide the group fields. If this line is commented out or removed, then the “Hidden Field” toggle would be greyed out and the fields would be visible on the form like they are normally as per the original instructions in this blog post above.
Hi, this was a very helpful article but I can’t get it to work with the above additional code provided by others when there’s an existing subscriber that uses the form to add them to the group to trigger an automation. Anyone have any ideas as to revisions of the above code to assist with this?
Thanks for sharing!
How may I create an hidden signup form location section on Bloom email opt-in?
Thanks
Hi Aki!
You need to contact the Elegant themes support for the feature request.
Thank you so much for this. You have saved my laptops life as it was on the verge of being launched out the window 🙂
One question if I may. I have set this up for two forms. It works perfectly on the opt in in bloom – inline and sends it to the right place in mailchimp, but on the optin in bloom – pop up it’s not sending to the different group. I’ve followed the instructions exactly the same. Is it not possible to have it for more than one group?
Thank you so much again.
Hi Debbie!
Can you share the URL of the page to check further?