Fixed, Transparent, And Changing Divi Header
Combining All The Header Tutorials Together
As we go through our Divi header series, you probably notice a few of our tutorials overlap a little. This one works perfectly with two of our other tutorials. Our last one showed us how to create a fixed header in the Divi Theme Builder, and the one before that showed how to have a transparent header with the Divi Theme Builder. This tutorial combines the fixed and transparent tricks and adds on a new one. This Divi tutorial will show you how to change the Divi header when scrolling!
▶️ Please watch the video above to get all the exciting details! 👆
1. Create Your Fixed Divi Theme Builder Header Menu
From your WordPress Dashboard, go to Divi>Theme Builder. Create a new template, and assign where needed. In our example, we chose to assign the menu to a specific page.
Click on “Add Custom Header” and in the popup choose “Build Custom Header.”
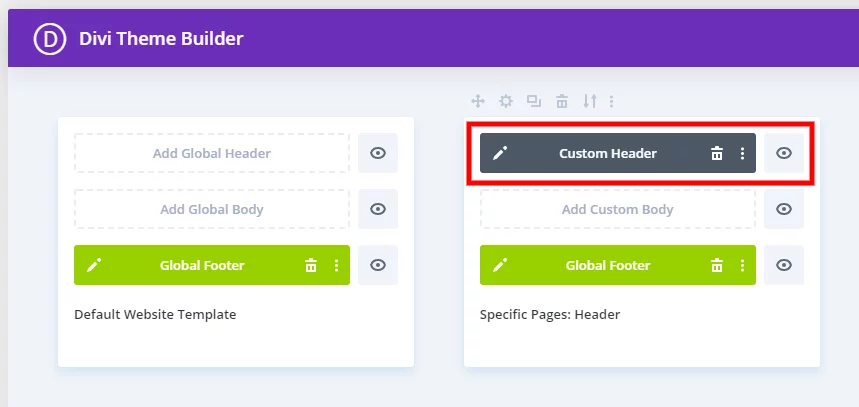
In the Divi Theme Builder template, create a section and add a row with any layout you want. In our example, we used a logo, menu, and button.
NOTE: If you want the header to have a background color by default before it scrolls, then set that in the section. If you want to have a transparent header before it scrolls, then let the background as is by default.
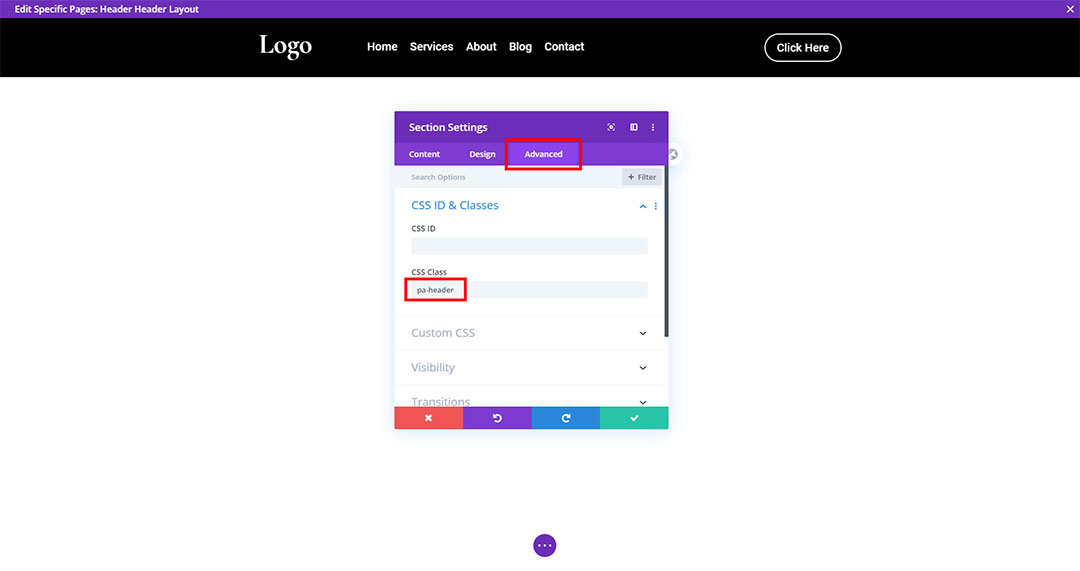
The other important part here is adding the CSS class to the section. Go to the section settings to the Advanced tab and add the class “pa-header” as shown in the image below.
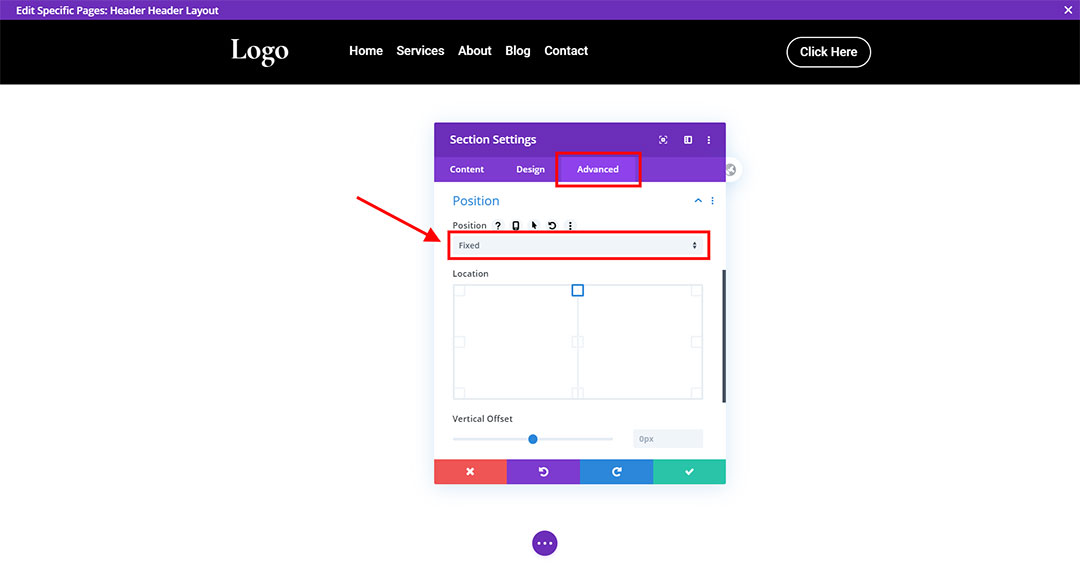
Be sure to set the header section position!
Go to the section settings to the Advanced tab and go down to the Position toggle. Set the position to Fixed.
2. Add Some Custom jQuery Code
This Code Will Add A New CSS Class On Scroll
Now for the fun part! Don’t worry about adding code, I’ll show you exactly where to add this and you will do great!
Where To Paste The jQuery Code
1. Divi Assistant
If you are using our Divi Assistant plugin, simply paste the code in the jQuery tab in the custom code window in the Divi Visual Builder.
2. Child Theme
If you are using a child theme, paste this code into the scripts.js file (don't forget to remove the <script> tags at the beginning and end). If you don't have a child theme, you can generate a child theme directly on your site or download our free child theme.
3. Divi Theme Options Integration
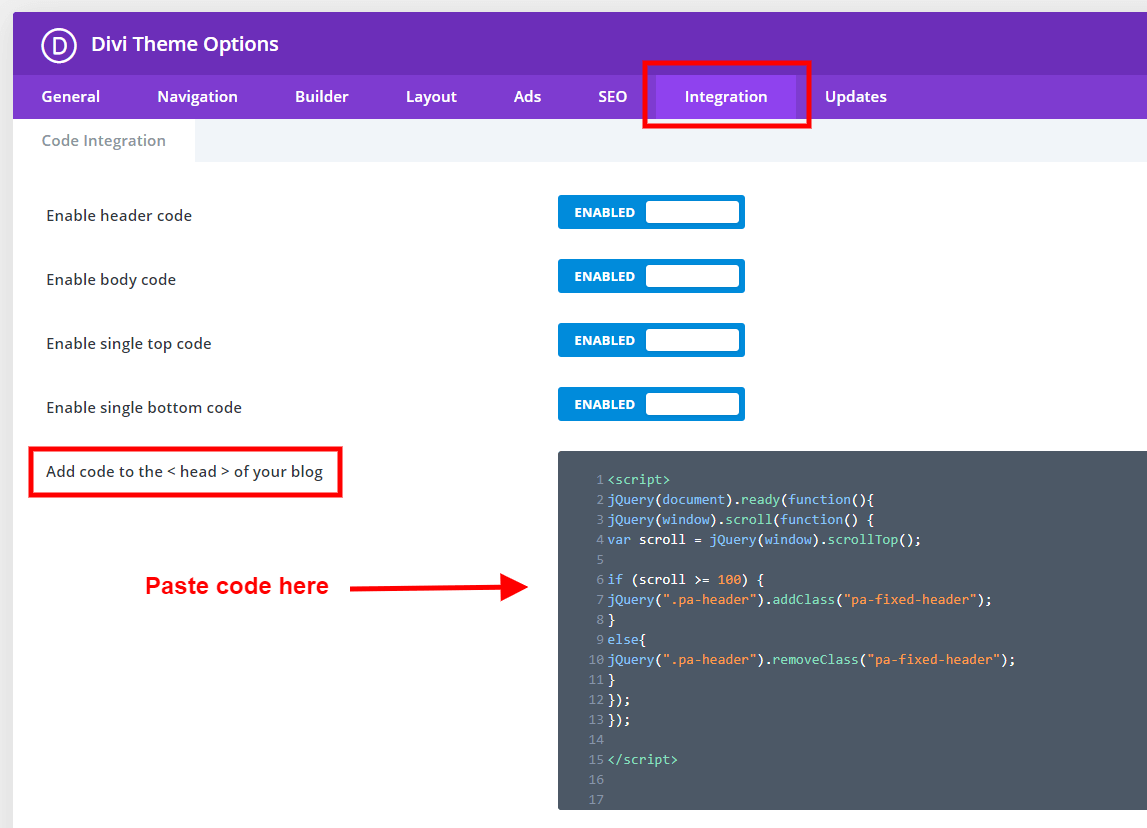
Otherwise, paste this code in your Divi>Theme Options>Integrations tab in the "Add code to the < head > of your blog" code area.
If you need help understanding where to paste the code, please check out our complete guide about where to add custom code In Divi.
<script>
jQuery(document).ready(function(){
jQuery(window).scroll(function() {
var scroll = jQuery(window).scrollTop();

if (scroll >= 100) {
jQuery(".pa-header").addClass("pa-fixed-header");
}
else{
jQuery(".pa-header").removeClass("pa-fixed-header");
}
});
});

</script>
Here’s how that will look!
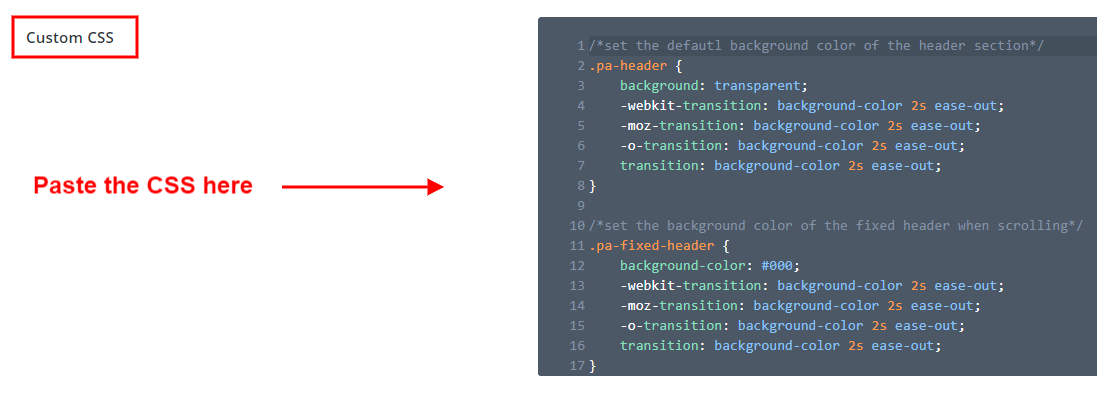
3. Add Some Custom CSS Code
This Code Will Change the Divi Menu Background Color On Scroll
In step #2, we add jQuery code that activates a new class in the header section when the page scrolls. Now, we need to tell that class to change the background color whenever it is activated.
Where To Paste The CSS Code
1. Divi Assistant
If you are using our Divi Assistant plugin, simply paste the code in the CSS tab in the custom code window in the Divi Visual Builder.
2. Child Theme
If you are using a child theme, paste this code into the style.css file. If you don't have a child theme, you can generate a child theme directly on your site or download our free child theme.
3. Divi Theme Options Integration
Otherwise, paste this code in your Divi>Theme Options>Custom CSS code box.
If you need help understanding where to paste the code, please check out our complete guide about where to add custom code In Divi.
/*set the defautl background color of the header section*/
.pa-header {
	background: transparent;
	-webkit-transition: background-color 2s ease-out;
	-moz-transition: background-color 2s ease-out;
	-o-transition: background-color 2s ease-out;
	transition: background-color 2s ease-out;
}


/*set the background color of the fixed header when scrolling*/
.pa-fixed-header {
	background-color: #000000!important;
	-webkit-transition: background-color 2s ease-out;
	-moz-transition: background-color 2s ease-out;
	-o-transition: background-color 2s ease-out;
	transition: background-color 2s ease-out;
}
Here’s how that will look!






Thank you. This is what I’ve been looking for for a website I’m working on right now.
That’s great, Jacob! I’m glad this was timely!
Brilliant adding another class on scroll!
It’s like changing the background color of a standard Divi header with header#main-header and .et-fixed-header
Thanks Nelson!
Yes, exactly Senan! Thanks! You can do a lot with that class too, not just background color. I’ll update the article with some new ideas as well.
Hi, I would love to see, what more can you change. I’ve tried to play a bit but without success.
Thank you for this tutorial. Very useful indeed.
I have one question, I see that you always include the code snippets in the Divi theme options. Can I do the same but instead on the theme include in a code module inside a section? And the CSS can be included in the section or row?
One good tutorial you could create would be where to include the code or jquery snippets (divi options, code module, or in the advance tab in some specific modules like the header module or blurb module) and when (what’s the differences and cases where we should use one or the other. I’m guessing that including this on theme options will include for the whole website, but I might want to use this on the homepage and not on the products page? makes sense? I hope it does…
Thanks again
Cheers
Hi Luís,
I’m so glad you are finding our tutorials helpful! Thanks for asking, and that’s a great suggestion for a tutorial. There are six places you could put code, but I would not recommend using the code module. It’s best to put it in your child theme, but I usually say “Theme Options” because I know I have beginners who don’t have child themes and that’s fine. So the best place I recommend is the Theme Options. Even if you were wanting the code to affect a certain page, it’s still best. I will definitely work on a tutorial like that!
Hi again 🙂
I’m playing with your code and it works perfectly. Thank you!
But, instead of background color, I wanted to include a gradient instead.
What happens is, when I scroll down, the smooth effect of 2s doesn’t work.
Any idea how I can fix that?
Many thanks
CSS code:
/*set the background color of the fixed header when scrolling*/
.pa-fixed-header {
background: rgb(2,103,173);
background: linear-gradient(180deg, rgba(2,103,173,1) 0%, rgba(22,155,214,1) 100%);
-webkit-transition: background-color 2s ease-out;
-moz-transition: background-color 2s ease-out;
-o-transition: background-color 2s ease-out;
transition: background-color 2s ease-out;
}
As I want to do the same (gradient background… Have you solved this issue? What adjustments did you make to the css?
Thank you so much it’s awesome !
But i’m facing an issue on safari browser, The second menu background is only half of the size it should be… Do you have a solution ?
Hi Chris,
I don’t have any ideas, I don’t have access to Safari and I wouldn’t want to if I did. They are so far behind web standards, and there are so many issues with it that I would recommend against using it. I heard they may actually switch to Chromium, like Edge did, and that would be awesome.
Thanks for your answer, but unfortunately it doesn’t work on ipad or iphone so i’m confused about it 🙁
Sure, but that would not be relevant to our tutorial though. We are simply adding a CSS class with jquery, then adding CSS and we even have all the browser prefixes included. So it’s either an Apple thing like I suspect, or a Divi thing.
You are right, it,s safari…
well… Solved : The problem was between my laptop and my chair lol
It work super! Just one quest, how can I change the text colour + logo + Instagram icon when fixed?
Hi Laura,
You can use what I have already in the tutorial as a system, and change out the parts of the CSS that target a certain thing.
For the menu items use this: .et_pb_menu__menu>nav>ul>li>a
For the Instagram icon use this: .et_pb_social_media_follow li a.icon:before
To change the logo is harder, I have a separate tutorial coming for that.
I’m trying to achieve this too – with text color – but not sure how to follow the above advice(?)
Hi Alex, to change text color in a Text module you will need to target the module text with CSS like .pa-fixed-header .et_pb_text p {color: yourcolor;}
What about the dropdown menu? I got this to work but I want the dropdown menu items to also have a white (or any color) bg on scroll, right now, the main nav changes color on scroll but the dropdowns are clear.
Hi Lisa,
You can set the background color of the dropdown in the Menu module. By default it is transparent now (not sure why).
Hi Nelson,
This is amazing. Great post.
I have two things I’d like to add that I did for my site and I think will help people out there too (and please add them to the post if you want to).
The first question is how can we add a background to the dropdown menu when the background of the menu component is set to the “default” or “transparent” like in the post. Seems that the background field in the menu component affects both the background of the menu elements and the dropdown menu.
I’ve fixed this by setting the background of my menu component to my color of choice (black in my case), then in the Advanced tab > Custom CSS paste this in the Main Element:
This will allow you to have the menu elements (or hamburger) on transparent color but keep the dropdown background to whichever color you set.
The second thing I’ve done is that I wanted my transparency to change depending on how much I had scrolled down, not on a timer. So I changed my jQuery to this:
<script>
jQuery(document).ready(function(){
jQuery(window).scroll(function() {
	var scroll = jQuery(window).scrollTop();
	if (scroll >= 100) {
		jQuery(".pa-header").addClass("pa-fixed-header");
	}else{
		jQuery(".pa-header").removeClass("pa-fixed-header");
	}

	jQuery(".header-overlay").css("background-color", function() {
		var elementHeight = jQuery(window).height();
		var opacity = 1 - ((elementHeight - scroll) / elementHeight);
		return "rgba(0,0,0," + opacity + ")";
	});
});
});


</script>
Now I use pa-header for mobile as I think it looks better on a timer with a portrait long look, but I use header-overlay for desktop that looks much smoother when scrolling down.
All these examples are for black background but you can change the color in the jQuery script to whatever you want.
Happy editing!
Thanks for sharing Rob,
I’ll certainly leave your comment here for others to see if they want the same thing as you described!
Hi Nelson 🙂
Thanks a lot for this video! Works perfectly!!!
I have an other question, how can I make this menu responsive for phone and tablet?
Thanks for all your tutorials.
Fanny
Hi Fanny,
It is responsive by default. Is there something in particular you need help with?
I had the same issue. I agree your steps appear to be responsive by default, but on my site the background colour doesn’t change on scroll for tablet or phone. Very puzzling.
Hey Em,
Could you please share the URL of the website for me to investigate it further?
HI,
Thanks a lot for all your job to helps us.
It works super ! Just one question, how can I change the text color of all the items at the same time when hover on them as this site :
https://www.brassart.fr/
And this is the link of my site :
http://byauctavia.com/ensmiv2/
Thanks a lot
Thanks Dikra, you are welcome! I enjoy helping! 🙂
I looked at both links and either you figured it out already or I am missing something. Can you let me know?
Hello thanks for your return
yes I figured it all is ok now
Would you be so kind to share this? I have the same, but not figured it out yet…
Hello! Thanks for the tutorial! There is a small issue which is that if user refreshes the page or if you start mid-page (with an anchor link for example), the header will be transparent wich will not look good because of all the page elements behind. As soon as user scrolls more than 100px, the pa-fixed-header styling kicks in. Is there a solution for this?
Hi Ricardo,
I’m a little confused. You are saying if a user lands on an anchor link halfway down the page, the menu is transparent?
Hello ! It’s the case for me. If I refresh the page too.
Hi, and thanks for this tutorial.
I have a problem because I can’t get to change the color in the section, but if I add the class to the inside row, then it works.
You know why it can happen?
Hi Juan,
That sounds odd, could you do it like the tutorial then share the link so I can see the code?
Of course:
<script>
jQuery(document).ready(function(){
jQuery(window).scroll(function() {
var scroll = jQuery(window).scrollTop();
if (scroll >= 100) {
jQuery(“.pa-header”).addClass(“pa-fixed-header”);
}
else{
jQuery(“.pa-header”).removeClass(“pa-fixed-header”);
}
});
});
</script>
/*set the defautl background color of the header section*/
.pa-header {
-webkit-transition: background-color 2s ease-out;
-moz-transition: background-color 2s ease-out;
-o-transition: background-color 2s ease-out;
transition: background-color 2s ease-out;
}
/*set the background color of the fixed header when scrolling*/
.pa-fixed-header {
background: #000;
-webkit-transition: background-color 2s ease-out;
-moz-transition: background-color 2s ease-out;
-o-transition: background-color 2s ease-out;
transition: background-color 2s ease-out;
}
When I do the scroll with the inspector opened, it get the new .pa-fixed-header class, but nothing else happens.
Hi Juan,
It looks like you probably need to add !important to the background, so “background: #000!important;”
Hi Nelson,
I’ve tryied adding !important in the CSS without results, so I added the class .scrolled to the section and I managed it by jQuery.
I don’t know if is the best solution, but is the only method that has worked for me.
<script>
jQuery(document).ready(function($) {
$(window).scroll(function() {
if ($(document).scrollTop() > 100) {
$(“.scrolled”).attr(“style”, “background-color: rgba(21, 26, 36, 0.9)!important”);
$(“.scrolled”).prop(“style”, “background-color: rgba(21, 26, 36, 0.9)!important”);
} else {
$(“.scrolled”).css(“background-color”, “rgba(0, 0, 0, 0)”);
}
});
});
</script>
I’ll keep visiting your blog because it’s really interesting.
Thank you very much!
That sounds good, Juan! I say whatever works is good 🙂
Hello, It can be done with generatepress + divi builder and I have not generated the same result
What should I do if I previously set a navigation? This may not be showing up for me because of that? For the time being I have removed all code and items from theme builder. Thanks
Hi Amber,
I’m not quite sure what you are asking. Can you clarify for me?
Before I tried this I had already set the navigation options in the theme options area. I chose fixed nav and in the theme customizer made the background clear. Should I set this all back to default and try your solutions. Having previously selected these settings conflicted big time.
Hello,
Thanks for the great tutorial. I would like to change the color of the menu (text) when I scroll. I tried to follow your instructions in the comments, but without success.
Can you enlighten me?
Thank you very much for your help.
Hi Valentin,
I’ll try again. You would add .pa-fixed-header .et_pb_menu__menu>nav>ul>li>a { color: #12346!important; } to your CSS. So when the header is fixed, the links turn the color you specificy.
Ok it works now… Thank you very much 🙂
Hi,
I have an other question : how to change the color of the burger menu on mobile ?
Thank you !
Hi Nelson,
Thanks for this great tutorial. Just what I needed.
Weird thing happened though, I had it working beautifully and then did some more tasks, came back and it was no longer working.
Would you be able to have a quick look and see?
http://ourmb.wyfoldcreative.com/what-is-the-microbiome
Many thanks,
Ollie
Hi Ollie,
It looks like it is working! Let me know in more detail what isn’t working.
Hi,
Just expanding on my first comment, it looks to me like the jquery is not loading:-
DevTools failed to load SourceMap: Could not load content for http://ourmb.wyfoldcreative.com/wp-content/themes/Divi/js/custom.unified.js.map: HTTP error: status code 404, net::ERR_HTTP_RESPONSE_CODE_FAILURE
I can’t understand why it was working and then stopped.
Would you be able to help at all?
Many thanks,
Ollie
Hi Ollie,
The error is in Divi, the hosting server is not loading it. Not sure I’m the right person to help with that, try the host or Divi support.
Hi Nelson,
Thanks so much for your reply. I thought it might be.. it has however sorted itself out. Not quite sure why but possibly a Divi update.
Looks great, thank you
Hello,
Thank you !
I have a question : how to change the color of the burger menu on mobile ?
Thank you 🙂
Hi there, just change this in the module settings. Look for the icons toggle and the color picker.
Thanks for this amazing tutorial.
Worked well for me however for some reason it’s not working on the Shop page (woocommerce) built with divi.
It’s coming up transparent and not changing on scroll.
Is there any reason it would do that? (as far as I can tell it work fine on all other pages including cart and checkout pages.
I updated the code, just add !important after the hex color and it will work.
Thanx. Will try tomorrow
Anothe question, I would like to do this for the default divi header instead of creating a new custom header, what do I put in to replace the PA-header? Is there a way to set a custom class to the default divi header?
Ahh this tutorial is exactly what I’m looking for to use on my site!
The only problem is that I’ve followed this tutorial line for line and it is doesn’t seem to be working for me and can’t for the life of me work it out.
Have you had any common problems with it not working?
Many thanks,
J
Hi there,
All my tutorials work 🙂 You will need to share your site URL for me to help.
I’ve fixed it now, no worries!
Cheers for all the great tips. 👌
Hi there, thanks for this code. Working! I have a question. Is there a way to add s line of code to change the font color also? I tried adding this before the transition arguments but it didn’t work
font-style: color #000000;
Hi Ernest,
Yes for sure, but the code you tried is not the right syntax. You can target the menu items with this: .et_pb_menu__menu>nav>ul>li>a { color: #000000;}
Forgive my ignorance, I don’t have much coding knowledge other than copy pasting and very little html. I’m probably doing it wrong.
I tried inserting the row in the below, but it didn’t work
/*set the defautl background color of the header section*/
.pa-header {
background: transparent;
-webkit-transition: background-color 2s ease-out;
-moz-transition: background-color 2s ease-out;
-o-transition: background-color 2s ease-out;
transition: background-color 2s ease-out;
}
/*set the background color of the fixed header when scrolling*/
.pa-fixed-header {
background-color: #b3b3b3!important;
.et_pb_menu__menu>nav>ul>li>a { color: #000000;}
-webkit-transition: background-color 2s ease-out;
-moz-transition: background-color 2s ease-out;
-o-transition: background-color 2s ease-out;
transition: background-color 2s ease-out;
Hi Ernesto,
Try adding !important after the #000000
didn’t work. The .et_pb argument has a red x mark beside it like I’m using incorrect punctuation or something
Oh, please use my original code snippet, yours has incorrect syntax. Just add !important to the code in the blog post.
Thanks again, I managed to partially make it work. I’ve spent about 4 hours toying with css today and have learned a little. I pasted the code I used below.
The final challenge I have is that my header has 2 columns: one with text and the second one with the menu. The argument you gave me makes the menu work, however the text column doesn’t change color.
I have spent about 2 hours searching the internet and trying multiple ways to change it, but haven’t succeeded. Could I bother you one last time for this one please?
css that worked for the menu:
.pa-fixed-header .et_pb_menu__menu>nav>ul>li>a {
color: #000000 ;
}
All good, figured it out 🙂 I learned how to use the inspect element to find any css target. Thanks a lot for the code!
Very nice! Many thanks! but I don’t understand why now the mobile drop down menu is transparent .. any suggestion?
Thank you! its working perfectly. but how to include the font color, logo and button color so i can make a total switch
Hi Tommie,
I try to provide people with a base to get started with my tutorials. For that, you will need to use CSS and target each of those items and follow the pattern set in the tutorial.
Hi Nelson, I love your tutorial and that’s what I needed but it’s not working properly for me I can see where the problem is but I can’t solve it. Can I ask for your help?
Hi Julien,
Make sure to follow the tutorial exactly and especially the note about letting the background section color the default instead of making it transparent. I think that is the issue.
Thank you very much Nelson! You’re awesome
You’re welcome 🙂
Hi Nelson,
Thank you so much for the tutorial, it’s great! The only thing is: my footer dissapears when I save my template in the Divi Themebuilder. What am I doing wrong?
Are you adding a footer Theme Builder template?
no, it’s standard in the childtheme I use.
Weird, nothing here is related to the footer so there must be something else wrong there unrelated to this.
I downgraded WordPress 5.6 and it’s working properly now!
Hi, thank you for all your tutorials. I think I understood the machanism of making changes.
But I have a problem with the dropdown menu. I know how to target and change the background color in css, but it doesn’t work because the bgcolor is already set with
!important in .et_pb_menu_0_tb_header.et_pb_menu .nav li ul. I don’t know where to change that. I want the background to be white at the beginning and gray with transparency when scrolling.
Hi, I have the same problem, did you find a solution?
Hello, I just started building a test site to get familiar with Divi as a new user. Your tutorials have been extremely helpful! The overall concept did work for me, but I’m having an issue that the solid header background once it has scrolled is only covering half of the header logo/text. https://msbeta.messengersmith.com/
What am I missing? Thank you!
Hi Nadia,
Thank you so much for your kindness, I am so happy to hear that my tutorials are helping you. I checked your link and don’t see anything wrong, looks great. I would personally make the transition faster though.
Hey,
I’m not very familiar with java script. But is there a possibility, so that the transparency only changes once you past a certain class.
Since I would like to have the menu transparent as long as it is above the picture and only then become solid if it‘s under the picture. However, if I increase the pixels, it doesn’t do me any good either, because depending on the monitor, the position where the picture ends is different and so the menu’s background changes in the middle of it.
So is there any way to rewrite this line so that instead of
if (scroll> = 100) {it is replaced by a class that I have to pass to cange the background?
Tanks
Great tutorial! I’m so glad I saw your presentation at Divi NYC meetup. You have a trove of tutorials here! So glad to have found your site
Hi Seema, hey I’m so glad you saw my presentation! Yes, I would agree I do have quite a lot of tutorials, several hundred and counting. I hope you find my content very helpful!
I struggled with this tutorial because it didn’t work. then I watched your video and there was the extra step that wasn’t in the written tutorial.
I’m glad that it’s finally working. maybe you can add the extra step (clear the transparency of the section) also to the text.
Hi Sander,
Okay thanks for sharing!
Hi Nelson!!
Thank you so much for all your tutorials!
I have a question.
Using this code, when using the computer, the website looks beautiful, however, when accessing the website on my phone, the menu doesn’t show up at all! It’s like it doesn’t have a menu on mobile.
I tried a lot of things but nothing worked :((
Could you give me a hand?? Thank you so much! ♥
Could you please share the URL of the website so that I could investigate further?
Hi, Hemant!
Same here: desktop perfect, but not responsive to mobile devices at all.
Mine is
http://www.brazilcleanenergy.com
Thank you!
I don’t understand, this tutorial is not anything specific to desktop or mobile. What do you mean by not responsive? That makes no sense.
Really Really Thank You . I had a problem with the header section but now by this tutorial the problem solved. hope you the bests 🙂
I’m so glad to hear this was helpful!
Dear Nelson
First of all many thanks for your wonderful training videos. I learn so much.
I have successfully used your guidance to create a sticky menu that reduces the size of the logo and the menu items on scrolling. The only thing I cannot get to work is changing the background of the menu to white when scrolling. It remains transparant. Here’s the CSS I added to the head together with the JSON code as per your instructions. Any idea what I am doing wrong – here is the site: http://lambrechtsbouers.co.za
/*set the transition for the spacing shrinking action*/
.pa-header .et_pb_row {
-webkit-transition: all .5s ease;
-moz-transition: all .5s ease;
-o-transition: all .5s ease;
transition: all .5s ease;
}
/*set the background color of the fixed header when scrolling*/
.pa-fixed-header .et_pb_row {
padding: 0px 0;
-webkit-transition: all .5s ease;
-moz-transition: all .5s ease;
-o-transition: all .5s ease;
transition: all .5s ease;
}
/*set the transition for the logo shrinking action*/
.pa-header .et_pb_menu__logo img {
-webkit-transition: all .5s ease;
-moz-transition: all .5s ease;
-o-transition: all .5s ease;
transition: all .5s ease;
}
/*change the logo size when the header shrinks*/
.pa-fixed-header .et_pb_menu__logo img {
max-width: 70%;
-webkit-transition: all .5s ease;
-moz-transition: all .5s ease;
-o-transition: all .5s ease;
transition: all .5s ease;
}
/*set the transition for the font size shrinking action*/
.pa-header .et_pb_menu ul li a {
-webkit-transition: all .5s ease;
-moz-transition: all .5s ease;
-o-transition: all .5s ease;
transition: all .5s ease;
}
/*change the menu font size when the header shrinks*/
.pa-fixed-header .et_pb_menu ul li a {
font-size: 15px!important;
-webkit-transition: all .5s ease;
-moz-transition: all .5s ease;
-o-transition: all .5s ease;
transition: all .5s ease;
}
/*change the menu font colour when the header shrinks*/
.pa-fixed-header .et_pb_menu ul li a {
color: #21567D!important;
-webkit-transition: all .5s ease;
-moz-transition: all .5s ease;
-o-transition: all .5s ease;
transition: all .5s ease;
}
/*set the defautl background color of the header section*/
.pa-header {
background: transparent;
-webkit-transition: background-color 2s ease-out;
-moz-transition: background-color 2s ease-out;
-o-transition: background-color 2s ease-out;
transition: background-color 2s ease-out;
}
/*set the background color of the fixed header when scrolling*/
.pa-fixed-header {
background-color: white!important;
-webkit-transition: background-color 2s ease-out;
-moz-transition: background-color 2s ease-out;
-o-transition: background-color 2s ease-out;
transition: background-color 2s ease-out;
}
Hi Riaan,
This is because I see you have background-color: RGBA(0,0,0,0)!important; as the section, so the !important is taking over. When I disable that, it works.
Thank you for this tutorial.
How can I extend the transparency to color change feature to the dropdown menu? It seems (by default) it’s either transparent or it has a background color.
Is there a way for the dropdown to start transparent, but change color on scroll, too?
Hi Jenn,
Based on the URL of the website provided, I wrote the code for you.
#main-header ul li.menu-item-has-children .sub-menu{

    background-color: transparent;

}
#main-header.et-fixed-header ul li.menu-item-has-children .sub-menu{
background-color: #272727;
}
Paste this code in Divi > Theme Options > Custom CSS Panel and let me know how it goes. 🙂
It does work – thank you!
AWESOME! And so easy. Thanks Nelson.
You’re welcome!
Hi there, awesome bit of code!!
Just wondering, is it possible to add a second (scroll >= 250) statement, for mobile devices.
So for example, have (scroll >= 250) for desktop and (scroll >= 100) for mobile devices.
So maybe have to add something like (window).width() > 768) – but not sure if that will be possible.
Look forward to your reply.
Hi Aaron,
It is possible to achieve and your approach towards it is on spot and you can go ahead and place the code under the if-else condition.
Hi Nelson!!
Thank you so much for all your tutorials!
I have a question. When I put the code the code is not working when I scroll the menu remains the transparent and till in the white color.
Hi Hussnain,
I am afraid that I am not completely sure that I have understood your problem. Could you please elaborate on what you are trying to achieve exactly in order for me to help?
Can’t seem to get this to work. Can you help?
https://vague-crane.flywheelsites.com/
css:
/*set the defautl background color of the header section*/
.pa-header {
background: transparent;
-webkit-transition: background-color 2s ease-out;
-moz-transition: background-color 2s ease-out;
-o-transition: background-color 2s ease-out;
transition: background-color 2s ease-out;
}
/*set the background color of the fixed header when scrolling*/
.pa-fixed-header {
background-color: rgba(52,135,162,0.88)!important;
-webkit-transition: background-color 2s ease-out;
-moz-transition: background-color 2s ease-out;
-o-transition: background-color 2s ease-out;
transition: background-color 2s ease-out;
}
Hey Malia,
The code is working perfectly fine on the URL that you have provided. Please try seeing the website in incognito mode and see if that helps.
Hi Nelson and community. I was wondering 2 things. 1st is how to change a button background colour on scroll and the second is the animated the scroll effect to a smoother ‘ease-in’ ‘ease-out’? Let me know your thoughts here. Thanks!
Hey Gen,
To change the background color of the button you can add another line of code in the jQuery code to add and remove the class to the button. To do that you need to provide a custom class to the button and place this code in if and else respectively:
For if
jQuery(“.custom_button_class”).addClass(“change_color”);
For else
jQuery(“.custom_button_class”).removeClass(“change_color”);
Now you can use the change_color class and provide a background color to the button using CSS.
.change_color{
background-color: red !important
}
About the ease-in and ease-out effect, you can change the .pa-fixed-header transition to ease-in in order to have a smoother effect and keep the other one to ease-out.
Hi !
Thanks for this post.
How can I set a background color to the sticky menu in that case : https://atoweb.fr/carhaixboutik2022/
I can’t use your method because I don’t want to fix the whole section containing the menu at the top (it contains a big background image).
Any idea ?
Sorry I’m not clear on what you are asking…
Hi Nelson,
thx for the tutorial. Works perfect.But, i have a question regarding the header background color coming up on a mobile device. As i scroll down on an iPhone 12 mini the background color when scrolling has more space than the menu itself. Means, if i scroll down, there is underneith the logo about 20px more space getting background color.
the spacing is correct on an computer. Hope it is understandable wich issue i do have. What can i do?
Hey Kim,
I am not able to replicate the issue on my end, could you please check it on incognito mode and let me know how it goes?
Hi Nelson,
Thanks for all the header tutorials, I have used them to great effect for many of my websites, however I am experiencing an issue with the latest website. I have added the class pa-header and used the css and js in the head tag but the header is not changing color.
Website: https://yesmore.otiscreative.co.uk/services/social-media/
There is a js error but I am not sure how to resolve that?
Would you be able to have a look? Strange that it works on all my other sites and not this one.
Many thanks,
Ollie
Hey Ollie,
Please use this CSS code and see if that helps:
.et_pb_section.et_pb_section_0_tb_header.pa-header.et_pb_with_background.et_section_regular.et_pb_section--fixed.et_pb_section--with-menu.pa-fixed-header {

    background-color: #000 !important;

}
I love these tutorials and I”m trying to make this work on my site but having a problem.
The logo is shrinking just fine when scrolling, but the background color wont change to black and the menu text is not shrinking. Can you please help?
https://rainsongdesign.net/fantaseek/
I’ve put in the js and the CSS from above just like you said.
thank you
Thanks for this great and simple tutorial!
The code worked just fine on one of my sites but when I try it on another one it’s not! I’m puzzled
I wonder if it might have to do with the header already having a snippet of jquery code embedded inside a code module…
Am I out of luck using both codes together?
Here’s the snippet just for the record
Hi Florencia!
I am not sure exactly what is causing the issue, that’s a little outside the scope of the tutorial.
how do I add a 3px solid border at the bottom? so when I scroll down the background turns black with a solid border located at the bottom
i have teird this but will not work
/*set the background color of the fixed header when scrolling*/
.pa-fixed-header {
background-color: #000000!important;
border-bottom-width: 3px;
border-bottom-style: solid;
border-bottom-color: #F3C700;
-webkit-transition: background-color 2s ease-out;
-moz-transition: background-color 2s ease-out;
-o-transition: background-color 2s ease-out;
transition: background-color 2s ease-out;
}
Hi Rizzolo!
I have checked your code in my test side and the bottom border is displaying fine. To clarify, the border will be added at the bottom of the section and not the Menu.
Please try clearing the browser cache and check again.
Hey! Thanks for the awesome tutorial. I have a fixed transparent header that changes to a dark background on scroll using this process. My logo is in an Image module centered in the section of the header. On scroll, I would like this image to change and shrink in size. Is there a way to accomplish this by adding to the custom CSS for .pa-header and .pa-fixed-header? Thank you!
Hi Matt!
Please try the following code to decrease the image height on scroll using the guide approach. Add the custom class in the Image module and change the width of the image as per your requirement.
.pa-header .custom-image {
width: 100%;
-webkit-transition: width 2s ease-out;
-moz-transition: width 2s ease-out;
-o-transition: width 2s ease-out;
transition: width 2s ease-out;
}
.pa-fixed-header .custom-image {
width: 70% !important;
-webkit-transition: width 2s ease-out;
-moz-transition: width 2s ease-out;
-o-transition: width 2s ease-out;
transition: width 2s ease-out;
}
Well I have invested hours in just trying to get this damn menu to not be transparent and Im ready to swallow a steak knife. I have triied yours and every other persons solutions to no avail. Your JQuery and CSS seem to have ZERO effect whatsoever. Any help or ideas would be appreciated. I want to cry this is sooo frustrating.
It’s not possible for anyone to help without details of what you are doing. However, if nothing is working then it sounds like either a major website issue or just user error. With issues like that it may be best to hire a developer short term on a freelancing site.
I love your content! I just implemented this tut, works perfect. I noticed something concerning the jquery. When scrolling down the header does change from transparent to the background color I have set. When I scroll back up to the top of the viewport, it doesn’t change from the color background on scoll back to transparent. That might be a great addition to the jquery as an option! (Also, I added my URL in the comment info, but the site isn’t live to the public yet– In case you wanted to see what I’m referencing.)
Hi Erin!
Can you please check if the pa-fixed-header class is being added when the section comes to top again? You can use the browser inspector to check it.
If class is not getting added, please make the website live and share the URL with me.
This doesn’t work for me. The background of the section does not change color when scrolling. Nothing happens and I don’t know what else to do anymore.
Hi Gabriela!
Please try using the following code for the fixed header:
body #page-container .pa-fixed-header {
background-color: #000000!important;
-webkit-transition: background-color 2s ease-out;
-moz-transition: background-color 2s ease-out;
-o-transition: background-color 2s ease-out;
transition: background-color 2s ease-out;
}
If it doesn’t help, share the page URL to investigate further.
Hi, I have a little problem, the elements of my page are “over” the header, so when i scroll, they are on top of my header. I do not want that to happen, I mean, when the header is fixed on top while scrolling, I want it to be over everything, and not the other way. Am I being clear? I am from Argentina, so my english can be a bit poor… Thank you!
Hi Damasia!
It seems to be a z-index issue. Please go to the layout settings in Theme builder header layout > Advanced > position and increase the z-index.
If it doesn’t help, share the URL of the page to investigate further.
The tutorial works amazing except for one thing. I can’t get the fixed header text color to change on scroll on mobile. Works on desktop and tablet, but it remains transparent on mobile. any thoughts?
erraswim.com
Hi Kanefire!
I can see that the color of the mobile header is also changing to #FFFFF0. Try clearing the browser cache and check again.
Hi Nelson,
thanks for the tutorial. I have a little issue: I want the Header to change color from beige to blue and added the colors in the css script but instead the header changes just for a nano second to blue and than gets transparent.
I have set the backgroud color of both section and row of the header in der theme builder to default.
Maybe you have an idea?
Greetings from Germany
Kat
Hi Kat!
Can you share the URL of the page to investigate further?
Hello,
i solved it! First i used the code to create this change of color, but i did it now directly in the section via the scrolling effects and its working now. Thanks!
kind regards
Kathrin
for some weird reason the jQuery does not add the pa-fixed-header class after scroll
any idea how this is possible or how to debus this?
Hi Sven!
Can you please check in the console if there are any JS errors? If not, share the URL of the page to investigate further.
sorry for the late reply
i used an other option
Hey there Nelson, I have a flash of old styled content since i’ve implemented this code. Temporarily i’ve added a preloader but that’s not ideal. Anyway you can assist?
Hi Gen!
In that case, avoid using the fixed position as shown above. Use the Divi sticky option instead in Advanced tab.
Thanks for all the great tutorials! I have some questions 🙂
I have the menu text and the logo set to white, and it looks nice when it is transparent. When scrolling down the color of the menu is a light color so I want the text and logo to switch to dark green. Is that possible with CSS? I think I figured it out to make with the menu settings, but it doesn’t feel 100% because the text color change before the menu change color.
I have also made the section to change color when hover, but then again I need the text to turn green.
I really hope you can help me!! My website is under construction so please let me know if you need to see it to understand what I mean 🙂
Hi Anna!
We need to filter for the logo. Can you please share the URL of the page and disable under construction so that I can check the header?