Change The Default Animation
The Divi Filterable Portfolio module is popular for its category tabs which allow people to filter the items shown, but if you ever used it you probably noticed the animation. When the module initially loads or when you switch to different filters, the items in the portfolio animate from left to right. While this is fine, it’s also a bit odd that there are no settings to change the animation effect. So in this tutorial, I will show you how to use CSS to change the Divi Filterable Portfolio animation affect when switching between filters.
▶️ Please watch the video above to get all the exciting details! 👆
1. Add A Custom CSS Class To The Divi Filterable Portfolio Module
The first step to adjust the filter animation in the Filterable Portfolio module is to add a custom CSS class to the specific Filterable Portfolio module that you want to affect. This class will be the link between the module and the CSS code, which will be added in the next step.
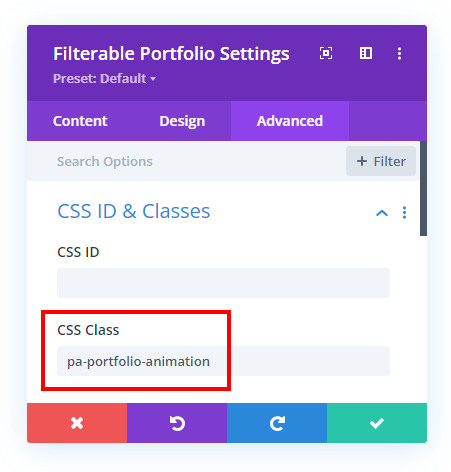
Open the Divi Filterable Portfolio module settings and go to the Advanced tab to the CSS IDs & Classes toggle. Place the class “pa-portfolio-animation” in the CSS Class input field.

2. Add The CSS Snippet
We are going to use the default CSS animation in the Divi Filterable Portfolio module as the base, and then modify it in step #3. I have added the default CSS snippet below and also added the CSS class selector from step #1. So go ahead and copy and paste the snippet, and we will customize it in step #3.
Where To Paste The CSS Code
If you are using Divi Assistant, simply paste the code below into the CSS tab of the code editor window (be sure to enable it in the Code Helper settings).
If you are using a child theme such as our free Divi child theme, place this snippet into the style.css file.
Otherwise, you can place this code in your Divi>Theme Options>Custom CSS code box.
If you need help understanding where to paste the code, please check out our complete guide about where to add custom code In Divi.
/*Divi Filterable Portoflio Animation*/
.pa-portfolio-animation .et_pb_portfolio_item.active {
    animation: fadeLeft 1s 1 cubic-bezier(.77,0,.175,1)!important;
}
3. Adjust The Animation
The default CSS snippet in Divi is using shorthand to create the animation, but you could also separate each property if you want. If you are new to the topic, you can learn more about using CSS animations.
To keep it simple, I suggest changing the “fadeLeft” animation name in the snippet to something else. The great news is that Divi already comes with several pre-made keyframe animation names built-in, so we just need to replace it in the code snippet.
- fadeRight
- fadeBottom
- multi-view-image-fade
- fadeInRight
- fadeInTop
- fadeOutRight
- fadeOutBottom
- fadeOutTop
You can also adjust the animation timing function. So you could replace the “cubic-bezier(.77,0,.175,1)” with something else like “ease” or “linear.”
NOTE: A topic like this gets a little more complicated, so be sure to watch the video to see examples of this in action.


This is a great guide Nelson, btw do you have a list of what other keyframes Divi has? Thank you
Oooooh my bad, found it! thanks bro!