Highlight The Divi Blog Date Or Category On The Image
In our last tutorial, I showed you how to remove the Divi Blog module meta separators. That tutorial is the perfect prerequisite to this one, and complements it perfectly. In this tutorial I will be showing you how to move the Divi blog module meta author, publish date, and/or category up over the top of the featured image. This creates a beautiful highlight! This is a very requested feature, and there are no other tutorials like this, so I am excited to show you this.
Be sure to check out all our other tutorials, especially our entire Divi Blog module series. You’ll find everything you need and didn’t know you needed there, and if you have any suggestions for new blog related tutorials let me know!
▶️ Please watch the video above to get all the exciting details! 👆
Overview And Preparation
This is a very nice effect, but it will take some focus to get it right. A lot of the items in this tutorial depend on the scenario you want, which you will see when we get to each of the snippets. I really do mean it when I say, please watch the video. It explains things so much better than I can do with written words.
Remove The Post Meta Separators
As mentioned at the top, you will most likely want to remove some or all of the post meta separators, such as the “by” before the author and the vertical pipes “|” between the items. Please be sure to check the full tutorial and video:
How To Remove The Divi Blog Module Meta Separators

Add A Custom CSS Class
We are going to starty by adding a custom CSS class to the Divi Blog module. Using a custom class like this will make sure that our code only affects the module with this class, rather than affecting other Blog modules on your site.
Open the Divi Blog module settings and go to the Advanced tab and open the CSS ID & Classes toggle. From there, copy and paste or write “pa-blog-separators” into the CSS Class input field, as shown in the the screenshot.
This first snippet is needed to accompany any of the snippets below. It is critical for this to work. Basically it allows us to move the meta relative to the individual posts. Otherwise, without this, all the meta from all of the posts would move onto one post, creating a crazy mess.
Where To Paste The CSS Code
1. Divi Assistant
If you are using our Divi Assistant plugin, simply paste the code in the CSS tab in the custom code window in the Divi Visual Builder.
2. Child Theme
If you are using a child theme, paste this code into the style.css file. If you don't have a child theme, you can generate a child theme directly on your site or download our free child theme.
3. Divi Theme Options Integration
Otherwise, paste this code in your Divi>Theme Options>Custom CSS code box.
If you need help understanding where to paste the code, please check out our complete guide about where to add custom code In Divi.
/*position the blog posts to prepare for moving the meta*/

.pa-blog-separators article {
	position: relative;
}
Now you can move on to the rest of the tutorial. Be sure to take a glance over all of it first in order to decided which items you want to move, and get an idea of how they will look from the included screenshots.
Move And Highlight The Divi Blog Published Date Over top The Featured Image
The first thing you can choose to do is move the date. This will allow you to highlight the date the blog posts were published. Just take note of the “left: 0;” in the code. This means it will align the date to the top left. If you prefer this to be on the right, simply replace the word left with right.
The one small caveat to this is that you would need to turn off either the author or the category, since the separator pipes | are removed.
Where To Paste The CSS Code
1. Divi Assistant
If you are using our Divi Assistant plugin, simply paste the code in the CSS tab in the custom code window in the Divi Visual Builder.
2. Child Theme
If you are using a child theme, paste this code into the style.css file. If you don't have a child theme, you can generate a child theme directly on your site or download our free child theme.
3. Divi Theme Options Integration
Otherwise, paste this code in your Divi>Theme Options>Custom CSS code box.
If you need help understanding where to paste the code, please check out our complete guide about where to add custom code In Divi.
/*move the Divi Blog post meta published date up over the image*/

.pa-blog-separators .et_pb_blog_grid .et_pb_post .post-meta span.published {
	position: absolute;
	top: 0;
	left: 0;
	margin-bottom: 0;
	color: #ffffff!important;
	background: #0071fc!important;
	padding: 6px 12px;
	margin: 15px;
	border-radius: 50px;
}
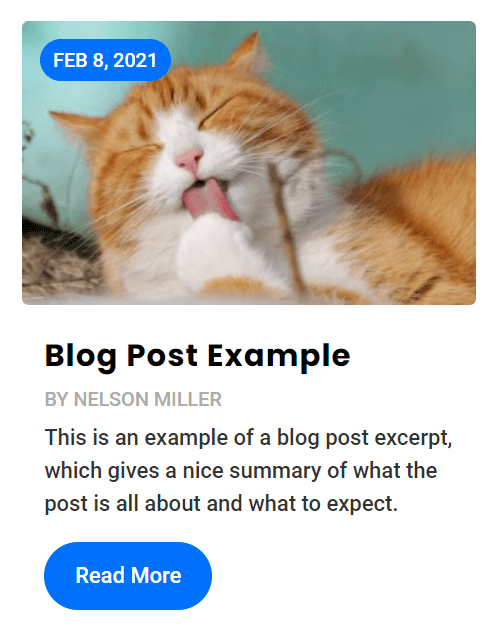
Here is how it looks with this snippet with the blog date highlighted on the image. Feel free to adjust the top, left, right, color, background, padding, margin,, and border radius to your own branding and preferences.
Move And Highlight The Divi Blog Category Over top The Featured Image
Another thing you can choose to do is move the category up over the image to highlight it. Just take note of the “left: 0;” in the code. This means it will align the category to the top left. If you prefer this to be on the right, simply replace the word left with right.
One thing to note is that this works beautifully with only one category. But if the post has 2 or 3 or more categories, I think it would lose the effect.
Where To Paste The CSS Code
1. Divi Assistant
If you are using our Divi Assistant plugin, simply paste the code in the CSS tab in the custom code window in the Divi Visual Builder.
2. Child Theme
If you are using a child theme, paste this code into the style.css file. If you don't have a child theme, you can generate a child theme directly on your site or download our free child theme.
3. Divi Theme Options Integration
Otherwise, paste this code in your Divi>Theme Options>Custom CSS code box.
If you need help understanding where to paste the code, please check out our complete guide about where to add custom code In Divi.
/*move the Divi Blog post meta category up over the image*/

.pa-blog-separators .et_pb_blog_grid .et_pb_post .post-meta a:nth-child(3) {
	position: absolute;
	top: 0;
	left: 0;
	margin-bottom: 0;
	color: #ffffff!important;
	background: #0071fc!important;
	padding: 6px 12px;
	margin: 15px;
	border-radius: 50px;
}
Here is how it looks with this snippet with the blog post category highlighted on the image. Feel free to adjust anything in the snippet like the top, left, right, color, background, padding, margin,, and border radius to your own branding and preferences.

Move And Highlight Both The Divi Blog Published Date And Category Over top The Featured Image
In the previous two snippets we provided separate snippets to move either the date or the category. But if you want, you could also do them both! Just make sure to make one of the on the left, and the other on the right.
There is a caveat for doing this, depending on the number of other meta items you have. If you also have the the Author and Comment Count turned off, then the snippet will work as is. But if you have those on, then you need to add “:nth-child(3)” to the end of the second snippet like “.post-meta a:nth-child(3)” to make sure it only targets the category.
Where To Paste The CSS Code
1. Divi Assistant
If you are using our Divi Assistant plugin, simply paste the code in the CSS tab in the custom code window in the Divi Visual Builder.
2. Child Theme
If you are using a child theme, paste this code into the style.css file. If you don't have a child theme, you can generate a child theme directly on your site or download our free child theme.
3. Divi Theme Options Integration
Otherwise, paste this code in your Divi>Theme Options>Custom CSS code box.
If you need help understanding where to paste the code, please check out our complete guide about where to add custom code In Divi.
/*move the Divi Blog post meta published date up over the image*/

.pa-blog-separators .et_pb_blog_grid .et_pb_post .post-meta span.published {
	position: absolute;
	top: 0;
	left: 0;
	margin-bottom: 0;
	color: #ffffff!important;
	background: #0071fc!important;
	padding: 6px 12px;
	margin: 15px;
	border-radius: 50px;
}

/*move the Divi Blog post meta category up over the image*/

.pa-blog-separators .et_pb_blog_grid .et_pb_post .post-meta a {
	position: absolute;
	top: 0;
	right: 0;
	margin-bottom: 0;
	color: #ffffff!important;
	background: #0071fc!important;
	padding: 6px 12px;
	margin: 15px;
	border-radius: 50px;
}
Here is how it looks with both the date and category moved up over the Divi blog featured image. As usual, you can customize the colors and other values in the CSS to your own liking.

Move And Highlight The Divi Blog Post Author Over top The Featured Image
The last one here is about moving the blog post author over the image. To me this would only be needed if your blog has a lot of different well-known authors that you want to highlight. This is very similar to the other ones here, and works best if you either have 1 or no other meta items turned on.
Where To Paste The CSS Code
1. Divi Assistant
If you are using our Divi Assistant plugin, simply paste the code in the CSS tab in the custom code window in the Divi Visual Builder.
2. Child Theme
If you are using a child theme, paste this code into the style.css file. If you don't have a child theme, you can generate a child theme directly on your site or download our free child theme.
3. Divi Theme Options Integration
Otherwise, paste this code in your Divi>Theme Options>Custom CSS code box.
If you need help understanding where to paste the code, please check out our complete guide about where to add custom code In Divi.
/*move the Divi Blog post meta author up over the image*/

.pa-blog-separator .et_pb_blog_grid .et_pb_post .post-meta span.author.vcard a {
	position: absolute;
	top: 0;
	left: 0;
	margin-bottom: 0;
	color: #ffffff!important;
	background: #0071fc!important;
	padding: 6px 12px;
	margin: 15px;
	border-radius: 50px;
}
Here is how it looks with this snippet with the blog author highlighted on the image. Once again, feel free to adjust any of the other values in the code.



Hi Nelson, Thanks for this. I’m trying to get this to work with multiple categories assigned to a blog but I can only get one to show. How would you do this for multiples?
Also, is it possible to change the background colour based on the category value? I’m assuming that would have to be by done by script.
Thanks, Steve.
Hi Steve,
Can you tell me more about the issue with multiple categories? I’m not sure exactly what you mean, please share a link and I will check it.
About the colors, I actually have a tutorial scheduled for that. It will be very similar to the one I did for my Divi Events Calendar plugin, you can check to get the idea: https://www.peeayecreative.com/how-to-highlight-event-categories-by-color-in-divi-events-calendar/
Sorry for delayed reply. Working with a temp domain name which I’ve included below. Plus I’ve attached an image. You can see I’ve got two categories – massage and physiotherapy. I can’t figure out how to isolate them as they seem to be lumped together under the category-physio class so when I change the background colour for physio, the massage background colour changes too.
The workaround as far as I can see is to ensure you only ever assign one category to a blog post.
Thanks,
Steve.
Hi Steve, yes I do not think it is possible to target each category as each one does not show a class like you are wanting.
Ok, thanks Nelson. That at least confirms what I thought.
Hi,
As I’ve turned off the date, and writer in the ‘elements’ section of the blog module. Do I still need to follow the ‘Remove the separators’ tutorial first if I only want the category shown over the image? I’ve tried it, and it doesn’t seem to work.
It is good to remove the separators between the meta tags because even if you are showing only the categories then also there can be two or more categories for a single post and then also the separators will show up. But if every post of yours is having a single category then you don’t need to remove the separator just go to the Blog Module Settings > Advanced > CSS ID & Classes and give a custom class there. For example, the custom class is pa-blog-module
After that go to the WordPress Dashboard > Divi > Theme Options > Custom CSS Panel and paste the code given below:
.pa-blog-module article{
position: relative;
}
.pa-blog-module article .post-meta a{
position: absolute;
top: 0;
left: 0;
margin-bottom: 0;
color: #ffffff !important;
background: #0071fc!important;
padding: 6px 12px;
margin: 15px;
border-radius: 50px;
}
I hope that this will help. 🙂
Perfect. I was messing with too many different classes. That messed it up. This works!
Great! I am glad that the issue is resolved now. 🙂
Hello,
Thanks for this tutorial. I applied it to the posts on my home page but for some reason it also applies to the posts everywhere else on my site, even though I haven’t used the pa-blog-separators on any other modules. Any idea why this would happen? Compare the home page to this: https://liftyourneighbor.org/all-needs/ where I haven’t included the CSS class.
Hi Matt,
As I could see on the page provided, the code that is creating the issue is:
.post-meta a:nth-child(1) {

    position: absolute;

    bottom: 0px;

    left: 0;

    color: #ffffff!important;

    background: #2f3085!important;

    padding: 2px 8px;

    margin: 20px;

    border-radius: 50px;

    font-size: 13px;

}
This is directly being applied to the post meta without any custom class and that is introducing the issue that you are facing. Please look for this code and use the Custom Class in the start to solve the issue.
That’s it, thanks so much!
Hi there! Thank you for this. One question: is there a way on Divi to put the author image in blog module? Or some other solution? Thank you!
There’s no way to do that, it would need to be modified blog module and that’s get’s complicated because it would need copied to a child theme.
Nelson thanks for the good and helpful tutorial. But what should I do if I have multiple subcategories, how can I remove the main categories and show only the subcategory or maybe place both categories as highlight?
Hey Dima,
Could you please share the URL of the website and also elaborate a little more about what you want to achieve in order for me to understand the issue accurately?
I would like to play more than one caregorie as higghlight. Vor exampe https://ibb.co/hsXy6SD
What is the question? Have you tried it?
Hey Nelson, thanks for all the effort with your posts. Is there a way to place the ‘Category’ tag over the image whilst having the blog module in a list layout (as on one of your other tutorials)?
Hi Tans,
I Personally have not tried that, but there is always a way. Maybe you can share what you have so far.
Hi Nelson,
Thank you so much for creating great content. You make my life so much easier!
Is there a way to do the same but for filterable portfolios? I would like to have the categories on top of the picture, just like in this tutorial. Thanks!
Hey Emma,
That will require a separate Custom Snippets. We will work on it on our end and will get back on this issue.
Hello. Thank you for the great tutorial! Can the code be modified to only do this for certain categories? For example, if I have a category named “Expired”, I would like the post to show “Expired” on the top left of the image as shown in the tutorial above, but to ignore all other categories. If it is any other category, it should just simply appear in the default location, and not overlay the image. Lastly, the posts that are categorized as “Expired” will likely have another category or two attached to the post. I would only like “Expired” to display in that case, not multiple categories (hopefully this makes sense).
I am also open to a solution (which may be easier, not sure) that simply overlays “Expired” in the manner above for any post in the expired category. So rather than relocating the existing meta, the code would simply carry out overlaying a static text bubble of “Expired”, if the post is in the “Expired” category.
Any help is appreciated! This is my first post, but this site has helped me tremendously! Thank You!
I am not sure how to do that, so I will suggest hiring a developer to help with that.
Thank you very much! it really makes blog grid looking much better!
You’re welcome, glad you like it!