Change The Order Of Divi Blog Grid Elements
Today we are adding another tutorial to our Divi Blog tutorial series with an easy trick to reorder the different parts that make up the blog post grid! This CSS code and tutorial allows you to choose which item you want to show first, second, third, etc. and it is very easy for anyone to do. Please be sure to follow along with the video and enjoy the tutorial!
▶️ Please watch the video above to get all the exciting details! 👆
1. Set Up The Divi Blog Module
Set the Blog module to either grid or fullwidth layout under the Design tab>Layout (it works for either one). You can go ahead and adjust the Divi builder design settings and style the title text and meta however you want.
2. Add A Custom CSS Class
If you only want to affect just one blog module on your site (if you have more than one) then you will want to add a custom class in front of each selector in the snippet below. Then add a custom CSS class in the module to match. Go to the Advanced tab to the Custom CSS ID & Classes toggle and add “pa-reorder-blog” to the CSS Class input field.
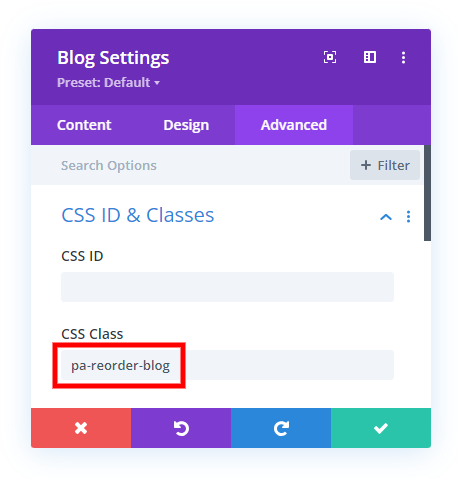
3. Copy & Paste The CSS Snippet
The last step is to add the CSS code snippet below into your Divi website.
Where To Paste The CSS Code
1. Divi Assistant
If you are using our Divi Assistant plugin, simply paste the code in the CSS tab in the custom code window in the Divi Visual Builder.
2. Child Theme
If you are using a child theme, paste this code into the style.css file. If you don't have a child theme, you can generate a child theme directly on your site or download our free child theme.
3. Divi Theme Options Integration
Otherwise, paste this code in your Divi>Theme Options>Custom CSS code box.
If you need help understanding where to paste the code, please check out our complete guide about where to add custom code In Divi.
/*make the parts of the blog post flexible*/

.et_pb_post {
	display: flex;
	flex-direction: column;
}


/*blog post featured image*/

.et_pb_post .et_pb_image_container, .et_pb_post .entry-featured-image-url {
	order: 2;
}


/*blog post title*/

.et_pb_post .entry-title {
	order: 1;
}


/*blog post meta*/

.et_pb_post .post-meta {
	order: 3;
}


/*blog post excerpt and button*/

.et_pb_post .post-content {
	order: 4;
}
This next part of the CSS is two snippets that adjust the default margin found on the blog post featured images. The first one removes the default negative margins, making the image inline the same width as the title, meta, excerpt, etc. The second part adjust the spacing below the image, which may be needed depending on which order of items you use.
Where To Paste The CSS Code
1. Divi Assistant
If you are using our Divi Assistant plugin, simply paste the code in the CSS tab in the custom code window in the Divi Visual Builder.
2. Child Theme
If you are using a child theme, paste this code into the style.css file. If you don't have a child theme, you can generate a child theme directly on your site or download our free child theme.
3. Divi Theme Options Integration
Otherwise, paste this code in your Divi>Theme Options>Custom CSS code box.
If you need help understanding where to paste the code, please check out our complete guide about where to add custom code In Divi.
/*remove negative margin on blog image*/

.et_pb_blog_grid .et_pb_image_container {
	margin: 0!important;
}


/*adjust margin below blog post featured image*/

.et_pb_post .entry-featured-image-url {
	margin-bottom: 10px;
}
Here are some of the ways you can arrange the Divi blog post items.

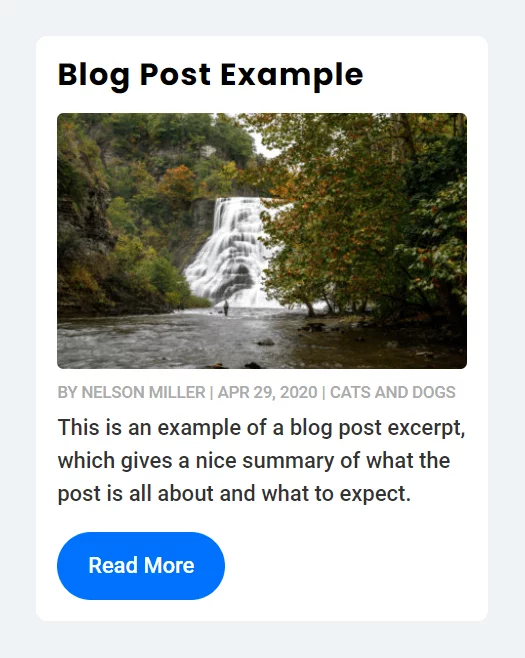
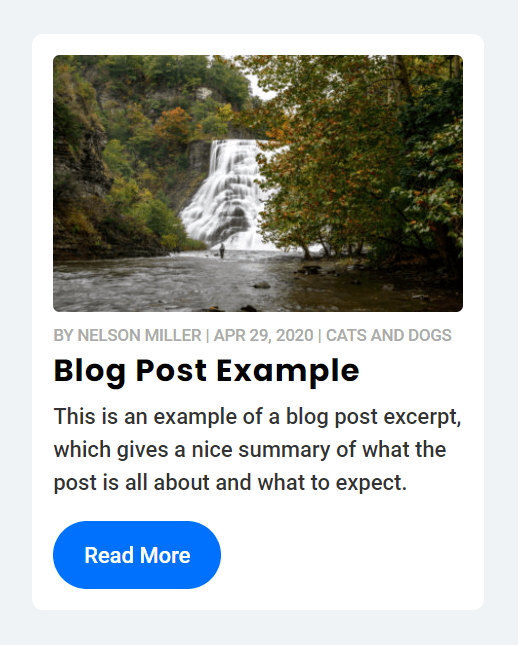
Occasionally, depending on the order, you may need to add a margin to one of the items. If you watch the video, you will see me doing that a few times to adjust the spacing to perfection.




Awesome!!!!! I really like your tutorials. I just created a blog grid with two of your tutorials.
I also read and used the Change The Number Of Columns In The Divi Blog Module and Change The Divi Blog Module Into A List Layout.
But I have a question. Would it be possible to separate the author from the category and the publish date so I could show the category above the title, and below the excerpt the author and date?
Thank you!
Hi there,
Those items are all part of the meta class, so that will not work. You could probably reorder them within the meta, but you couldn’t separate the meta items and mix and match them with the other items.
This is great, thank you, is there a way to use this in conjunction with your other post? –
https://www.peeayecreative.com/how-to-change-the-divi-blog-module-into-a-list-layout/
Should be fine, have you tried it?
Hi Nelson…Your tutorials are super helpful and I’m trying to combine a few of them to achieve a specific outcome
I am trying to implement the change in order of the title, meta, and excerpt on the fullwidth layout. However when I change everything to flex it places items in the vertical layout.
I need that flex option for something else as well. After I get these items in order I want to use margin: auto to center the text to the image in the right column. It seems as though I need columns within the et_pb_post class but I don’t know what to do.
My staging site is here. If you have a chance could you please offer
your recommendation for making this happen
https://vps70997.inmotionhosting.com/~natur380/blog/
Hi David,
Go to the Divi > Theme Options > Integrations and place the jQuery code given below:
jQuery(document).ready(function(){

    jQuery(".pa-blog-list article").each(function(){

        jQuery(this).children('h2,p,div').not(':first-child').wrapAll('
');
})
})
Note: The jQuery code should be wrapped in script tags.
Now go to Divi > Theme Options > Custom CSS Panel and place the CSS code given below:
.pa-blog-list article .wrap{

    display: flex;

    flex-direction: column;

    justify-content: center;

}
.pa-blog-list article .wrap h2{
order: 1;
width: 100%;
}
.pa-blog-list article .wrap div{
order: 2;
width: 100%;
}
.pa-blog-list article .wrap p{
order: 3;
width: 100%;
}
In the CSS code, you can see orders 1, 2, and 3. These are the default order of your heading, content, and meta tags respectively and you can change the order by changing these order numbers as per your liking.
Let me know if that helps. 🙂
Amazing. This worked beautifully. Thank you for taking the time to reply to me and help. You guys are great
I am really glad to hear that everything is working fine now. 🙂
Please let me know if you need any further assistance.
I want to display parent category underneath each title within the blog module.
Is it possible?
Hi AZ,
Could you please share the URL of the page where the blog module is present for me to investigate further?
Hi there! Can I reorder the elements in conjunction with your text overlay blog image tutorial?
In other words, can I combine this tutorial with the following?
https://www.peeayecreative.com/how-to-move-the-divi-blog-title-text-and-button-over-the-image/
I have not tried that.
Hi,Thank you for the tutorial.
Can I change the order of authors, dates, categories, etc. in the meta information?
You should be able to use this same principle with any elements, yes.
Hello!
Is there a way to have this work on mobile only?
I have a different CSS class for desktop that floats the featured image left.
I tried creating a separate mobile-visibility-only blog module with the “pa-reorder-blog” CSS class but the CSS effects the existing desktop-only CSS as well.
Hi Conor!
The code provided in this post is applicable to all views (Desktop, Tablet, & Mobile). If you want to make modifications to a certain blog module, you must add the CSS class to the ” pa-reorder-blog ” in the CSS code.
If the blog module in your case has a CSS class added specifically for mobile views, you can use the following code:
/*make the parts of the blog post flexible*/
.pa-reorder-blog .et_pb_post {
display: flex;
flex-direction: column;
}
/*blog post featured image*/
.pa-reorder-blog .et_pb_post .et_pb_image_container, .pa-reorder-blog .et_pb_post .entry-featured-image-url {
order: 2;
}
/*blog post title*/
.pa-reorder-blog .et_pb_post .entry-title {
order: 1;
}
/*blog post meta*/
.pa-reorder-blog .et_pb_post .post-meta {
order: 3;
}
/*blog post excerpt and button*/
.pa-reorder-blog .et_pb_post .post-content {
order: 4;
}
/*remove negative margin on blog image*/
.pa-reorder-blog .et_pb_blog_grid .et_pb_image_container {
margin: 0!important;
}
/*adjust margin below blog post featured image*/
.pa-reorder-blog .et_pb_post .entry-featured-image-url {
margin-bottom: 10px;
}
OR
You can use the code with the “media query”, so the code will work only on mobile view:
@media only screen and (max-width: 767px) {
/*make the parts of the blog post flexible*/
.et_pb_post {
display: flex;
flex-direction: column;
}
/*blog post featured image*/
.et_pb_post .et_pb_image_container, .et_pb_post .entry-featured-image-url {
order: 2;
}
/*blog post title*/
.et_pb_post .entry-title {
order: 1;
}
/*blog post meta*/
.et_pb_post .post-meta {
order: 3;
}
/*blog post excerpt and button*/
.et_pb_post .post-content {
order: 4;
}
/*remove negative margin on blog image*/
.et_pb_blog_grid .et_pb_image_container {
margin: 0!important;
}
/*adjust margin below blog post featured image*/
.et_pb_post .entry-featured-image-url {
margin-bottom: 10px;
}
}
Hope this helps!
Hi, this also works:
/* Divi blog module: Metatext above the title */
jQuery(function ($) {
“use strict”;
$(“.home .et_pb_post”).each(function () {
var $title = $(“.entry-title”, this);
$(“.post-meta”, this).insertBefore($title);
});
});