Swap The Divi Theme Builder Logo
Another Header Tutorial To Compliment Previous ones
At this point in our Divi header series we have covered quite a lot! We have so many tutorials and videos on this that I keep thinking there can’t be any more to make, but here are! This one will show you how to change/swap/replace the logo in a fixed Divi Theme Builder header.
One of the requested tutorials which will go along with some of our previous ones is to change the logo image in the Divi Theme Builder header menu you scroll. This would be for fixed headers.
This one is going to go along perfectly with some of our previous tutorials:
How To Change The Color Of A Fixed Divi Header Menu When Scrolling
▶️ Please watch the video above to get all the exciting details! 👆
NOTE: The written part of this tutorial has been updated after the Divi Sticky settings feature released. Previously we included jQuery code to make the header fixed/sticky, but now you can just use the built-in Divi sticky settings plus our CSS.
#1. Add Custom CSS Class to The Divi Theme Builder Header
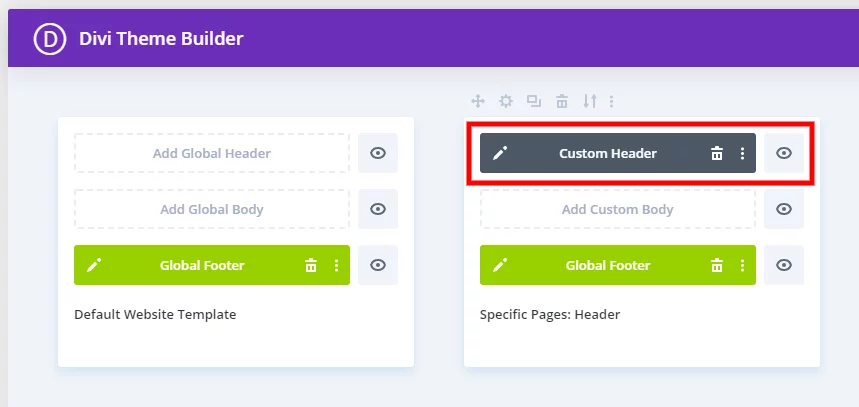
From your WordPress Dashboard, go to Divi>Theme Builder. Create a new template, and assign where needed. In our example, we chose to assign the menu to a specific page.
Click on “Add Custom Header” and in the popup choose “Build Custom Header.”

In the Divi Theme Builder template, create a section and add a row with any layout you want. In our example, we used a logo, menu, and button.
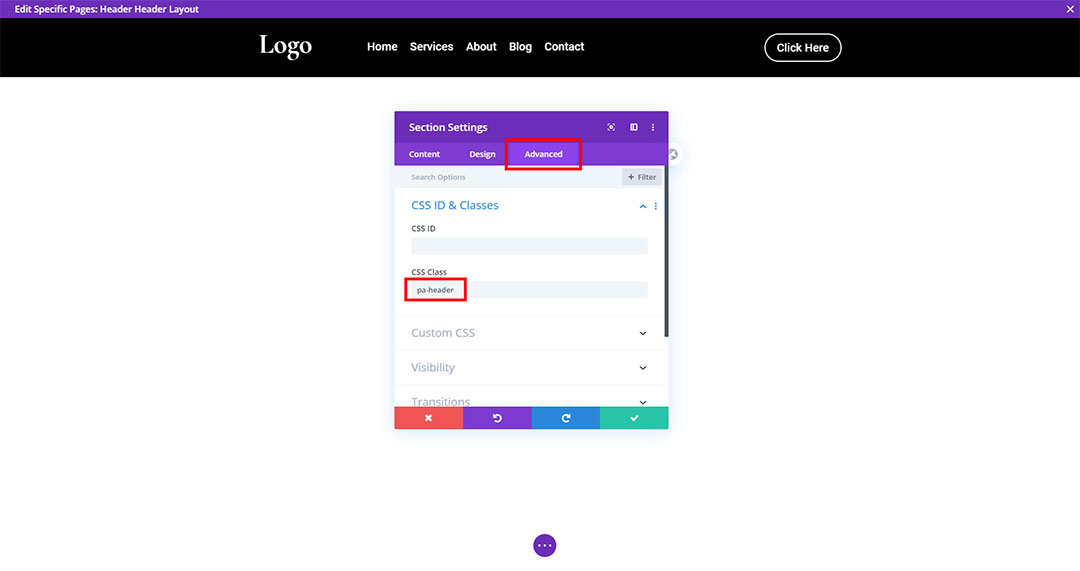
The most important part here is adding the CSS class to the section. Go to the section settings to the Advanced tab and add the class “pa-header” as shown in the image below.

#2. Set header Section To Sticky On Scroll
Divi now had built-in sticky position settings, so this is great. You can just go to the section settings to the Advanced tab and go down to the Scroll Effects toggle and set the Sticky Position setting to Stick to Top.
#3. Add The Custom CSS Code
Now that you have set the section to sticky, when you scroll down the site, the header stays fixed in place at the top. Maybe you are using one of our other tutorials linked at the top of this post to shrink the header or change the background color. In that case, you may want to replace the logo image.
Where To Paste The CSS Code
1. Divi Assistant
If you are using our Divi Assistant plugin, simply paste the code in the CSS tab in the custom code window in the Divi Visual Builder.
2. Child Theme
If you are using a child theme, paste this code into the style.css file. If you don't have a child theme, you can generate a child theme directly on your site or download our free child theme.
3. Divi Theme Options Integration
Otherwise, paste this code in your Divi>Theme Options>Custom CSS code box.
If you need help understanding where to paste the code, please check out our complete guide about where to add custom code In Divi.
/*replace the logo when scrolling*/

.pa-header.et_pb_sticky--top .et_pb_menu__logo img {
	content: url(INSERT NEW LOGO IMAGE URL);
}


thank Nelson
great tutorial as usual
Thanks Zamir, glad you like them!
Hi, very helpful tutorials.
In Firefox the Logo Change doesn’t work?
Should be fine in Firefox. Have you tested that?
I can confirm, Logo change does not work in Firefox (78.0.2 (64-bit) at least not on Mac
That would be strange for universal code not to work.
Yeah, confirming as well :/ Strange
Hi Peter!!
Fantastic tutorial! I changed the logo and the color when scrolling, but there is a gap between the new scrolled section and the top of the page. I adjusted the html to 0px, but the gap reappears when I scroll. Any suggestions? Here’s the site. http://ifh.wpengine.com/ I apologize for the http, but this is the staging site, and I don’t have any control over installing a certificate.
Michelle
/*set the defautl background color of the header section*/
.pa-header {
background: transparent;
-webkit-transition: background-color .5s ease-out;
-moz-transition: background-color .5s ease-out;
-o-transition: background-color .5s ease-out;
transition: background-color .5s ease-out;
}
/*set the background color of the fixed header when scrolling*/
.pa-fixed-header {
padding: 0px 0;
background-color: #fff;
-webkit-transition: background-color .5s ease-out;
-moz-transition: background-color .5s ease-out;
-o-transition: background-color .5s ease-out;
transition: background-color .5s ease-out;
}
/*set the font color*/
.pa-header .et_pb_menu__menu>nav>ul>li>a {
color: #fff;
-webkit-transition: all .5s ease;
-moz-transition: all .5s ease;
-o-transition: all .5s ease;
transition: all .5s ease;
}
/*change the menu font color*/
.pa-fixed-header .et_pb_menu__menu>nav>ul>li>a {
color: #000!important;
-webkit-transition: all .5s ease;
-moz-transition: all .5s ease;
-o-transition: all .5s ease;
transition: all .5s ease;
}
/*replace the logo when scrolling*/
.pa-fixed-header .et_pb_image img {
content: url(http://ifh.wpengine.com/wp-content/uploads/2020/08/IFH-Logo-Black-Small.png);
}
html {
margin-top: 0px!important
}
Logo change is working in Google Chrome, Edge Developer & Brave browser but not in Firefox Developer Edition. On inspect, found that the CSS doesn’t have any effect in Firefox.
That’s weird! No idea why.
I have the same problem… in all the browsers works fine but in firefox wont change… any idea or solution?
Nelson, your tutorials are super-useful and easy to understand, many thanks.
I’ve used the code for replacing the logo on scroll. But then the new logo does NOT link back to the h’page, like the original logo did.
I got round that by hyperlinking the column the image sits in, and on desktop works fine. But not on tablet/phone view. Any ideas?
Regards, Robin.
Hi Robin,
That’s interesting, the link in the module should work either way. Otherwise there would not be any way to do it that I know of.
Hello Nelson,
I’ve successfully used your tutorials to create a global header with the Divi theme that swaps colors, logos and shrinks upon scroll.
I’m having trouble changing the menu (upon scroll) from centered (with logo on top) to left-aligned (with logo to the left). In the theme customizer this setting would be under menu > design > layout > style (left-aligned, centered, inline centered logo).
Is this something that can be changed, like your other tutorials, in the Theme Options > Custom CSS, with a line like .pa-fixed-header .et_pb_menu { code} or is this another beast entirely? I want the fixed header to have the menu style change from center to left-aligned.
Many thanks, you are awesome!
Andrew
Hi Andrew,
Unfortunately that would not work, that would require changing the actual struction of the module, which may be possible by hacking it with jquery, but that is something you would need to hire someone to do.
Yeah, that makes sense after using the inspect tool to check out the code structure… it appeared that attribute of the module was deeper in the theme css. I eventually gave up on it to get the website going and just went a different route entirely and it’s all good. Work with what I got, ya know.
But thanks in general… these tutorials are very helpful for those of us that aren’t adept at code. I barely understand it and was able to accomplish most of what I was going for with your instructions. Some day, I might take a stab at learning from the beginning if the work warrants. I prefer to work on aesthetic, but ultimately knowing the code would allow me to execute the vision better.
Cheers mate, thanks for responding.
Great tutorial. and all the others that led to this one are great too.
My question is: What css should be used if I only want the logo to change to another after I scroll down past 40% of the hero section/viewport?
Hey Kevin,
Could you please provide the URL of the website for me to investigate it further?
Thanks Nelson, great tutorial, but my logo link URL no longer works when scrolling (sticky active), can you help me? I greatly appreciate your help.
This sounds like something you would need to contact Elegant Themes about.
Hi Nelson, I’m replying your comment on this blog post’s YouTube video. Basically I have Image module for the logo and when it changes on scroll the new logo doesn’t have a link assoisiated with it. Looking to have the image link back to the homepage. I have made the class is .et_pb_image just fyi
Thanks!
Hi Collin!
Could you please provide the URL of the website for me to investigate it further?
Hello,
Thanks for this tutorial!
How to make clickable (add a link) on the second logo to scroll?
Thanks!
Hi Massimo!
The sticky logo will be using the same link as the static one. Make sure to add the logo link in Menu settings > Content > Link > Logo link.
Hope it helps!
Hello Thanks a lot for this tuto. It works fine but I’d like to change the colour of the hamburger icon when scrolling from white to blue, but despite all my attempts I can’t manage it. Could you please help me?
Hi Dikra!
You can change the Hamburger icon color in the Menu module. Go to Menu module > Design > Icons > Hamburger icon color > Switch to sticky mode and change the color.
Hope it helps!