Divi Blog Sidebar List Of Recent Posts
Everyone likes a fun and practical tutorial, and this one describes both of those. We are going to use a Divi blog module and put it in our sidebar area and display recent posts. Without this method, you would need to use a widget, but this method gives us much more freedom. Be sure to check out all the blog related tutorials in our Divi Blog tutorial series, and we have more to come!
▶️ Please watch the video above to get all the exciting details! 👆
1. Set Up The Divi Blog Module
Set the Blog module to fullwidth under the Design tab>Layout (this is already set by default). You can style the title text and meta however you want. Also note that I only have the Image, Title, and Date showing.
You probably want to do this on the main blog Archive page or in a Theme Builder Template. Note that this is not a widget, so if you are using widgets for other things, just place this module above or below the sidebar module on your blog page or Theme Builder template.
2. Add A Custom CSS Class To the Blog Module
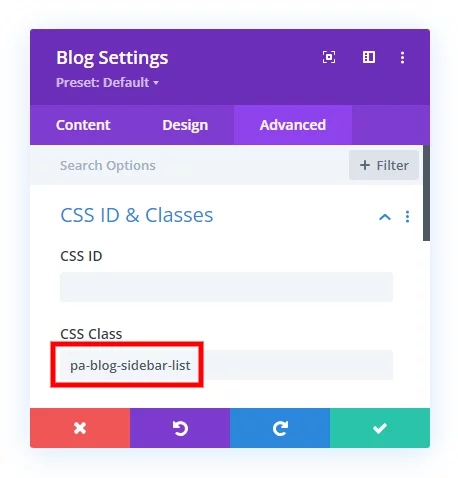
Next, add a custom CSS class in the module. Go to the Advanced tab to the Custom CSS ID & Classes toggle and add “pa-blog-sidebar-list” to the CSS Class input field.

3. Copy & Paste The CSS Snippet
The last step is to copy and paste the CSS code snippet below into your Divi website.
Where To Paste The CSS Code
1. Divi Assistant
If you are using our Divi Assistant plugin, simply paste the code in the CSS tab in the custom code window in the Divi Visual Builder.
2. Child Theme
If you are using a child theme, paste this code into the style.css file. If you don't have a child theme, you can generate a child theme directly on your site or download our free child theme.
3. Divi Theme Options Integration
Otherwise, paste this code in your Divi>Theme Options>Custom CSS code box.
If you need help understanding where to paste the code, please check out our complete guide about where to add custom code In Divi.
/*set the image width*/

.pa-blog-sidebar-list .entry-featured-image-url {
	width: 100px;
	float: left;
	margin-bottom: 0!important;
}


/*set the text width*/

.pa-blog-sidebar-list .entry-title,
.pa-blog-sidebar-list .post-meta {
	width: calc(100% - 100px);
	float: left;
	padding-left: 20px;
}


/*make the image square*/

.pa-blog-sidebar-list .entry-featured-image-url {
	padding-top: 100px;
	display: block;
}

.pa-blog-sidebar-list .entry-featured-image-url img {
	position: absolute;
	height: 100%;
	width: 100%;
	top: 0;
	left: 0;
	right: 0;
	bottom: 0;
	object-fit: cover;
}


/*adjust the spacing and add a border between the posts*/

.pa-blog-sidebar-list .et_pb_post:not(:last-child) {
	border-bottom: 1px solid #dddddd!important;
	padding-bottom: 20px;
	margin-bottom: 20px;
}
4. View The Result
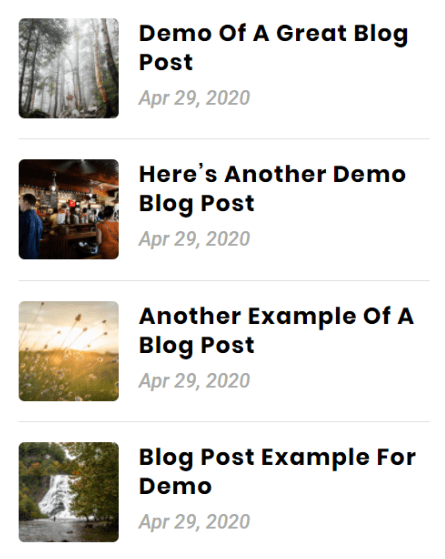
Now you can check the frontend and view how this looks! This screenshot shows how it could look when using the same design settings.

You may notice that we made the image square. We set it to 100px height and width, so if you want to change this, just change 100px to something else every place you see it in the code.
And of course we adjusted the title text, meta text, and made the image rounded corners in the module settings.
That was a fun one, right?


Looking for some help! I have the exact code pasted in above with your instructions. However, i need there to be less space between the blog posts. Any idea what I can do?
Adjusting the padding-left and padding-bottom like you do in the video doesn’t work for this one, the changes just don’t do anything. Top of link included in post.
Thanks!
Hi Spencer,
Yes that is already part of the tutorial, you can see the margin-bottom: 20px; at the bottom of the snippet, just adjust that however you want it (the default in Divi is 60px which we are overriding).
Hi, I just did what you as what you teach on the video and I want to have less space on the top margin but couldn’t seem to be able to do it…and I didn’t find the right coding to adjust it to.
Hey Dena,
It would be great if you could provide the URL of the page where the sidebar is present so I can grab the right selector and write a code for you.
Hi, i did that tutorial on my blog post :https://www.peeayecreative.com/how-to-reorder-the-divi-blog-image-title-meta-excerpt-and-button/
unfortunatly now i cannot have the feed with the recent post looking like your exemple…
do you have any solution ?
thank you
I am afraid that I am not able to replicate the issue on my end about this code. Please try using a different browser or device and see if that helps.
Hello,
Recently I am starting my blog with DIVI and you are a very big help with all the tutorials you provide. Thank you in advance.
I am trying to replicate your code in the custom CSS field but I always get an error of Expected RBRACE.
The code is copied as you mention above but I always get the same error.
—————————————————————
/*set the image width*/
.pa-blog-sidebar-list .entry-featured-image-url {
(Expected RBRACE. error appears here.)
width: 100px;
float: left;
margin-bottom: 0!important;
}
—————————————————————
There is no code apart from the code you provided and even like this I always get the error. Hope you can help.
Hi David,
The RBRACE error appears when we don’t close the curly braces after placing the CSS properties but the code you have placed in your comment has both of them so I guess the issue is not that. Sometimes the Custom CSS Panel behaves absurdly and through errors without even having the issue so could you please check if the code is working fine or not on the frontend?
Let me know how it goes. 🙂
Your vieo tutorials are the best out there on Divi
Hi Hameed,
We are greatful that you are liking our work. Please stay tuned for more amazing content like that.
Hi Thanks for all the content.
This is great but I would just like the image and text to stack on responsive. Any help on how I can make this happen.
Image
Title
excerpt
So not like this https://drive.google.com/file/d/1UdTGjKi91qYMvjaLKUpe3f0soxcW6LPp/view?usp=drivesdk
Thanks
Hey Jim,
I have investigated the URL provided and everything looks fine on my end.
Hi, I used your css code in blog. Everything looks nice only that there are too large gaps on the smartphone. How to reduce them?
Hey Ralph,
Could you please share the URL of the exact page where the issue is happening in order for me to investigate it further?
Love this list! I added to this site and now the blog page images are hidden. https://dianamurphycoaching.com/blog/. Any idea why?
I’m also using a plugin called Divi Toolbox that makes the images for the blog all the same size.
in addition, when I’m on any given blog post, the excerpt is shown in the footer with your code, yet only for the first post. Any suggestions?
Thanks in advance!
Hey Sheila,
The height of the anchor tag in which the image is present is set to zero and that’s why you are not able to see the image. Please use this snippet and see if that helps.
.dtb-blog article a{

    height: auto !important;

}
This almost worked. I set the height to 150px and that solved it. :-). Thanks!
This is still weird thought…. when I’m on any given blog post, the excerpt is shown in the footer with your code, yet only for the first post. Any suggestions?
https://dianamurphycoaching.com/does-overwhelm-need-to-be-solved/
Hi Sheila,
That would have nothing to do with the tutorial. If each post has excerpts added in the actual post, and they are not showing, then you can contact Elegant Themes support.
Always there when I need you. Like a trusty companion.
Thanks again!
Glad to hear that, Nathan! You’re welcome!
HI, Nelson Lee Miller (aka The Divi Teacher)
I WANT POST LIST WITHOUT IMAGE IN SIDEBAR ONLY AND ALSO POST WITH BULLET SIGN
LIKE
* KDJASK SDJAS ADKH HJHHH
* JADSKHJDHAJ JDALK KLNDFKLAS
* JDKA ASKSD AKSJDKL AKSKJD
Hello Kishan!
Please go to Blog Module Settings > Content > Element and turn off “Show Featured Image” if you want the featured image to remove from the Sidebar.
https://prnt.sc/wb-RXjLB3n5P
Regarding the bullet sign, could you please share the exact page URL so I can provide you the CSS code accordingly?
Thank you!
Hi, this is a great tutorial and helped very much! Is there a way to adjust the size of the title? It is a little bit too big but I am not familiar with CSS codes ;o)
Thanks and kind regards,
Janine
You can adjust anything in the Blog module with the built-in design settings in Divi.
Hi, this is great tutorial, thank you! But i have a problem. How can I center the text vertically next to the image? I tried several css but none of them worked.
Hi Andy!
Please try adding the following code to vertically center the image:
.pa-blog-sidebar-list .entry-featured-image-url img {
top: 25% !important;
}
If the issue persists, could you please share the exact page URL so I can provide you the CSS code accordingly?
Is there anyway that you know of to instead show the viewers most recently viewed posts/pages instead of the most recently created?
Hi Alex!
I’m afraid the functionality is out of scope of the guide. You can try using a third party plugin for the requirement.
Oh thank you very much! it was just what I was looking for to customize the website we created with my MAGNET agency.
Showing blog posts like this in the footer definitely looks more professional. I don’t understand why DIVI didn’t implement this possibility right away!
Hi Simone!
You’re very welcome! you can contact the Elegant Themes support and ask them to add this feature request.
Hi Hemant! Thank you so much for this tutorial. Can you make a tutorial on generatepress theme?
Hi Dashy!
You’re very welcome! Sure, we will look forward to tutorials for other themes as well in the future!
Hello,
I have the same problem as Andy. I also tried your code
.pa-blog-sidebar-list .entry-featured-image-url img {
top: 25% !important;
}
but it only crops the image at the top. Any way to fix this?
Thanks!
Hi Yen!
Can you share the URL of the page to investigate further?
I love having the blog in the sidebar. The issue I am facing is with the 3 blogs in the sidebar I am getting errors that there are multiple H1’s on the page.
What can I adjust so I am just showing the main blog title as the H1?
Thanks for your help!
I am not sure what you mean, as the blog does not have any H1s – it uses H2s by default. What do you mean by errors? If you are referring to some SEO checker, then they are wrong, as Google says more than one H1 is fine.
hello! Thank you for your valuable content 😀
Consult….I could use this same system to (on mobile) make a restaurant menu card and each of the restaurant menu items would be made as Blog entries and by clicking on an item from this list (which you showed now) a pop-up window appears with the complete development of the dish (text, image and price)? do you think it is possible?
(That’s how it occurs to me that I could just create entries or posts on the blog and they appear in the front 🙂
Greetings!
Hi Victor,
Sure, you could also make a custom post type for the menu items instead of using the default Posts, but that is up to you.