The Only Solution Out There
I know may of you look for ways to add a caption text to your Divi images, especially for blog posts. But there simply is no way to do it without copying the entire module PHP code to your child theme and hacking it up – until now! We love innovative solutions, and have come up with a way to modify the existing Divi Image module and add the required code to add the caption text from WordPress into the image module. This easy tutorial will walk through the steps from adding the caption, enabling a setting, and adjusting the design. Enjoy!
▶️ Please watch the video above to get all the exciting details! 👆
1. Add The Caption Text To The Image In The WordPress Media Library
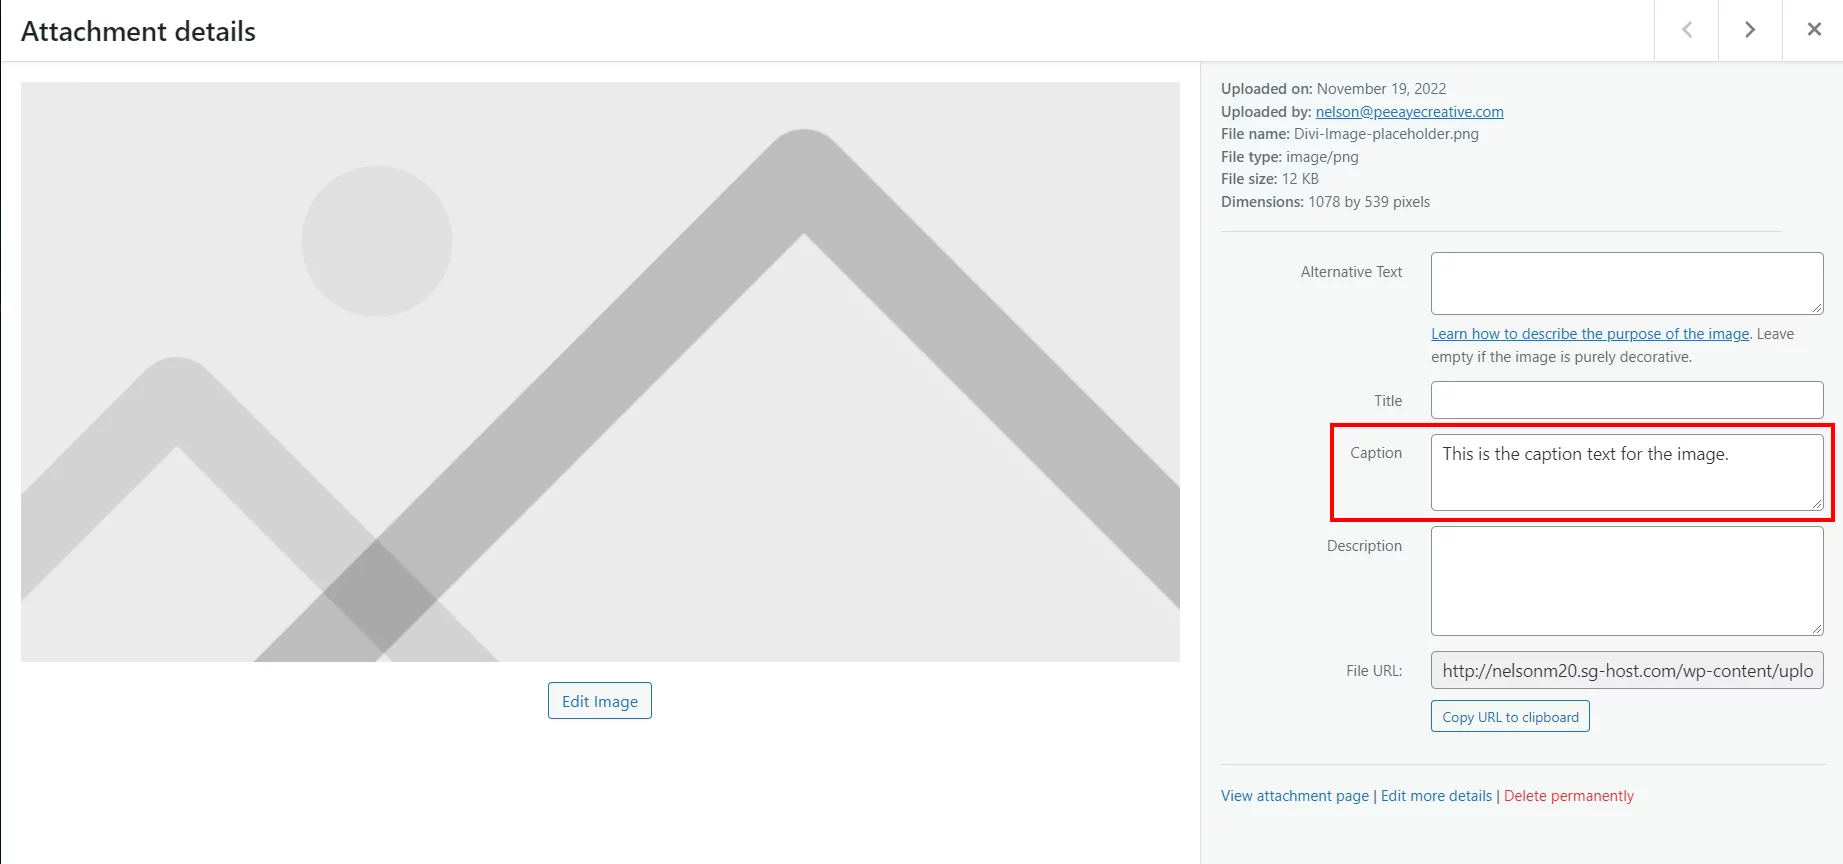
The first step is to add the caption text to the actual image. This is a WordPress related feature, and can be added to the image details in the WordPress Media Library. Just go to your Dashboard and click on Media>Library in the left side menu, then find the image and click on it. The Attachment details screen will open. On the right side will be the Caption input field where you can write your image caption text.
2. Install The Free Divi Image Helper Plugin
We are pleased to offer a FREE plugin that adds the caption text as a feature to the existing Divi Image module. Just download the Divi Image Helper plugin, install it on your website, activate the plugin, and the new settings will automatically appear in every Divi Image module on your site!
3. Enable The Caption Text For A Divi Image Module
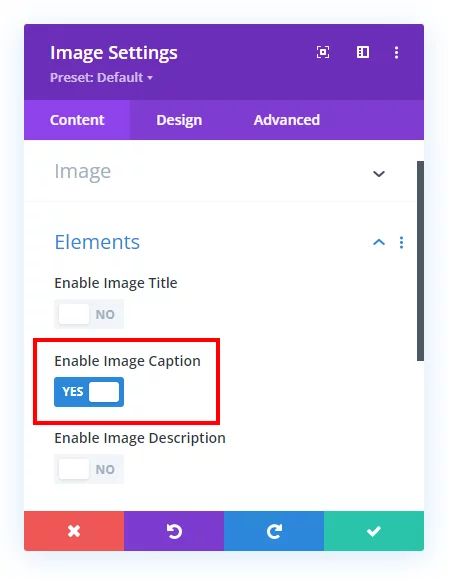
As I mentioned, when you activate the plugin, new settings are automatically added in all of your existing Divi Image modules. So the last step is to either add a new Image module or go to an existing image, and open the module settings. You will notice new settings have been added in various places by the plugin, one of those being the new Elements toggle, which contains a setting called Enable Image Caption. Simply enable this setting, and the text you entered in the image in step #1 will appear below the image when you exit the Visual Builder and view it on the frontend.
4. Adjust the Caption Text Design
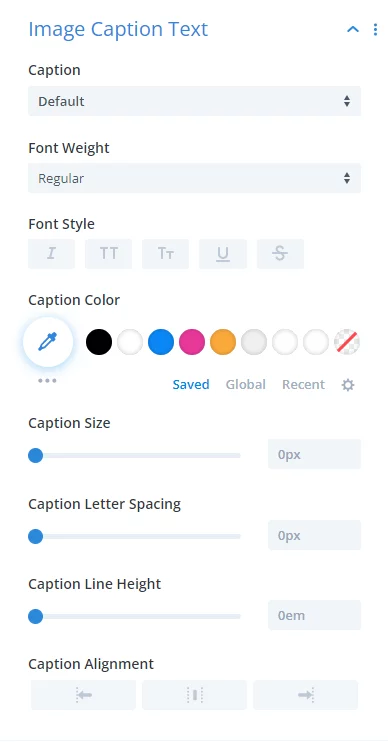
We also added all the text and font design settings you could need to customize and style the caption text! Just head over to the Design tab, scroll down to the Image Caption Text toggle, and adjust the text according to your own preferences. (Since Divi cannot render custom settings, these design styles will take effect when you exit the builder.)





Hi, thanks.
It would be great if it were possible to add the caption text on the image itself, and with a background or the text to stand out when its placed on the image.
Hi Tonny, yes you can do this, just use our settings in the Overlay toggle.
Dont Work!
We just released a new version with a fix for the aspect ratio feature on some iOS devices, I assume that is what you meant.
hi nelson how are you
Doing well, thank you!
The Caption text isn’t showing on mobile, just on desktop. Any solutions?
Hmm we are not aware of any issue like that, you can reach out to our support team and we will take a look!
Hello. I am not able to reduce the caption letter spacing to less than 1px. Is there any option to do that?
sorry, problem already solved, I don’t know what happened yesterday…
on the other hand it would be very interesting to be able to see the caption in the visual editor
We can’t control the Visual Builder, only Divi can do that as we mention often after Divi 5.0.
I am not sure what you mean, there is no issue like this for us. Maybe you have a preset. You can share more info with a video to our support team.
Hi, I followed your instructions and have done it twice but I can´t see the caption on frontend. The new setting are there and I have written a caption but no luck…
I am not sure about this, but we did find some issues with iOS that we fixed. Can you download the latest version from your account and try again? If it continues send us an email!
Hey Nelson,
thank you so much for offering a free plugin!
I just want to let you know, that the plugin doesn’t work for me either. Neither the aspect ratio functionality nor the subtitles. As there have been some similar posts recently, there might be an unsolved issue. I didn’t want to complain on a free plugin – just a kind info… 😉
All the best from Germany
Thomas
That issue was only on iOS, we have fixed all issues now in latest 1.0.2 build which you can download from your account.
I absolutely love this plugin. Is there a way to adjust the spacing between the caption and the image? Maybe just with CSS? I can’t figure out the selector for the caption itself…
I’m so glad you love it, could you leave us a review on the product page? That would be awesome! Yes you can easily adjust the spacing between the text and the image in the design settings. Just go to the Design tab and open the Caption Text design settings and adjust the margin or padding.
Nice add-on. Many thanks. The spacing between image and caption is adjusted in Design Tab > Image Details Container > Padding-Top
Love this, thank you!
Is there any way I can set the caption text to be visible only on mouse over?
And would you consider making a similar plugin for the gallery-module? That’s where I really miss showing text on individual images / being in control of the design.
Regards form Denmark.
Hi Sigrun!
Please go to Image module settings > Advanced > CSS ID and class > CSS class, and add the class pa-image in it.
Then add the CSS code:
.pa-image .pac_dih__image_details .pac_dih__caption{
opacity: 0;
}
.pa-image:hover .pac_dih__image_details .pac_dih__caption{
opacity: 1 !important;
}
Also, we have provided design control to the caption in Image settings > Design > Image caption text.
Let me know how it goes!
Hi Nelson, and thanks for the plugin. Unfortunately, it doesn’t seem to work for background images. I’m using a Fullwidth header module, with the background image assigned as the featured image. None of the plugin settings appear in this case. Ideas?
Right, this is literally the Divi Image Helper, for the Image module, and has nothing to do with the fullwidth header or background images.
Hi! I love your work and im learning a lot with you. Now iim working on a blog and I would like to know if there is some option for the captions of the blog module so i can customize the caption of the images of the post. The default is quite ugly/boring. Thanks in advance!
Hi Beatriz!
I’m afraid it is not possible right now. However, we will consider the feature for our future products or guides. Thank you!
Hi,
It’s not working for me.
Hi Diane!
Can you please share the URL of the page so that I can check further?
Hi,
Thank you for your solution. How do you do for featured images in posts ?
It would work the same way, just use the Theme Builder template and be sure to add the caption text to the image in the media library.
Great plugin, thanks for sharing. That’s it, no extra BUT…. hahaha like many of the comments. It worked first time everytime and very kind of you to offer it up for no charge.
haha you are welcome, so glad you like it and I’m happy to do this for the Divi community!
Is there a way to play with the spacing between captions. The spacing between my caption title and description title is big enough to be an eye sour
Hi Jamie!
Please add the following code in Theme options > Custom CSS:
.pac_dih__image_details .pac_dih__caption{
margin-bottom: 0;
}
Let me know how it goes!
Hi
Just want to say thanks for creating this plugin. I was trying to add the image title, using the css content property but just couldn’t get it to display how I wanted.
Amanda
Thank you Amanda, I appreciate your kind words!
Hi Nelson! Thanks a lot for another lifesaver!
It works fine on individual posts or pages but I couldn’t figure out how to make it work from Divi Builder for blog posts as it shows here: (https://share.getcloudapp.com/2NupAEgE)
Please let me know what I am doing wrong
Hi Vera, I am not sure what you mean, but please be sure to be using the Image module (your screenshot show a Post Title module).
Hi Nelson,
Is there a CSS way to enable globally the Image Caption Text over all pages ?
You can try the built-in Divi features like extend feature or presets, I have never tried them with these custom settings.
Thank you for this. One issue, when I have an image module aligned left and the caption center, the caption text centers in the center of the module and not centered under the image which puts it on the right bottom corner of the image. Link to the example page is in the website field. Is there a way to make sure it centers with the image and not with the entire module?
I didn’t quite understand. Is the image also aligned to center? Sounds like that is what you are missing.
Right, centering the image module makes the caption centered, but for a use case where you want a left aligned image this will center under the module’s center regardless of where the image is centered. Does that make sense? If I align the image left, the caption will not be centered under the image, it will be centered under the module itself.
But centering the image works so I’ll just use that. Thanks!
Hi William!
The caption under the image also moves when the alignment of the module gets changed. Just make sure, change the alignment in Image settings > Design > Alignment.
Let me know how it goes!
Hi! The caption text doesn’t show in the visual builder… Is that correct functionality? Thanks for the free plugin!
Hi John!
You’re very welcome! I’m afraid yes, the caption won’t show in the builder.
Hey, glad to have found this plugin, thank you. Is there a way to have the caption and the image side by side? (and even more difficult: the caption on the left and the image on the right?). Cheers.
Hi Samuel,
That should be pretty easy with CSS, but no setting for that kind of thing as that soon becomes a Blurb. But yeah I assume should be pretty easy with CSS.
Great! Thanks. Works so well. And I just saw above that it works with text over the image – thought I would need to figure that out myself.
That’s great to hear, Florence! I’m glad it works well for you!
Hello! This super great and so glad it’s free! I used the code to minimize the spacing between the caption and description and it works great..
But I wonder, is it possible to have the description first, and then caption? and have it be on one line? Like not stacked on top of each other but as a “continuation”? I added the website below:
https://clone.flowermag.com/martha-stewarts-summer-getaway-skylands/
Hi Anna,
I have never seen an image caption above an image, only below. We don’t have any other settings built in for what you described.
no sorry, i was talking about switching the caption and description. having the description first and then the caption. instead of caption, then description.
You can try it with The CSS order properties, but it would probably not be ideal.
.pac_dih__image_details {
display: flex;
}
.pac_dih__caption {
order: 2;
}
.pac_dih__description {
order: 1;
}
very nice work man
Thank you Ephraim!
Hey Nelson – great plugin! It would be great to see this same caption capability extended to the video module as well if this is possible? thanks!
Hi Gaby,
I never heard of captions in a video like this, so I don’t think we would do that. Captions are for images only as far as I know.