Beautiful Divi Blog Pagination
We’ve been having a lot of fun with the Divi Blog tutorial series, and we are not done yet! Today we add beauty and functionality all at once with some great pagination! I give you two methods. You can style and customize the default next and previous buttons, or you can add advanced pagination with the WP-PageNavi plugin. Both are great, and fit beautifully into our blog series. I hope you learn something new today!
▶️ Please watch the video above to get all the exciting details! 👆
Adjust The Divi Pagination Design Settings
You can start by adjusting some of the basic settings that are included in the Blog module design tab under the Pagination Text toggle. It is very strange, but they treat these links as text rather than links, just like the Divi Blog read more text tutorial. This is why you need this tutorial and snippet.
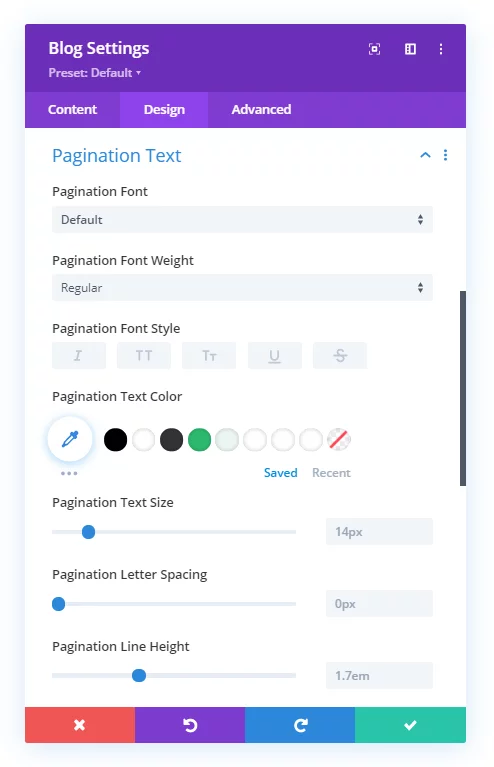
So go ahead and start with things like the font, font weight, text size, text color, etc.
Change The Divi Blog Pagination Text Links Into Buttons
Now that we have some basic design styles set, let’s continue by adding some CSS to make the pagination links look more like buttons. We are adding a background color, border, and hover effect.
Where To Paste The CSS Code
1. Divi Assistant
If you are using our Divi Assistant plugin, simply paste the code in the CSS tab in the custom code window in the Divi Visual Builder.
2. Child Theme
If you are using a child theme, paste this code into the style.css file. If you don't have a child theme, you can generate a child theme directly on your site or download our free child theme.
3. Divi Theme Options Integration
Otherwise, paste this code in your Divi>Theme Options>Custom CSS code box.
If you need help understanding where to paste the code, please check out our complete guide about where to add custom code In Divi.
/*style the Divi blog pagination buttons*/

.pagination .alignleft a,
.pagination .alignright a {
  color: #ffffff;
	background: #0071fc;
	border: 2px solid #0070fc;
	padding: .7em 1.3em;
	border-radius: 50px;
	text-transform: capitalize;
	transition: all 0.3s ease-in-out;
}

/*style the Divi blog pagination buttons on hover*/

.pagination .alignleft a:hover,
.pagination .alignright a:hover {
	background: transparent;
  color: #0070fc;
	border: 2px solid #0070fc;
	transition: all 0.3s ease-in-out;
}
Add Advanced Pagination Page Numbers With The WP-PageNavi Plugin
On our main blog page and most of the websites I design, I like to use the plugin called WP-PageNavi. This plugin adds advanced pagination to the Divi Blog module. Just by installing and activating the plugin, it replaces the old ← Older posts | Newer posts → links with numbered page links. I really like this and think its a great addition to every blog.
Once you install and activate the plugin, the pagination automatically appears in the blog module. There are no other settings, so all you have to do now is style the pagination. I don’t like how it looks by default, here is a screenshot:
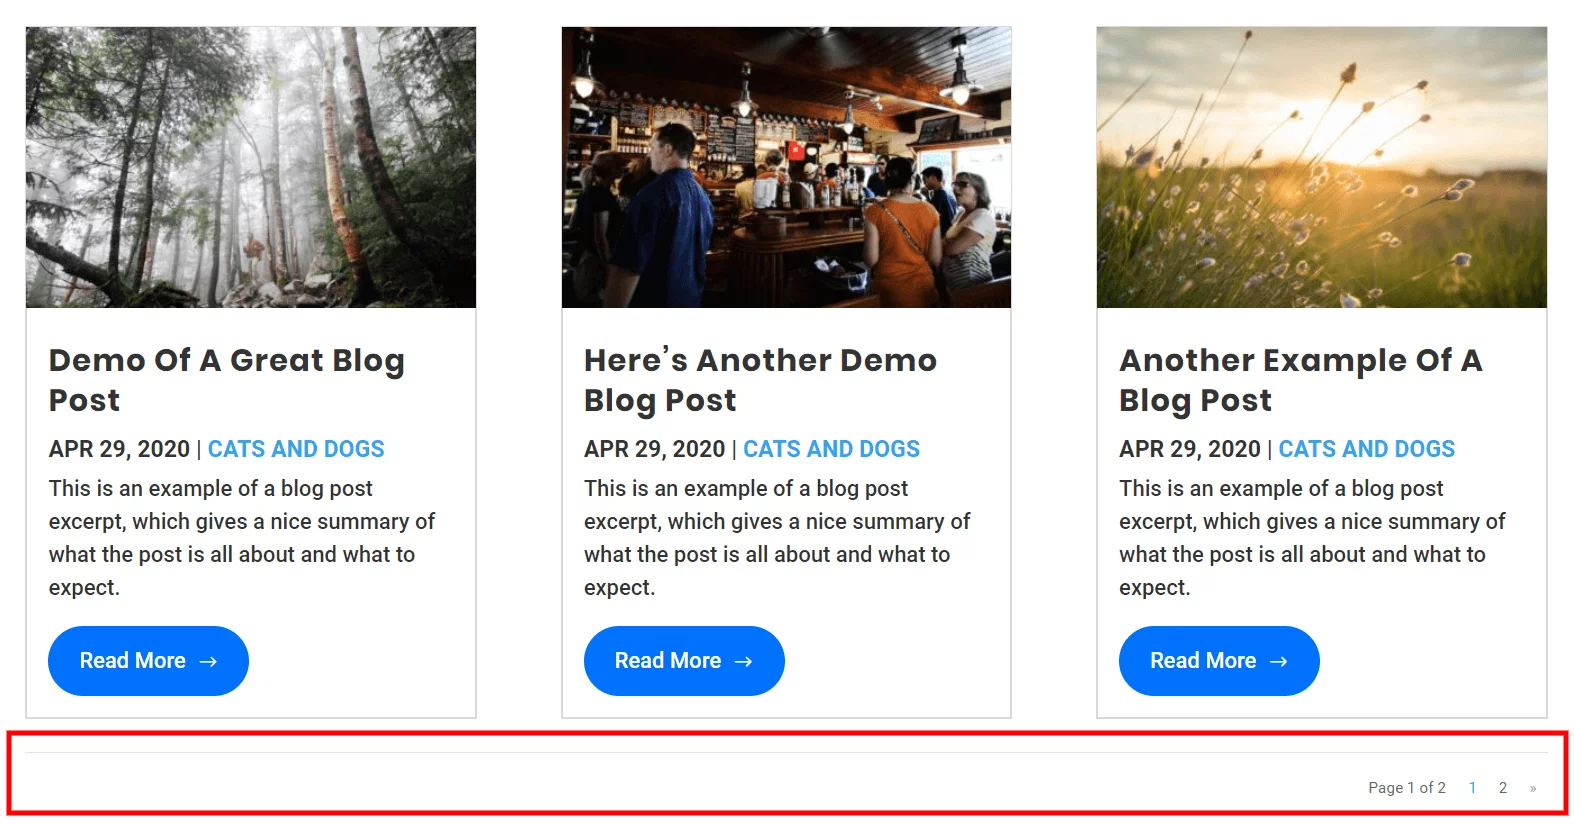
We can improve this quite a lot with some CSS! We go over all the details in the video, so be sure to always watch those since they accompany the blog posts.
You can add the code to your website by copying and pasting the entire snippet below. If you are using our free Divi child theme, place this snippet into the style.css file. Otherwise, place this in your Divi>Theme Options>Custom CSS code box.
/*style the wp-pagenavi pagination links*/

.wp-pagenavi a,
.wp-pagenavi span {
	color: #000000;
	background: #f1f3f5;
	font-size: 1em !important;
	line-height: 1em;
	font-weight: bold !important;
	padding: 0.45em 0.8em !important;
	border-radius: 100px;
  border: none;
	transition: all .5s;
}


/*style the wp-pagenavi current page number*/

.wp-pagenavi span.current {
	color: #ffffff !important;
	background: #0070fc !important;
	border-radius: 100px;
}


/*style the wp-pagenavi pagination links on hover*/

.wp-pagenavi a:hover {
	color: #ffffff!important;
	background: #0070fc!important;
}


/*style the wp-pagenavi pages text*/

.wp-pagenavi .pages {
	background: none;
}


/*remove border and center the wp-pagenavi links*/

.wp-pagenavi {
	border-top: none;
	text-align: center;
}
Try to read what each of the parts are doing. The first part styles the numbers, the next one styles the current page number, the next one styls the numbers when hovering, the nexts one hides teh background around the pages, and the last one removes the border and centers the entire pagination. Again, we go over all of this in the video, so if you are serious about learning, be sure to watch that.
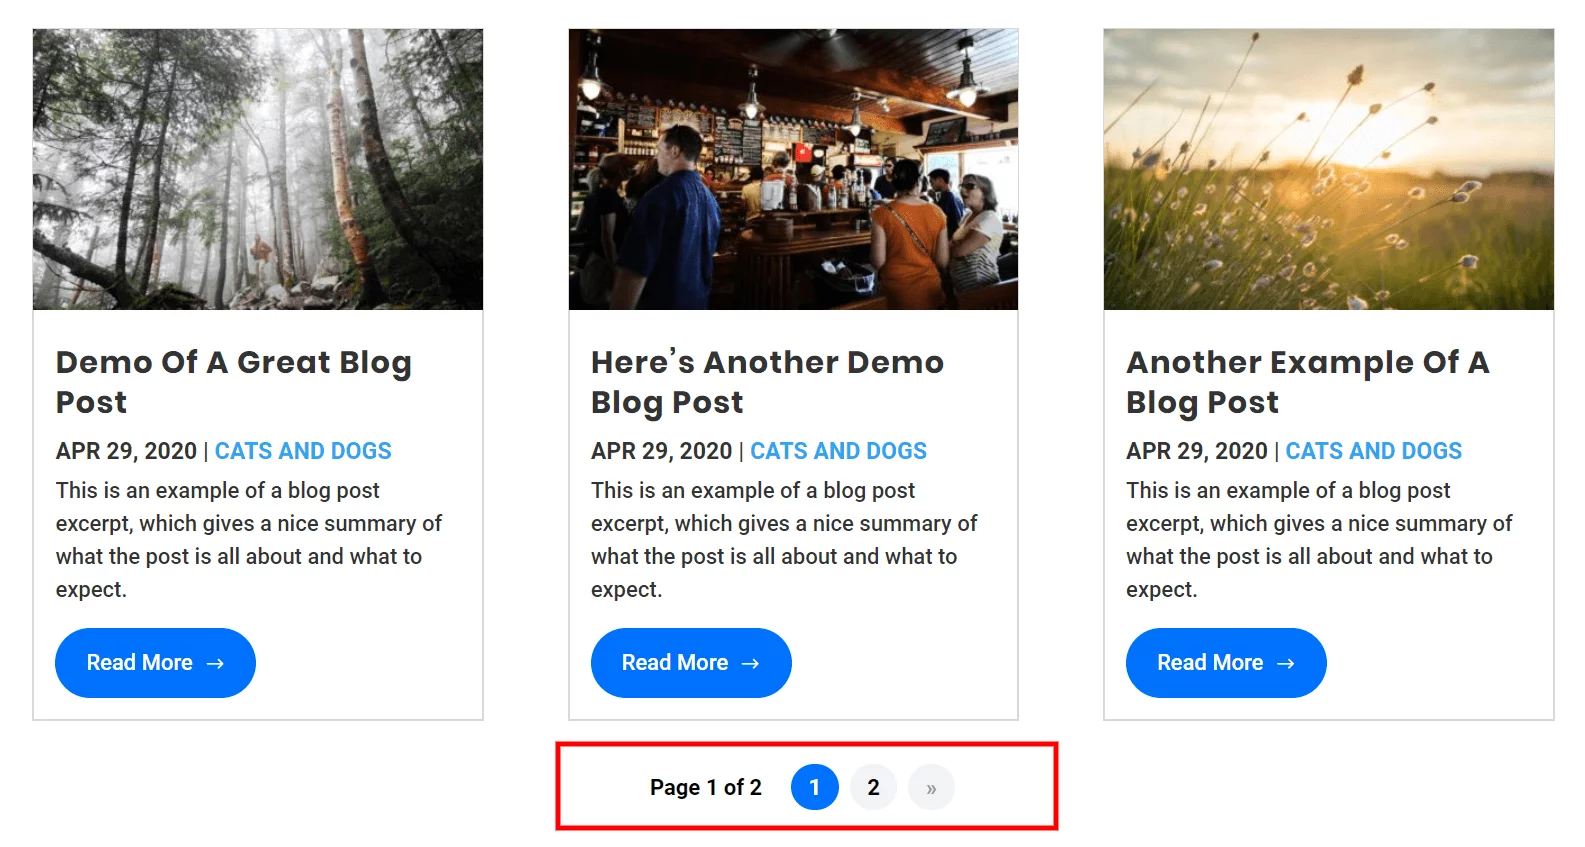
Here’s the final result using the WP-PageNavi plugin and CSS to add and style our Divi Blog module pagination:




I’d like to recommend that you dock the settings block so that you display the entire builder.when you are teaching.
Thanks for the suggestion Ben. Although I don’t think I have ever docked it in my entire life, so I probably won’t start now unless there is some sort of definite benefit to the viewers.
Excellent tutorial, thank you
You’re welcome Aidan!
Is there a way to add pagination to a specific post?
Hi Thomas, sure, just use the Divi Post Navigation module, best used in a Theme Builder template.
hey Nelson, yet again another awesome and useful tut! (Reading PA area here btw) Is there a way to use jquery with the pagenavi plugin to customize the pagination text like you did with the read more button? thanks in advance
Thanks Eric,
I’m glad you like it! I’m not sure, I think that would involve customize the pagenavi plugin but I am sure it could be done or maybe someone already would have a tutorial specific to that plugin.
Hi, followed the tutorial “How To Style And Customize The Divi Blog Pagination” from youtube, but when I try to see the page in safari or firefox, pagination does not appear. Only in chrome, what can this be? see my site, thanx a lot for any help! Living my site here so you can take a look.
Hi Maria,
I’m not sure, you should contact Elegant Themes or your hosting provider or a developer.
Nelson, your are great. You always have the best solutions!
Hi, thanx great tutorial, how do you adjust font size etc CSS for mobiles (& tablets/ipad)?
Hi Olivier,
You could do that by using a different font size unit such as rem, em, vw, etc or by using media queries for each size. https://www.peeayecreative.com/how-to-add-custom-css-media-queries-to-divi-for-making-your-site-responsive/
Dear Nelson, I just used the WP pagination module that you described above. It works very well and your style CSS is very good.
I just suggest if you can add another piece of CSS for the previous – next post link “«” “»”, so they will match the color of “Page 1 of 2”:
/*style the next-previous post link «» */
.wp-pagenavi .nextpostslink, .wp-pagenavi .previouspostslink {
color: #000000!important;
}
Thank you. You are doing a great job
Thank you for sharing this tutorial. I have several sites built in DIVI and the pagination has always bothered me. In fact, I don’t understand why DIVI doesn’t have a native solution for this.
dear Nelson,
I have 2 questions
1. Why can’t I see my pagination in the middle?
2. Why do I see this code: Unexpected token ‘}’ at
.wp-pagenavi {
border-top: none;
text-align: center;
}
Could you please share the URL of the page where the pagination is for me to investigate further?
Dear Nelson you work is amazing but there is a problem.
Actually I want to break the content on my category page to several other pages. I am using blog module section on my category page so I have switched on the pagination button of this blog module and also have used WP-PageNavi plugin as guided by you.
Everything looks fancy after this but while clicking on the page buttons 2,3,4 etc the url of the page is not changing and instead the content on this same page is changing everytime.
When I checked the issue I found that when I am putting my cursor on 2,3,4 or any page buttons it showing the page number with ?et_blog. For example: When I am putting my cursor on 2nd page button it is showing – example.com/category/travel/page/2/?et_blog
Maybe because of this wrong url I am not able to go to other page Or maybe the page of this category has not been broken into another page, but the pagination of the section of the blog module alone has been done. I have also used the code for page break but it is not working in divi builder.
I wanna ask you that How to break the page of the category so that we can go to its second page and after breaking the primary page, our entire content can come to the second page. If you have any solution then please let us know. Many users have this same problem and they have complaint about this on divi forum also.
My website is not ready right now but for instance you can check this website. It is not mine but the owner of this website has the same issue –
theroadabroad . be/travel-blog/ (Please correct the url before pasting it in ur search bar)
Hi Nuvo,
As the Blog Module works on the Ajax functionality so it is nearly not possible to have a different second page as what Ajax does is it loads the different content on the same page. One thing that you can possibly do is create different pages with different categories checked in the blog module and then create custom pagination buttons using the button modules in a row and then giving them the link of the pages that you have created. You can place this buttons row in all the pages with the links so that visitor can navigate to any page from any category page.
Let us know if that helps. 🙂
What an incredible tutorial – so simple, yet so effective – thanks!
Hi Christian,
We are glad that you liked our tutorial. Stay tuned for more amazing tutorials like these.
This is a great post! I love the way the pagination looks using this. However, I think since this was done there were some updates to plugin and now there is some styling in the plugin that creates a some conflict with this CSS.
My pagination is smushed together once I turned off the CSS in the plugin itself. The small circles that hold each number (1,2,3, etc.) are pressed together. It looks OK, but would be better if there was a little space between them. I was thinking maybe some margin would work, but wasn’t sure.
Hey Michael,
I am afraid that I am not able to replicate the issue on my end. It would be great if you provide the URL of the page where the issue is present in order for me to investigate further.
Do you have any idea how to make this work with a Custom Post Type?
I’m not sure what you mean. The tutorial is for the blog, so it would work fine if the blog is showing custom post types, correct?
Does this work differently if you are using the divi builder plugin instead of the Divi Theme? I am using the divi builder plugin with the buddyboss theme (child) and changes that I put in the css file don’t seem to be working, is there a different stylesheet for the plugin?
Hey Michael,
I guess for the different theme please make sure that the CSS is being placed in the head tags and if they are not then you will need to right the php code in functions.php file containing the CSS and then hook it to the head to make it work.
Hi Nelson, thanks for the great tutorial. Is there a way to style wp-pagenavi differently on mobile? For example, on desktop I want to show 10 pages, but on mobile it’s too long and goes off the screen, so I would like to only display 3 pages with the next option. Do you know if this is possible? Here is a link to the site I am working on – http://box5402.temp.domains/~rojecttg/blog/
Sure, you can always style things differently on different devices by adding your CSS to media queries. https://www.peeayecreative.com/how-to-add-custom-css-media-queries-to-divi-for-making-your-site-responsive/
Great article! But I got one problem. The text color of the current page after turning off the visual editor remains black. And when you turn on the editor, it turns white again. I have static CSS disabled.
Hi Aibol!
Try clearing the plugin and server cache. If issue persists, could you please share the URL of the webpage? It will help me to understand the issue better.
Hello!
Thank you for this tutorial. It worked great but I have a small problem. I am displaying some blogs and Events from the Events Calendar plugin on the same page, and I need to make the pagination look the same for both. Any chance you could help me with applying the same css styling to the Events Calendar pagination?
Thank you!
Hi Ross!
Please use the following code for the numbered pagination of the Event calendar feed module:
#ecs-event-pagination a,
#ecs-event-pagination span {
color: #000000;
background: #f1f3f5;
font-size: 1em !important;
line-height: 1em;
font-weight: bold !important;
padding: 0.45em 0.8em !important;
border-radius: 100px;
transition: all .5s;
}
#ecs-event-pagination span.current {
color: #ffffff !important;
background: #0070fc !important;
border-radius: 100px;
}
#ecs-event-pagination a:hover {
color: #ffffff!important;
background: #0070fc!important;
}
#ecs-event-pagination .pages {
background: none;
}
#ecs-event-pagination {
border-top: none;
text-align: center;
}
Let us know if that helps. 🙂
You’re a legend!
I’m glad you are enjoying the resources! 🙂
Thank you for the styling the pagination video.
I have one additional question how can you change the text in the buttons? Like, change “Older Entries” to “Previous” and “Next Entries” to just “Next”?
Any help would be appreciated
thank you
Very easily, there are input fields in the module for that.
I thought Divi may have some pagination style but it disappointed me. I don’t want to use any extra plugins for this kind of thing. Is there any other way to do it without installing the plugins, please?
No, a plugin is just code, so whether the plugin or the Theme has the code does not make any difference. Remember, it is not about the quantity of plugins, but the quality.