Adding The Missing Read more Button To The Divi Blog Module
We are creating a great series on the Divi blog module, and before we can do some of our other tutorials we need to address the read more button. Oddly enough, this is treated as text rather than a button, so we are going to fix that and show you how to style and customize the Divi Blog module read more button and change it into a button.
▶️ Please watch the video above to get all the exciting details! 👆
Adjust The Basic Divi Design Settings
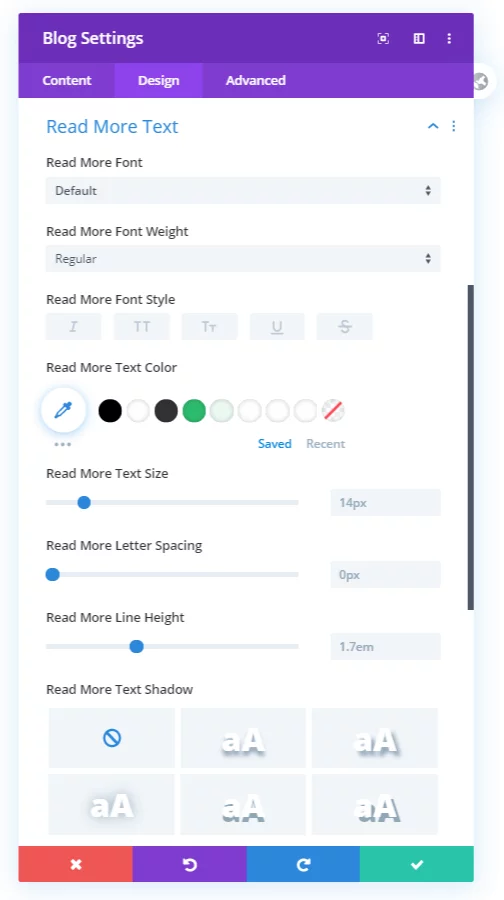
Start by styling what you can in the Divi settings. The weird thing is that they have incomplete settings, treating it like text instead of a button. Strange, but that’s why we need this tutorial and snippet.

So go ahead and start with things like the font, font weight, text size, text color, etc.
Make The Divi Blog Read More Text Link Into A Button
Now that we have some basic styles set, let’s continue by adding some CSS to make it look more like a button. We will be adding a background color, border, and hover effect.
Where To Paste The CSS Code
1. Divi Assistant
If you are using our Divi Assistant plugin, simply paste the code in the CSS tab in the custom code window in the Divi Visual Builder.
2. Child Theme
If you are using a child theme, paste this code into the style.css file. If you don't have a child theme, you can generate a child theme directly on your site or download our free child theme.
3. Divi Theme Options Integration
Otherwise, paste this code in your Divi>Theme Options>Custom CSS code box.
If you need help understanding where to paste the code, please check out our complete guide about where to add custom code In Divi.
/*style the Divi blog link text as a button*/

.et_pb_post a.more-link {
  color: #ffffff;
	background: #0071fc;
	border: 2px solid #0070fc;
	padding: .7em 1.3em;
	margin-top: 20px;
	border-radius: 50px;
	text-transform: capitalize;
	display: inline-block;
	transition: all 0.3s ease-in-out;
}


/*style the Divi blog link text as a button on hover*/

.et_pb_post a.more-link:hover {
	background: transparent;
	color: #0070fc;
	border: 2px solid #0070fc;
	transition: all 0.3s ease-in-out;
}
Add An Icon To The Divi Blog Read More Button
To add some more character to our button, let’s add an icon to it. This is especially important if you alrady use icons on your buttons across your site. This will help you be consistent and fill in a missing gap where there are missing Divi settings.
/*add an icon to the Divi blog read more button*/

.et_pb_post .more-link:after {
	content: "\24";
	font-family: ETModules;
	vertical-align: middle;
	margin-left: 10px;
}
The easiest way to change the icon is to go to the Elegant Themes blog post
Change The Actual Read More Text Terminology Into Something Else
A great way to customize this button is to change the words. So instead of using the default “Read More,” let’s change it to something else. In my example, I am going to change it to “View Full Post,” but of course you can make it say anything you want by replacing the words in the snippet.
Where To Paste The jQuery Code
1. Divi Assistant
If you are using our Divi Assistant plugin, simply paste the code in the jQuery tab in the custom code window in the Divi Visual Builder.
2. Child Theme
If you are using a child theme, paste this code into the scripts.js file (don't forget to remove the <script> tags at the beginning and end). If you don't have a child theme, you can generate a child theme directly on your site or download our free child theme.
3. Divi Theme Options Integration
Otherwise, paste this code in your Divi>Theme Options>Integrations tab in the "Add code to the < head > of your blog" code area.
If you need help understanding where to paste the code, please check out our complete guide about where to add custom code In Divi.
<script>
	jQuery(document).on('ready ajaxComplete', function () {
		//Replace read more link text
		jQuery(".et_pb_post a.more-link").html(function () {
			return jQuery(this).html().replace('read more', 'View Full Post');
		});
	});
</script>


Thank you so very much for this article.
I have a question, I added the .js script but it did not change the text
Hi Cletus,
Can you give me any context? Where you added it, did you clear cache, etc.
Your instructions state we should remove the tags. In the latest version of Divi, those tags ARE required to make the jquery code work.
Divi really should add some more customization options for this. It’s kinda lame not to allow for fine tuning the Read More options. So thanks for this article!
Hi Nelson, first let me thank you for your fantastic tutorials, you are a fantastic Divi teacher and your explanations are always crystal clear, even for a non developer like me. Today, however, I struggle with the modification of the read more button. I have added the jquery snippet to the head of my theme options but it does not trigger the expected change of text unfortunately. I am on a French version, so I have modified the “read more” with what I have in French which is “lire plus” in your snippet, but still no change…any idea why? Your help would be appreciated as I cannot leave this text in English on my website.
Me again, I realise that my problem comes from the fact that I am using a Child theme. I am not sure where and how precisely to insert the snippet then. Your guidance would be appreciated…all the best.
Hi Perret-Gentil!
You can add the CSS in Theme options > Custom CSS and script in Theme options > Integration > Head.
Let me know how it goes!
I also changed the text but it did not change as well.
Hi Marlon!
Can you please share a screenshot of the page to investigate further?
My designer wants different text for each post. We plan on reusing the same post so I pnly need to do about a dozen of them. Just change the date and content and repost. SO maybe I should be using an individual class for each? Where can I put the class in a post? Using DIVI for the content area. THanks.
Hi Jim,
I think I need some clarification. Are you talking about the blog module, or the blog posts?
Hi Nelson,
Thanks for the useful tutorial!
Is there any way to display custom fields (from the ACF plugin) on Divi Blog module in Grid mode?
Is there any plugin to inject a custom field value under the post title?
It’s possible to do it on Elementor loop using Elementor PRO and Elementor Custom Skin plugin.
Hi Senan, for that you will need the Divi Machine (my affiliate link) plugin. My friend Peter created it and I named it for him 🙂
Perfect! The js code was exactly what I needed to edit the Read More text only. Thanks Nelson:)
You’re welcome Amy! Glad this helped!
Great wee tutorial- this is exactly what I’ve been looking for, Thank you, Nelson
That’s great, Tom! So glad you found this!
This is wonderful. Can it be achieved for only selected blog modules – not all?
You can only change the text for all of them. As for styling, you could but that would be very difficult, you would need to select each one with advanced CSS.
Hi, How to solve this in the case of a multilingual website? Otherwise a perfect website!
Hi Bobo,
I’m really not sure, I’m not experience in multilingual at all. I’m sure here are ways.
Thanks you so much for the quality of your Tutorials Pee Aye Creative !
But I encounter a problem on hover effect read more button blog : I exactly follow your instructions but in hover effect I got nothing but just only the border with any text inside (it doesn’t appear). (in my case Color is #0021be)
I don’t know why it doesn’t work or what could be conflict ?
(I use the Divi builder)
Thanks for your help and your answer !
I would try adding !important to the color, that should solve it.
I’ve encountered the same issue, the hover color isn’t working even after adding !important
Hey Sarah,
I am afraid that I am not able to spot the Read More button so could you please direct me in the right direction?
I’m having this issue as well. Maybe something changed in Divi but I cannot change the background color of the button on hover no matter what I do.
It is working for me
Thank you, very helpful.
You’re welcome!
Thanks, Nelson brilliant as usual.
I have used change the read more script on one website and it works terrific. However, on another site, I have two blog modules with different categories and would like different text on each category but cannot see how I modify the script.
Please give different Custom Classes to each blog module by going to the Blog Module Settings > Advanced > CSS ID & Classes. For example, the classes that you have given to the blog modules are pa-blog-1 and pa-blog-2 respectively.
Now in the script, add these custom classes before .et_pb_post and this will work. So after adding the classes the script of the first blog module will become:
jQuery(document).on('ready ajaxComplete', function () { jQuery(".pa-blog-1 .et_pb_post a.more-link").html(function () { return jQuery(this).html().replace('read more', 'text you want to show for blog 1'); }); });and the second will become:
jQuery(document).on('ready ajaxComplete', function () { jQuery(".pa-blog-2 .et_pb_post a.more-link").html(function () { return jQuery(this).html().replace('read more', 'text you want to show for blog 2'); }); });Paste both of these codes in the WordPress Dashboard > Divi > Theme Options > Integrations > head panel and change the text in the script that you want to see in the button.
Please let us know if that helps. 🙂
Thank you very very much. You already answered the question I had 👍
Thank you so much, I was looking to do this for a specific blog module only. It worked beautifully!
Thank You, your tutorials are wonderful! Have you ever added a second button to the respective blog? So if I wanted a ‘Learn More’ and an ‘Apply Here’ to display – is that possible?
Hey Cammie, Could you please try placing the jQuery script inside the
Panel in Theme Options > Integrations and let me know if that helps?https://www.codepile.net/pile/Nop0zJod
This code will add the Apply Here button to each of the blog grids and you can place the URL at the place mentioned in the code. The more-link class is given to that button so the CSS snippets present in the guide can be used for styling of this button as well and one additional class is also present that is custom-link which can be used for specific customizations.
Dear Nelson, great tuto.
Unless i’m mistaken, on your snippet :
/*add an icon to the Divi blog read more button*/
.et_pb_post .more-link:after {
content: “24”;
it should be with an “\” before 24 : content: “\24”;
Best regards
Yes, it must have gotten stripped. I added it back not, thanks!
Hi Nelson
A great tutorial as always! I am trying to have have Read more as buttons in a grid portfolio, and I am using the Divi Tutorial https://intercom.help/elegantthemes/en/articles/3371227-blog-module-equal-height-grid-boxes-with-javascript to equalise blog module heights to get the boxes to line up.
The only problem is that it cuts the buttons off where a post has a longer title as the Javascript seems to only read the length of the text and not take the button size into account.
I have tried adding margin bottom to the button, but it didn’t change the cut-off issue.
Any ideas on how I can have both buttons and a nice equal grid?
Thanks
Ingrid
Hey there,
We also have a tutorial on the same and this is the URL: https://www.peeayecreative.com/how-to-make-the-divi-blog-grid-equal-height/
Please go through this guide and let us know how it goes.
Awesome! thanks so much for posting this. Very helpful.
Javier
Hi Javier,
We are glad that we could offer you some help. 🙂
Thank you very much for this tutorial! 🙂 It worked great before, but after one of the last updates (of divi/wordpress), I now get the error: “Uncaught TypeError: jQuery(…).on is not a function” for the first line of the snippet. Is the anything I can do?
Hi Vera,
The issue is happening because of the setting named “Defer Additional Third Party Scripts” under the Performance Tab. It is recommended to keep this setting closed as it can cause major conflicts on the website.
Thank you very much for this tutorial!
But why is the button NOT showing on my iphone?
It should be no?
Thanks!
It should be yes. I’m not sure why it wouldn’t be.
It looks like this only works with the Divi Theme and not the Divi Builder used on a different theme. Is that correct? I’ve tried it a bunch of different ways and it doesn’t work. Any ideas on how to use it with the builder as opposed to the theme?
Hi David,
I don’t see how that would make any difference for this particular tutorial, it is only specific to the Divi Builder (which is the same thing as part of the theme). It must be something else.
Any idea why adding “margin-top: 20px;” doesn’t actually increase the space between the post content and the read-more link? I’ve tried adding it in custom CSS in the blog module as well as in the main custom CSS like this:
.et_pb_post a.more-link {
margin-top: 20px !important;
}
Am I doing something wrong? It just doesn’t have any effect?
Hey Will,
The margin-top is not working because the display properly of the link is set to inline. If you want the margin to work, use display: block !important with the margin property and it will work.
Let me know how it goes.
How do I center the button? Right now it is left aligned.
Have you tried text-align: center;?
I’m trying to capitalize the first letter of Read more, but it only works on one of my pages as I have the blog module on multiple pages, how can I fix this?
Right now I have this written:
.et_pb_post a.more-link:first-letter {
text-transform: capitalize;
}
You can use text-transform: capitalize on the a.more-link and it will be fine (no need for first-letter). As for the whole site, that depends where you are putting the code.
I saw on one of your other tutorials you have the buttons aligned to the bottom of the module. How do you accomplish that?
That is done with jQuery in the other tutorial about equal height, and would only be relevant if the posts were equal height, otherwise they are at the bottom.
Thank you Nelson….I have multiple post type (blog, sermon, and job board). Is there a way to do this only for the job board…..everything else can be read more…but I want the job board to read “Sign me up”.
Thanks!
Mark
Hey Mark,
You can use a different blog module for just the Job Board and then change the Read More text to Sign me up for that module button and see if that helps.
Let me know how it goes.
Hey, thank you so much. your article really helped me a lot. I’m just confused about where should I post this code. in blog module?
CheesyMag
You’re welcome. I’m glad that it helped you. 🙂
You can have a look at our another tutorial about where to add Custom Code in Divi:
https://www.peeayecreative.com/where-to-add-custom-code-in-divi-css-javascript-php/
Hi Nelson. I am experiencing some hiccups with the hover effect on the “read more” button, after adding additional CSS to customize the pagination buttons. This results in the pagination buttons having a hover effect but not the “read more” butten. Could there be some conflicting CSS code?
Page Setting; Custom CSS:
/*style the Divi blog link text as a button*/
.et_pb_post a.more-link {
color: #ffffff;
background: #f79646;
border: 2px solid #f79646;
padding: .7em 1.3em;
margin-top: 20px;
border-radius: 3px;
text-transform: capitalize;
display: block;
transition: all 0.3s ease-in-out;
text-align: center
}
/*style the Divi blog link text as a button on hover*/
.et_pb_post a.more-link:hover {
background: transparent;
color: #f79646;
border: 2px solid #f79646;
transition: all 0.3s ease-in-out;
}
/*add a neceassry position to the blog posts*/
.et_pb_blog_grid .et_pb_post, .et_pb_posts .et_pb_post {
position: relative;
}
/*make the title link spread over the entire post*/
.et_pb_blog_grid .et_pb_post .entry-title a:after, .et_pb_posts .et_pb_post .entry-title a:after {
position: absolute;
display: block;
content: “”;
width: 100%;
height: 100%;
left: 0;
top: 0;
}
/*change the mouse cursor into a pointer*/
.et_pb_blog_grid .et_pb_post:hover, .et_pb_posts .et_pb_post:hover {
cursor: pointer;
}
/*style the Divi blog pagination buttons*/
.pagination .alignleft a,
.pagination .alignright a {
color: #ffffff;
background: #f79646;
border: 2px solid #f79646;
padding: .7em 1.3em;
border-radius: 50px;
text-transform: capitalize;
transition: all 0.3s ease-in-out;
}
/*style the Divi blog pagination buttons on hover*/
.pagination .alignleft a:hover,
.pagination .alignright a:hover {
background: transparent;
color: #f79646;
border: 2px solid #f79646;
transition: all 0.3s ease-in-out;
}
/*style the wp-pagenavi pagination links*/
.wp-pagenavi a,
.wp-pagenavi span {
color: #000000;
background: #f1f3f5;
font-size: 1em !important;
line-height: 1em;
font-weight: normal !important;
border: none;
padding: 0.45em 0.8em !important;
border-radius: 100px;
transition: all .5s;
}
/*style the wp-pagenavi current page number*/
.wp-pagenavi span.current {
color: #ffffff !important;
background: #f79646 !important;
border-radius: 100px;
}
/*style the wp-pagenavi pagination links on hover*/
.wp-pagenavi a:hover {
color: #ffffff!important;
background: #f79646!important;
}
/*style the wp-pagenavi pages text*/
.wp-pagenavi .pages {
background: none;
}
/*remove border and center the wp-pagenavi links*/
.wp-pagenavi {
border-top: none;
text-align: center;
}
Hey Rasmus,
Please remove the /*make the title link spread over the entire post*/ code and this will resolve the issue.
Hey there Mr. Nelson
Love your tips and tricks, really helping me learn. I added this code and as expected it worked flawlessly and looks good. I then wanted to center it and nothing seems to work. I tried text-align: center; then added the !important and nothing. I can add a margin and push it over so I know I am adding CSS in the right spot, but I cannot seem to put a margin that centers it. What is this rookie missing?
Hey Norm,
I have checked the URL and the read more text is in the center so I guess the issue is resolved now. Please let us know if you need any other help.
Hi Nelson, some of your tutorials have saved me some brains 😀 thank you man 😀
Im using DIvi 4.18, and i trying to change the read more text with your tips without suscess, do you know if it still working?
Hi Silva!
The script is working fine. Can you please share the URL of the page to investigate further?
Thank you, great trick to change the ‘READ MORE’ text button for WordPress Divi blog.
It works perfect.
That’s great to hear, you are welcome!
Hi Nelson,
I just used the last snippet to change the ‘read more’ buttom to show a dutch word instead. This is working fine and now I have two questions:
1 Is it normal that I have to change this myself or should it change automtically in dutch when my site language is set to Dutch?
2 The goal is to translate this website also to French, so how can I show a French word on the French version of the site and the Dutch word on the Dutch site?
Thank you so much!
Lien
Hi Lien!
The text translation will be depend on the translation plugin. However, you can manually translate the text using Say what plugin or custom JS.
I added an icon in the state ‘.et_pb_post .more-link:hover:after’ but I would like the button to appear with a smoother transition. How can I do that?
Hi Alessia!
Please try the following code for the transition:
.et_pb_post a.more-link:hover{
transition: all 0.6s ease-in-out;
}
Let me know if it helps!
I love your easy relaxed style and very practical tips. But would it be better to put this CSS in the Blog Module >Advanced >Custom CSS >Read More Button? This way you can easily have different styles for hover and mobile too.
The term “better” is very relative, and sometimes it is better for the user to do that if they want, other times it is better to keep it centralized.
Thanks so much for this – worked great except I have a home page where there are 3 feeds for the most recent 1) blog post 2) event post 3) video post, I’d like to customize text for each one, I tried giving each blog module its own id but it only changed all three of them to the same one. Is there away to make them different?
Hi Audrey,
What you described is unusual, so this tutorial would not do that. You could try targeting each button with a different nth-child class, and updating the jQuery snippet 3 times for each class – that seems like it could work, but not sure!