Little Things Matter
It is important that all aspects of your site give your visitors a cohesive, professional experience. But sometimes small things get forgotten, such as the success message after a form is submitted. So in this quick tutorial I will show you how to style the success message text in the Divi Contact Form module with some basic CSS which will you a base to match the values with your desired preferences.
▶️ Please watch the video above to get all the exciting details! 👆
FYI: You can do this with a setting directly in the Divi Contact Form module with our popular Divi Contact Form Helper plugin! Take a look, it is so easy!
1. Add A Custom CSS Class To The Divi Contact Form
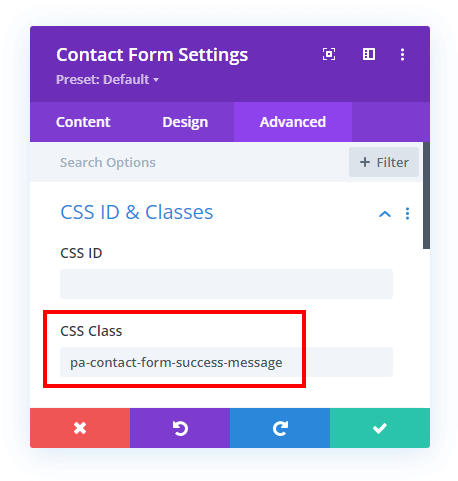
The first step to styling the Divi Contact form module success message after a form is submitted is to add a custom CSS class to the module. This is used to target the module with the code shared in step 2 of this tutorial. Open the module settings and go to the Advanced tab. Go to the CSS IDs & Classes toggle. Place the class “pa-contact-form-success-message” in the CSS Class input field of the Contact Form module.

2. Add CSS To Style The Divi Contact Form Success Message
This is a very quick and simple tutorial, and we are almost finished already. The second step is to add some CSS code to your site to style the Divi Contact Form success message text. This is necessary because there are no design settings for this in the module (without our plugin).
If you are using our free Divi child theme, place this snippet into the style.css file. Otherwise, place this in your Divi>Theme Options>Custom CSS code box. If you need help, check out our complete guide on Where To Add Custom Code In Divi.
/*style the contact form success message text*/

.et-pb-contact-message p {
  font-size: 28px;
  line-height: 1.7em;
  color: #ffffff;
  text-align: center;
  font-weight: bold;
  padding: 50px!important;
  border: 2px solid #000000;
  border-radius: 10px;
  background: #000000;
}
The main thing to do now is to customize the values. This CSS is meant to be a base for you to make your own design adjustments to meet your preferences.
Do It With A Setting!
Make life easier and use the Divi Contact Form Helper plugin instead, the ultimate Divi Contact Form upgrade with awesome features and settings!

The Divi Contact Form Helper plugin adds a new toggle to the existing Divi Contact Form module in the Design tab called Success Message Text with all the normal font and text design settings you need to style the success message using familiar Divi settings.


Hi Nelson,
I need help! Is there code to customize the headers of the email submissions or place a line return to make the submissions easier to read? I receive an Outlook email when a form is submitted but all the responses like Title, Date, Email, etc. are running into each other. Bolding the Titles or putting a line return in between each response would be easier on the eyes to read the form. Can you help? I’m a novice coder.
Hi Ben,
It sounds like you are asking about formatting within the email message. For that you would need to use our plugin which has HTML support and rich text editing. You can check this for more information: https://www.peeayecreative.com/divi-contact-form-helper-plugin-feature-update-1-3/
Nelson,
Possible to hide the success message all together? I am using the divi contact form inside of a popup (divi supreme) and would like bypass the message when the user submits the contact form. Much appreciated! -Eric
We actually just added this to the plugin settings!
Curious….
When I change the values to make it a white background with rounded corners, the corners disappear for some reason. After playing with it I realized the border is on the inside of another div/box/cell that has a white background. So even when using a solid border the corners still have white even if they rounded. This is being used over a blue background. Any idea where to change the colour to the rear area to transparent?
.et-pb-contact-message p {
font-size: 22px;
line-height: 1.7em;
color: #a80000;
text-align: center;
font-weight: bold;
padding: 40px!important;
border: 2px solid #fff;
border-radius: 10px;
background: #fff;
}
Hi Troy!
The following code should work fine:
.et-pb-contact-message p {
font-size: 22px;
line-height: 1.7em;
color: #a80000;
text-align: center;
font-weight: bold;
padding: 40px!important;
border: 2px solid #fff;
border-radius: 10px;
background: transparent;
}
https://prnt.sc/8z-h_3FppgIr
I have used this code before and it worked great, but now it is giving me an an error – “Expected RBRACE” and has a red X. The code no longer works.
You’re putting the code in the wrong place, the code works fine. Please place it in Theme Options, not the module.