
A Much Requested Solution Is Here!
Use Mailchimp Groups with Divi Optin Module
This is probably the most excited I’ve ever been about a tutorial! I’ve wondered how to add Mailchimp groups to the Divi Optin Module for a long time, and many of you have been searching for this solution as well. What seems difficult is not very hard when you break it down, and that’s just what I will do in this post.
Why Add Groups?
Groups let you categorize subscribers by things like interests and preferences. Your Divi Optin Module subscribers can select Mailchimp groups for themselves, or you can put subscribers into groups without them knowing.
Groups are an easy way to add segmentation and personalization to your email subscriber list. This allows you to send emails to specific audiences who have specific interests, ultimately leading to a much higher conversion rate. If you want to learn more about using Mailchimp, you may want to check out our new course.
▶️ Please watch the video above to get all the exciting details! 👆
Step 1
In your Mailchimp account, go to “Audience”. Once you get to the Lists page, decide which list you want to add groups to and select it. Click on “View Contacts.”
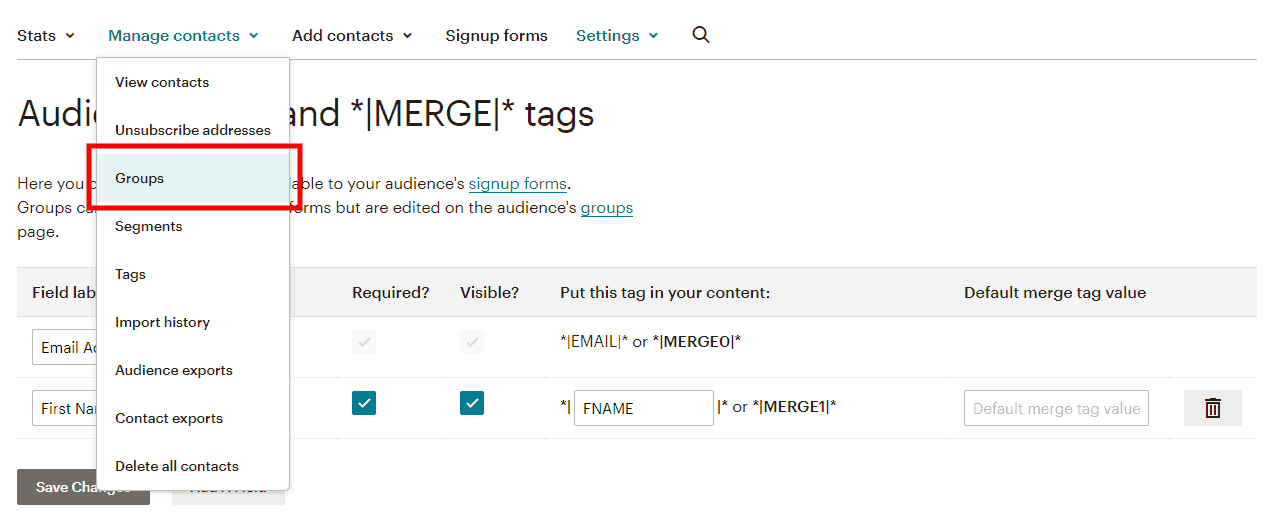
Step 2
Under “Manage Contacts” and click on “Groups.” Then click the button to “Create Groups.”
Next, you will see a question, “How should we show group options on your signup form?” Knowing which page(s) I am planning to show the Divi Email Optin will help me determine which groups to set up here in Mailchimp.
The first 3 choices are used if you want the subscriber to see the groups and be able to make a choice. This will depend entirely on your situation. For example, if you want your subscriber to select topics on your blog that interest them, then choose the first option. If you want them to have a choice to select one option, choose the second or third options. DO NOT USE THE LAST OPTION.
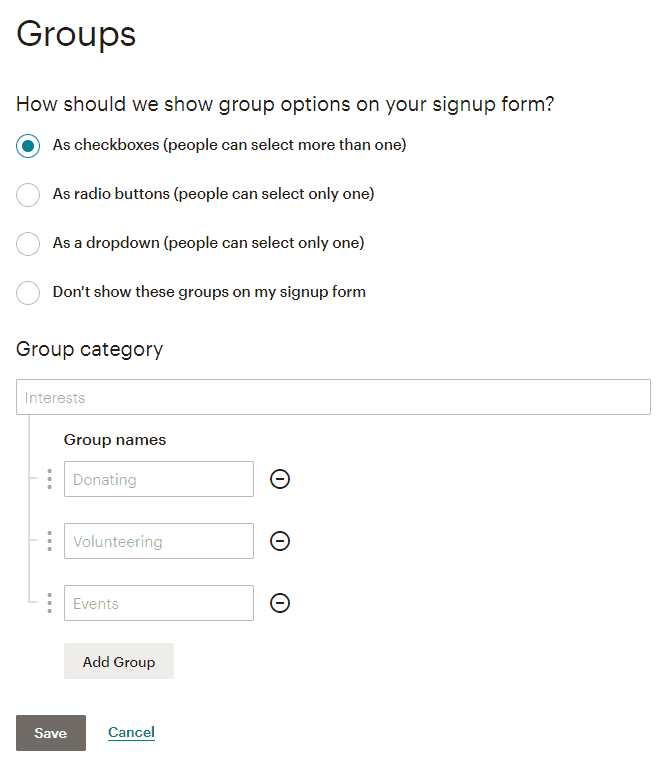
I’ll walk you through two examples I use on my website, one with a hidden group and one with them shown as options.
Enter a name for the group category. NOTE: It is important to word this correctly since this is the heading that will be shown if you chose options 1-3 in the previous step.
Under the category, enter at least two group names. Three come up by default, but you can add or remove them.
Hit the save button.
NOTE: The group category is what we will see later in the Divi Optin Module, but the groups inside the category are where the subscribers will be added.
Step 3
Before we jump into Divi, we need to double-check on something to verify the fields are showing correctly and to help you understand what’s going on here.
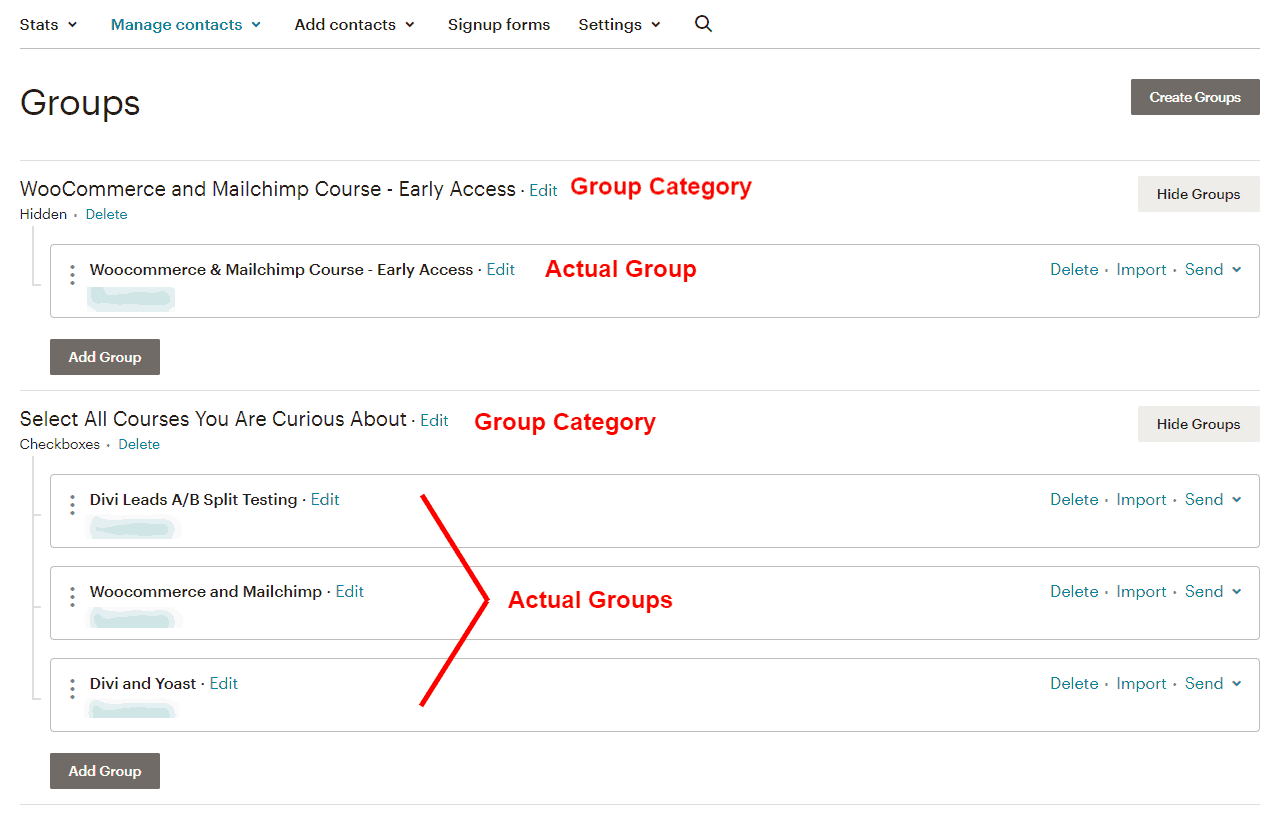
Once again in the audience menu, click on “Signup Forms.” Select the first one called “Form Builder.” Here you will see your form with the fields you chose in step 2 and the groups from step 3.
You will notice the group fields are visible by default. That is very important, and the MUST BE VISIBLE here in Mailchimp (we can hide them later on your website). If needed, you can click on a field and choose to hide or show those groups in the menu on the right.

Step 4
Go to your website and add an “Email Optin” module to your Divi layout. We will use the Divi Optin module to add Mailchimp groups which we set up in steps 1-3. You can make any design adjustments here that you want, but that is not relevant to this tutorial.
Step 5
Go down to the “Email Account” toggle. Since this tutorial is specific to Mailchimp, then, of course, you should choose Mailchimp as the Service Provider.
Select the Mailchimp list that you just configured in steps 1-3. Add your Mailchimp API if you haven’t already and select “Fetch Lists” (this refreshes the connection). Reminder, the API is found in your Mailchimp Dashboard>Account>Extras>API Keys.
Step 6
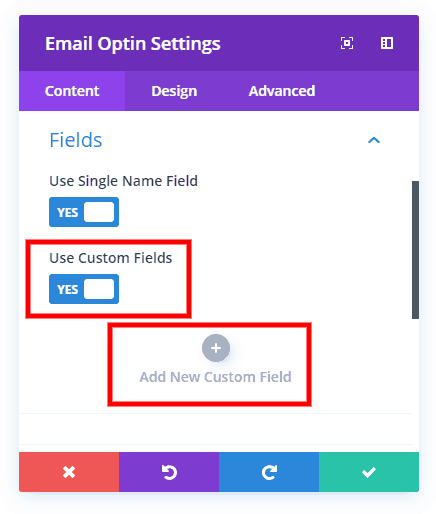
Next, click on the “Fields” toggle. Here, I typically toggle on “Use Single Name,” but you can do whatever matches the fields you chose in step 2.
Select the toggle to “Use Custom Fields.”
Select the plus button to “Add New Custom Field.”
Step 7
Next, click on the “Fields” toggle. Here, I typically toggle on “Use Single Name,” but you can do whatever matches the fields you chose in step 2.
Select the toggle to “Use Custom Fields.”
Select the plus button to “Add New Custom Field.”
Step 8
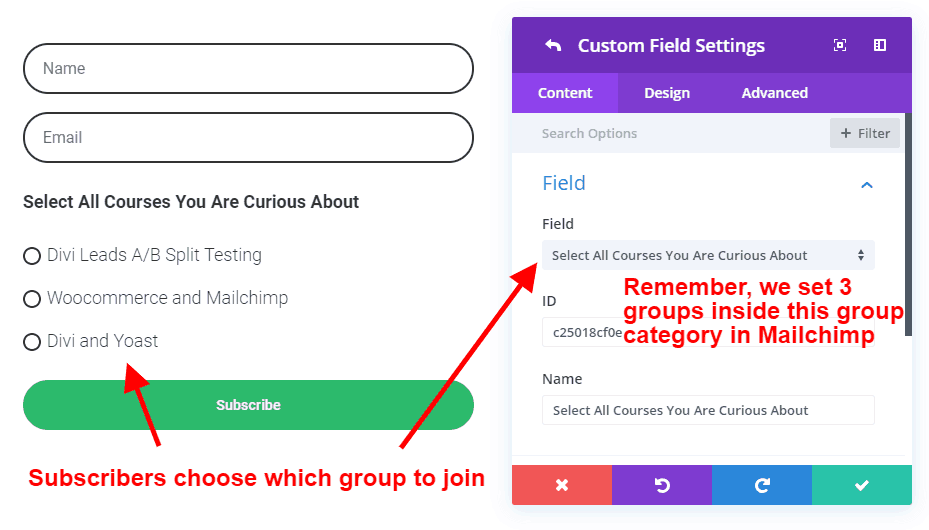
In the field dropdown, choose the name of the group category you set up in step 2. Now that you see this in context, you may need to adjust the group category wording. Simply go back to your Mailchimp groups and make any changes.

Visible Option
Here you can see that subscribers can choose which group to join.
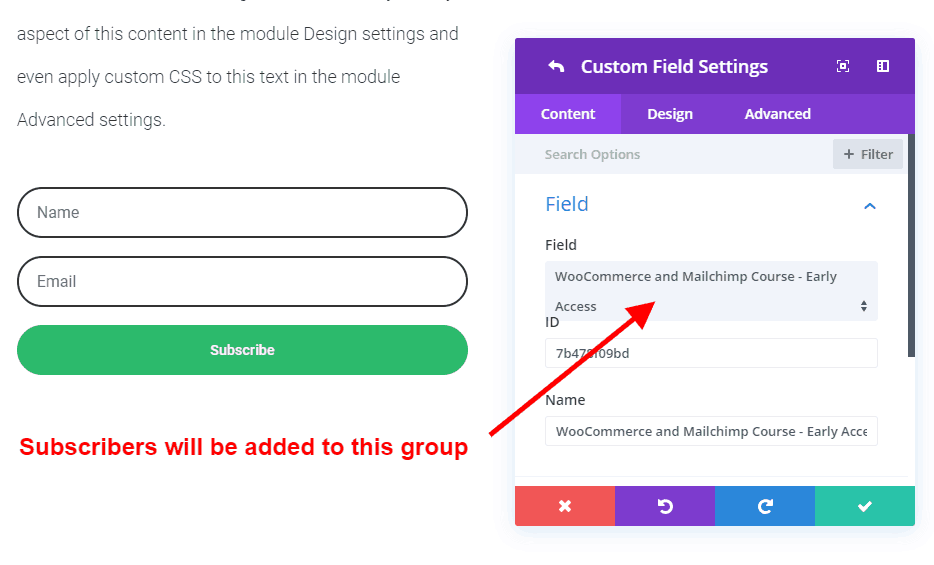
Hidden Option
PLEASE NOTE: The only way to add subscribers to a group is to have the option visible in the Mailchimp Form Builder (seen in step 3). HOWEVER, we can add some CSS to hide the entire group checkmark area on the contact form. This is the only way to make it work with groups. To do this, add a css class to the Optin Module’s advanced tab called “pa-hide-optin-group” and then copy and paste the following CSS snippet into your Divi Theme Options.
.pa-hide-optin-group .et_pb_contact_field_options_wrapper {
    display: none;
}
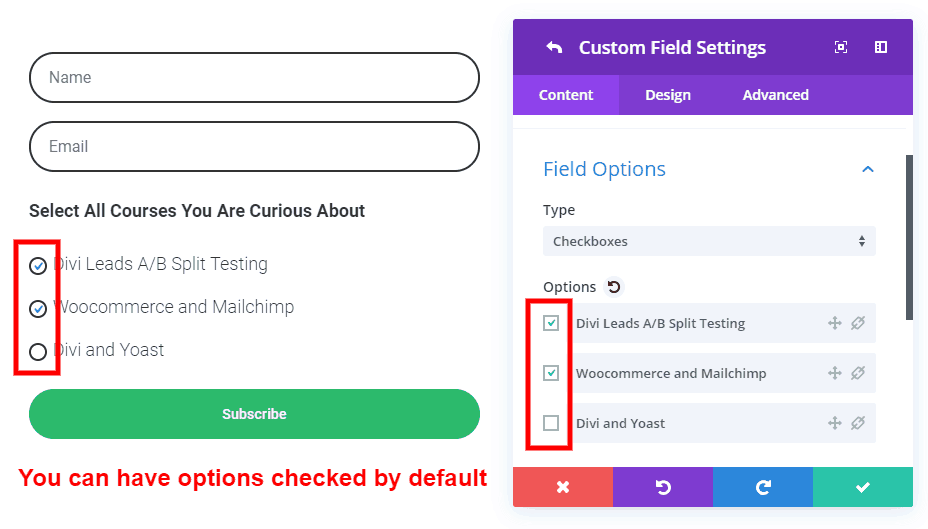
Step 9
In this final optional step, select the “Field Options” toggle. You may want to select your group names to make them checked by default for your subscribers. Here you will notice that some fields not


Thanks mate this helped a lot!
Hi Max,
Glad it helped! I know this was a tough one to figure out since there are no other guides, so I hope my experience has been a big help!
Thanks, man! This was exactly what I was looking for!
One question: I used this on sign up forms within a blog post. The problem is that they show up in the RSS feed. So when clients receive an email from a new blog post, the sign up forms including the “hidden” fields are visible. Is there a way to hide the fields (or the whole form) in the RSS feed?
Hi Pacha,
This is great to hear! Glad I could help.
Hmm, I’m afraid I know next to nothing about RSS feeds. In fact, what you describe is probably happening here on our blog. I really don’t know how to find that answer, sorry! Let me know if you do!
There’s no “Use Custom Fields” Option in My Divi Optin Email Module. I’m a paid user of Divi, my theme is updated. Any clues? Thanks. Awesome Tutorial!
Hi Marcelo,
It should be, check under the Fields toggle. If you don’t see that, then I’m not sure, seems like a weird bug, but contact ET. Glad you like the tutorial!
I just can’t get this to work 🙁
I checked the signup form, everything is showing up properly.
But when I choose ‘custom field’.. I don’t get an option for the group I created..
Hey Erin,
Sometimes it does take a while, but it always usually fixes it if you remove the integration and re-fetch the lists. Try that and see what’s up. Otherwise, you might have to check with ET support.
So, I tried that over and over again. ‘Remove’ then ‘Add’ then ‘Fetch Lists’
What FINALLY worked was to Save the module, Save the page, Refresh, And then go back to ‘Use Custom Fields’ WOOHOO!
Just documenting that fix for anyone else having trouble 🙂 Thank you! Thank goodness for this tutorial
Thanks Erin, I was having the same issue and this worked for me.
Wow, i was having same exactly issue. THANNNNNNS A LOT
I was getting soooo frustrated.
Hi
I’m not a developer, but feel like a rockstar for making this work. Thanks for the detailed help.
Two problems have occurred, though.
1) I am using groups (in this particular case) to add readers to a waiting list for a workshop, however the readers receive the normal MC confirmation email that readers should only receive when they sign up to receive the freebie on the regular list.
How do I avoid this occuring and simply allowing people to get on my waiting list with no MC confirmation?
2) Secondly, now it seems that the regular signup flow doesn’t work, i.e. readers don’t receive the confirmation email (double opt-in is activated in MC) but they do get on the list.
It’s a little confusing.
Looking forward to your help.
Kind regards
Tania
Hi Tania,
I’m excited to hear that! I know what you mean, it seems like a hack job! 🙂
Your questions are Mailchimp related, and I’m a Divi expert, not a MC expert…but I do use it. I won’t be able to help solve bugs, only use features. Your first question, I believe there should be a setting somewhere (can’t think off hand on an empty stomach) where, but I know there is some setting in Mailchimp to “update” the user if the user is already in the audience. As for your second question, I really don’t know. Is it working at all for test emails? You can test with adding +1 or +2 to your email like [email protected]
Let me know if I can be of more help!
Hi Nelson
I updated everything and now it all works perfectly.
Thank you for your assistance a guide.
/Tania
Hi again Nelson
I have two other questions:
In step 2, you say I should add atleast two groups. I only have the need for one now, so I’ve listed one simply called ‘test’. In connection with step 3 that states I must not make the groups hidden in MC, I end up having two groups showing on my sign up form that my new subscribers should not see.
1) Why do I have to add at least two groups, can I not delete the ‘test’?
2) And is there a workaround for hidding the groups on MC and the process will still work? It seems strange that they have to be visible, where they are not relevant.
Kind regards
Tania
Does this work if I try to subscribe an existing Mailchimp contact to a new Group? In other words, one contact form adds a subscriber to the Master Mailchimp audience and also adds him or her to a group. And a seperate contact form adds subscribers to another group. When the user ( with the same email address) subscribes on the second contact form, the expected result in mailchimp is one name in Audience and added to multiple groups.
Hi Vid,
I believe this is all controlled by Mailchimp, there is an option somewhere for that but I don’t know where off hand.
Hmmm, I hunted all over the place in Mailchimp, couldn’t figure it out (yet). We don’t have a paid version of Mailchimp to seek support from them. Hope someone else knows this option in Mailchimp.
Just so I understand – are you saying in Mailchimp, I need to change some setting that will enable Divi to add an existing subscriber to a new group?
Divi support came back and said “Mailchimp” does not allow for updating existing contacts. ” which I don’t belive. When I pushed back to Divi support, they said “We will pass this over to our Support Leads so they can take a more in-depth look.” not sure if this is their polite way to say “Sorry pal – cant help any more”
Hey Vid,
This has nothing to do with Divi, so ET support won’t help. They aren’t doing anything wrong (except by saying that you can’t update existing contacts).
I did some tests and for me it definitely updates the existing contact.
Nelson,
Thanks for feedback. So, just to confirm – in your tests – you were able to update (or add a new group to an existing contact) using Divi contact form and following the procedure you laid out? I searched all over Mailchimp for any setting to enable/disable this, but could not find a thing ( of course, I am not perfect and could have missed something).
Also, I saw this below comment from someone on ET community forum in October 2019 –
”
See if this fixes it:
https://gist.github.com/contemplate/65c … eba650c94d
You have to replace their mailchimp integration file with this one in possibly two places if you use Divi as well as Bloom.
Had a similar issue of trying to pass a group update to a member already on the list already but their current integration would not update any record.
“
In my testing, the user profile was updated. In the profile it did not show the user as being part of the new group though, so I’m not totally sure what to say.
Thats exactly what happens to me. I deleted my test mails and then it worked, but when is an already user, it does nothing. Just add some kind of note to the profile.
This is so frustrating. Seems like i will have to keep using my actual method that even works and allows me to add a tag to the contact, but is susch a lot of work.
Any update on this issue? I have the same problem
any update?
I’m having trouble on the CSS part! where exactly am I supposed to put that code to hide the field?
Hi Liege,
You can place it in the Divi Theme Options Custom CSS. It actually says it there above the snippet 🙂 If you want to learn more, check out our full guide: https://www.peeayecreative.com/where-to-add-custom-code-in-divi-css-javascript-php/
Hey man, thank you for this tutorial. I have a different question. I use Active Campaign and I want to apply a tag when someone opts in. Do the code snippets change?
Hi Robert,
I really don’t know without seeing it since I never tried that scenario.
Thanks for the response. I think i figured it out but I think I may have messed up the code to hide the check box field. Did I mess something up from what you see?
Is it possible to add a second group to the already existing member ?
For example if the person have subscribed to the newsletter but then he wants to get a free pdf, the group stays only on subscribed option.
Is there a way to fix this please?
I’m not sure, this has been asked many times and I simply don’t have an answer as I am not an expert on Mailchimp, rather I am on Divi.
Thanks Nelson, it’s working! Please help with a related question:
How come existing subscribers can’t be added to groups? I tested with form with a personal email address that’s already on the list but it didn’t update, only new subscribers can be added to a group. Where do I set that in MailChimp? I can’t seem to find anything on Google.
I’m really not sure, I wish I could answer that, I’m just not a Mailchimp expert. If I ever find out I’ll be sure to update the post.
From Elementor help. I think this is the reason an existing contact can’t be updated. Mailchimp thinks it tries to re-join the list and not update it:
This is super helpful, but I’m curious why two groups need to be created for this to work. I’d like to be able to create just one group to avoid any confusion for myself. Is that possible?
Hi Adam,
You only need one group, I don’t think we said that two are needed.
Hi Nelson, fantastic resource! Thanks for working this out and explaining it in such a clear and easy to follow way.
May I suggest adding a small trouble shooting or FAQ section at the end to cover issues that have been resolved in the comments, but people may miss. Cheers Matt
Thanks Matt! Great suggestion as well.
Thanks for this tutorial, really really heplful, however All worked til i made a test. For some reason group is not getting updated.
I am trying to apply the same opt-in form formula, only using Tags instead of Groups. Is this possible?
I tried using Zapier but am struggling with how Zapier could identify which form, to apply the correct tag.
A solution for either one of these would be so helpful. Thanks for your time in looking at this.
Hi Benjamin,
I hear ya, that’s why I made this post because it was the only trick possible to get close. I may work on a module for this eventually.
Got it working using this way, then triggering a Zap that applies the Tag. Look forward to a module if you get around to it. Thanks for the response.
Hello ! Thank you for this post, this helped me a lot ! I still have a question, how could you hide only one group ? For exemple I want to hide my “interest” group, but I want the user of the website to be able to see and agree on my “private policy” groupe. Whit this code it hide eveything, do you have an advice ? Thanks in advanced !
Hi there, you would just need to narrow down the specificity of the CSS targeting, so add the class of that field after the class for the whole wrapper.
I need help with that as well. I went throught your youtube comments as well and is a commong question but no one has seem to find the resolution yet. Reading the above, from my understanding you need to set up class for that filed but how do you do that. Because when you edit this filed option it does not let you to add class to that fild only.
You’re a godsend. Thank you!
You’re welcome, Mariko! Glad you found it helpful!
Thanks! Your help was once again life-saving
You’re welcome, glad to help!
Hello, I am having trouble with one part, I am following the steps and I added the group, checked that the option is visible in the forms on Mailchimp, but for some reason when I go to the custom field I still have no option to add my Group!
nvm – I got it figured out just needed to refresh – this tutorial has been life saving thank you!
Great to hear! Yes sometimes it takes a few moments and some refreshes to see it.
I Just want to thank you! Works perfectly!
Hi Thiago,
You are welcome! Appreciate you sharing!
Oh man I still can’t get this to work. I added the custom fields for my Mailchimp groups. The box is checked for the correct group. I was also able to hide the fields. I saved it, refreshed, and double checked the group box is still checked. However it still put each signup into all of my groups instead of the one checked. Please help! What am I missing? Thank you!
Hey Vanessa,
Any chance you included the quotation marks for the CSS Class – so it looked like this? “pa-hide-optin-group”. I made the mistake of including the quotation marks and realised that you’re not meant to. Once I deleted them and left it as: pa-hide-optin-group it worked fine.
Life saver! Thanks so much for publishing this! The only thing I did that was wrong was typed in the CSS class: “pa-hide-optin-group” (with the quotation marks included) which of course didn’t work. But once I realised that you’re not meant to include the quotation marks, it worked awesomely. It’s a giant learning curve for sure!
Hi Erin,
We are glad to hear that everything is working fine now on your end. 🙂
Hi Nelson, thank you for this great post! I’m using this method for 6 months now and it’s the best since I want my subscribers to opt-in for different lead magnet and so start different automated sequences.
I have a problem though, and I just didn’t look into it before…
Everything works fine, except that new subscribers don’t receive the Confirmation Email (+double opt-in).
I look into MailChimp Help and that’s the only thing I think matches my problem :
“If you host your own signup forms, make sure all your audience fields are matched correctly and that you correctly updated the form action code.”
Do you know what an Action Code is? Do we put it in the Divi module?
I even looked at the CSS code from the MC embed sign up form, but there’s no clue there either.
Thanks a lot!
Karoline
Hi Karoline,
I don’t think the issue is anywhere related to Divi Email Option Module. Also, I guess there is no need of placing the Action code as you are not hosting the Signup form or the signup form is not custom coded. Please check with Mailchimp and see if that helps.
Nelson, I very much appreciated this. As always, your tutorial posts are invaluable. Sincerely, Gary
Hi Gary!
We are glad to know that our guide helped you in some way. Stay tuned for more of such guides.
Has anyone solved the “add to group if contact is already in the MC audience list” issue? There must be a way to do this….
Hello Jay,
I have the same issue. If a contact is already present in the lists the API group tagging doesn’t work. Mailchimp picks up that something has been pushed to it via DIVI but it does Jack brick about it.
Hello Jay,
I have the same issue. If a contact is already present in the lists the API group tagging doesn’t work. Mailchimp picks up that something has been pushed to it via DIVI but it does Jack brick about it.
In case anyone else is struggling with this, I discovered, after much trial and error, that if you do this in the Builder, the checkboxes SEEM to stay there. BUT they DO go away when you view the page.