Styling The Divi Submenu
Understanding The Divi Submenu Structure
As we continue our Divi Menu Module series, we are going to focus on the dropdown submenu for the next several tutorials. With this tutorial, you will be able to style and customize the Divi menu module dropdown submenu and change things like the colors, border, spacing, hover effects, and more!
▶️ Please watch the video above to get all the exciting details! 👆
Understanding The Divi Submenu Structure
First, we need to understand how the Divi submenu is made so we can target individual elements of it separately based on our design style. There are three parts that make up the Divi dropdown submenu:
- Unorderd List (The Submenu)
- List Items
- Links
Here is an example of how the default Divi dropdown menu looks:

Here is the behind-the-scenes structure of the submenu by default:
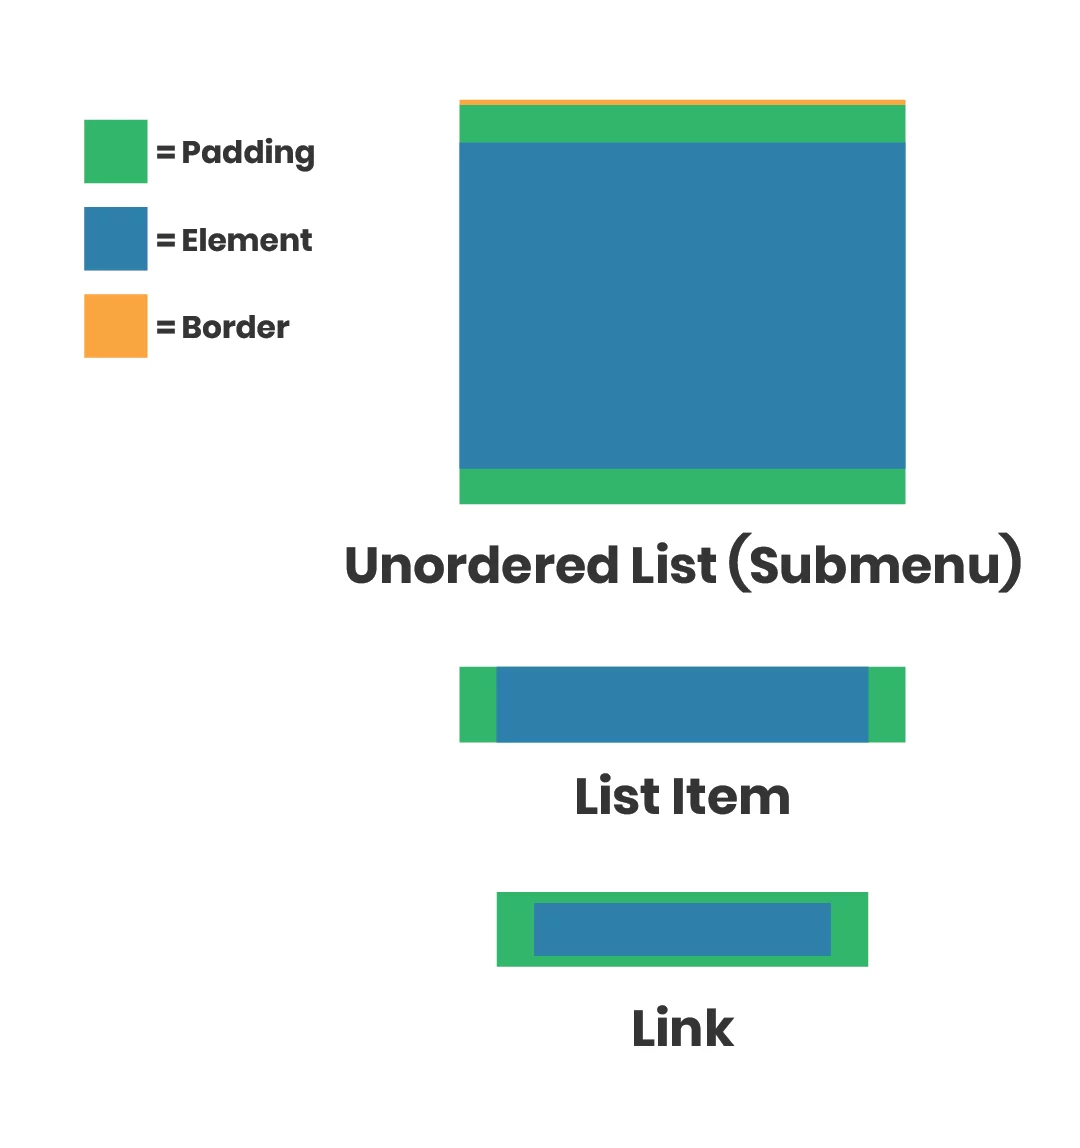
Notice anything? Each separate piece has it’s own properties, like padding and width. They are nested within each other, so in order to customize what we want, we first need to learn to target the correct piece of the structure.
It is important for you to understand the structure of the Divi submenu first before we start customizing it with CSS.
This tutorial will go over each part of the submenu separately, and you can follow along and use it as a guide for styling your Divi menu dropdown submenu!
How To Customize And Style The Divi Menu Dropdown Submenu
One of the first things we probably notice is the ugly blue thick like at the top of our submenu. Or maybe you want to remove some padding at the top or bottom or make it wider. You can do that by targeting the submenu unordered list as shown.

Edit The Overall Submenu
/*edit the Divi submenu*/
.et_pb_menu li ul {
YOUR CSS HERE
}
Once you have our CSS selector ready, you can start adding custom code where it says “YOUR CSS HERE.” (be sure to remove that text)
Custom Style Ideas
The following is a list of some ideas for things you might want to do to style the overall submenu. You can choose to do this by placing the snippets into the selector shown above.
Remove or adjust the spacing:
padding: 0!important;Remove the default border at the top:
border-top: none;Add a border:
border: 2px solid #2cba6c;Change the background color:
background-color: #2cba6c;Change the width:
width: 300px;How To Customize And Style The Divi Menu Dropdown Submenu List Items
Now we move on to the list items. It can be confusing how the list items and the links relate, but if you take a close look at my suggested custom style ideas, you will start to see. The list items control the links items, but the next section of links controls the link text.

Edit The List Items
/*edit the Divi submenu list items*/
.et_pb_menu li li {
YOUR CSS HERE
}
Edit The List Items On Hover
/*edit the Divi submenu list items on hover*/
.et_pb_menu li li:hover {
YOUR CSS HERE
}
Once you have our CSS selector ready, you can start adding custom code where it says “YOUR CSS HERE.” (be sure to remove that text)
Custom Style Ideas
The following is a list of ideas of some things you might want to do to style the submenu list items. You can choose to do this by default, or on hover, by placing the snippets into the correct selector shown above.
Remove or adjust the spacing:
padding: 0;Change the background color (for on hover):
background: #2cba6c;Add a border on the bottom:
border-bottom: 1px solid #e1e1e1;How To Customize And Style The Divi Menu Dropdown Submenu Links
The last section of the Divi dropdown submenu is the links themselves. The link text is great to style, and I have provided some ideas below like changing the color, size, spacing, or width. Another obvious one is the opacity, which changes to .7 by default on hover, but you can override that if you want.

Edit The Links
/*edit the Divi submenu links*/
.et_pb_menu li li a {
YOUR CSS HERE
}
Edit The Links On Hover
/*edit the Divi submenu links on hover*/
.et_pb_menu li li a:hover {
YOUR CSS HERE
}
Once you have our CSS selector ready, you can start adding custom code where it says “YOUR CSS HERE.” (be sure to remove that text)
Custom Style Ideas
The following is a list of ideas of some things you might want to do to style the submenu links. You can choose to do this by default, or on hover, by placing the snippets into the correct selector shown above.
Remove the spacing:
padding: 0;Change the opacity (especially on hover):
opacity: 1;Remove the slight background color (on hover):
background-color: rgba(0,0,0,0);Change the width:
width: 240px;Change the font size:
font-size: 12px!important;Change the color:
color: #2cba6c;Change the letter spacing:
letter-spacing: 2px;
Good tutorial, I think the next step on this series could be how to style the mobile menu. Just a thought.
Thanks
Hi Edgar, yes, good idea! I am planning one of those! Might be a few weeks away yet, but others have also asked for that!
Super helpful, thank you! <3
You are welcome, Aarón!
Thanks its an awesome tutorial
I’m very glad you liked it, Judy! 🙂
Hi,
Thanks for the tutorial, but it isn’t working for me. I’ve put the css in the theme options css editor. Nothing changes and I’ve some knowledge of css.
Hi Anselmo,
I works good. Maybe you are on the old header instead of the new module?
It works. Thanks
Thanks Nelson for this tutorial. I have used it on my online shop which I am currently building to change the background color of the dropdown menu and to remove the text underline on hover. It has worked well on desktop. However on mobile, I still have a challenge. What could be the code I can use to make it work?
Hi Charles, I assume you are asking for help with the mobile menu. That’s different from the dropdown submenu. I’ll try to get that post scheduled for the mobile menu very soon!
Thanks. It will help us significantly.
Hi,
Thanks for the tutorial.
But the ugly Blue top border doesn’t goes off.
Tried so many time, did not happen.
Tried with Builder as well as Theme Customizer and Theme Option
.et_pb_menu li ul {
padding: 0!important;
border-top: none;
border-bottom: 1px solid #4a835e;
}
.et_pb_menu li li {
padding: 0!important;
border-top: none;
border-bottom: 1px solid #4a835e;
}
.et_pb_menu li li:hover {
padding: 0!important;
border-top: none;
border-bottom: 1px solid #4a835e;
}
But this isn’t going
Hi Amar,
You can just change this in the Menu module settings. Definitely the easiest way!
Hi Nelson, thank you for the tutorial! But I am desperately trying to modify a menu inserted as Divi menu module (not a main menu in the header but in the body). Specifically I would like to highlight the active menu item linked to an anchor on the same page .. do you have any idea how to underline the active menu items of an anchor-linked menu module? Many thanks in advance!
Hi Federico,
I’ll look into this and when I get a chance release this a separate tutorial!
Hello, i am looking to do the same thing but cant figure it out. I want to target the menu in the body module instead of the main header.
Could you please provide the URL of the Page where the Menu Module is present in the body for us to investigate further?
Hi
Thanks for your excellent tutorials. I’m currently rebuilding a website – http://www.halfmanhalfmovie.com – and the rebuild is using Divi at https://homemacsupport.com/.
I’ve used your CSS for the submenu at https://homemacsupport.com/ but I can’t understand why I have to make the submenu size as wide as the widest link. This then makes the submenu’s with smaller links appear in a box that is so big.
Is there no CSS that tells the submenu links not to wrap text and the submenu box to adjust to fit the size of the the largest link in the box.
I’m honestly don’t understand why Divi haven’t addressed these issues which are so basic to any menu system.
Any input would be much appreciated 🙂
Hi John,
This is how you do it, there’s no automatic way. Maybe someday 🙂
Yeah I talked to Divi today. I would have thought this was elementary… like didn’t someone mention it in a meeting. They said they’d pass it on . Thanks for your code snippets 🙂
I don’t think having it automatic is elementary at all. Maybe having a setting to change the width manually. I’m sure that will come.
hi, great tutorial, i was wondering if you have an explanation on the mobile menu yet?
Hi Craig,
Do you mean a tutorial about the mobile menu? We have this one here: https://www.peeayecreative.com/how-to-customize-and-style-the-divi-mobile-menu/
Hi, what does mean class “.et_pb_menu” , I can´t find it in my html code. Why did you use this class?
Hi Ales,
.et_pb_menu is the main div for the Divi Menu module.
Hey, nice tutorial!
But how do I get the same drop down menu style in mobile & tablet view? Please share the snippet for mobile & tablet if possible.
Thanks.
Saifee Collection.
Hi Saifee,
The Tablet and Phone menu is totally different, you can check out our other tutorials about the mobile menu in our series: https://www.peeayecreative.com/category/tutorials/divi-menu-module/
Hi Edgar,
Great tutorial! Thank’s a lot.
All CSS works perfectly when I use the CSS in a menu somewhere in the body of any page. But the CSS doesn’t work when I add the CSS to the page setup of a global header. What am I doing wrong?
Can you help me?
Thanks!
I’m not sure, but I would not place it there, you should put in the Theme Options or in the child theme style.css file.
couldn’t this be done in the custom CSS in the menu module? Then It would be global if you are using the theme builder…right?
Only some of the items, that is why I recommend just using this method instead of placing the code inline in the modules.
I now see lol. Would I be able to add a different font to the dropdowns? How would I do that?
Thanks for creating the content you do it is helpful and your videos are just chill and approachable.😊
Hi, to widen the row of columns and to decide how many columns the Mega menu should have, which Css code should be inserted? thank you
Hi Max,
We have a separate tutorial about mega menus, you can check that out and ask any questions there. Thanks!
Hey there, I just watched the other tutorial, but it doesn’t really speak about Max’s question. I also have 5 columns not 4, hence have the same question.
Hi Anastasiia,
Let’s try to keep comments on the relevant tutorial. Asking about the mega menu here is getting confusing to me and to others. 🙂
For some reason, I am having trouble getting this to work. I want to make the menu. I want to make the submenu look like yours except for two things – grey buttons, not pink, and have the submenu centered underneath the main menu.
Hi Kimberly,
Can you share more about what is not working?
Hi Nelson, Thanks for the great tutorial! I will definitely use some of this moving forward. I was wondering if you intend to add some tuts that show us how to get some of these same effects on menus we build inside the theme builder? (and just some theme builder customizations in general). In particular, I would love to know how to add the js (I assume) that controls the dropdown behavior. For instance, in a regular menu, you can choose the dropdown effect of Fade | Expand | Slide | or Flip … there doesn’t appear to be a way to do that natively inside the builder as those options are missing. The default appears to have no easing and the dropdowns literally just clunkily appear. I’d like to match the Expand option from the native Divi menu and replicate that on my builder’s menu. Thanks in advance for your help and for your awesome tuts!
Hi Stephen,
To answer your first general question, most if not all of the menu tutorials are for the Menu module, which is used in the Theme Builder. About your specific question, I can certainly add that as a tutorial to my list! You will just have to watch for it to be posted as I don’t have an ETA right now.
Hi Nelson, I really enjoi your detailed approach to the divi menu. One question: The Css code does no effect on my drop down menu exept width. padding is not working at all. What might cause it?
Hi Carmen,
Can you tell me what code you are trying and share the link? I can then check it.
I’ve added in my custom code options but doesn’t seem to be making the fix?
Hi Melody,
Okay, have you got it by now? Where were you adding it? You would need to share a link for us to check.
Thanks for the great tips. I’m facing an issue when changing the background color and text color on hover for the menu links. I can change the background but the text remains unchanged even if I add !important. when I inspect the element it shows the the color is not active because it is inheriting it from the menu module text color which divi add !important to it. any workarounds? I’m using divi menu module within the theme builder.
Many thanks
If the Custom CSS that you are adding is affecting the element at the correct place but the property is getting overpowered by the property Divi adds then please try to increase the strength of the selector and use !important. By doing this your property will have more priority.
Thank you for this. How would you then code the nested menu of the submenu? Or the sub sub menu? When I create them, there is a gap between the sub sub menu and the submenu. Not so pretty 😉
Could you please share the URL of the page so that I can see the gap and remove that as well?
The top of the submenu is cut off. Any idea how to solve this issue? Tried several options including customizing using the tutorial. Unfortunately nothing changes. Header is building using theme builder.
https://fairdinkumonline.nl/lavie/contact
Hi Anneloes,
The URL that you have shared is showing Coming Soon so can you please deactivate the coming soon plugin or the source from where it is coming so that I could investigate further?
Great tutorial. Is there any way to change the length of the dropdown top border?
That would be the submenu border top value, so yes you could do that with this tutorial.
Great tutorial but the CSS selectors seem to not be working on my page. I’m trying to change the font size and text transformation for the dropdown links.
This is the page: https://aurareinigung-und-lichtkristalle.de
Hi Patricia,
Could you please try the code given below and see if that helps?
#menu-hauptmenue .menu-item-has-children .sub-menu li a{

   color: red !important;

   text-transform: lowercase;

}
Let me know how it goes. 🙂
I am working on maanglobal.com and have added the following but cannot get the grey/white background hover effect to go away. It remains over the maroon. Any ideas?
/*edit the Divi submenu links on hover*/
.et_pb_menu li li a:hover {
background-color: rgba(0,0,0,0);
}
/* Sub Menu */
#menu-main > .menu-item > .sub-menu{
left:-115px;
}
/* Link (hover) */
#menu-main > .menu-item > .sub-menu > .menu-item > a:hover{
background-color:#762023;
color:#ffffff !important;
}
/* Link 2 down hover */
#menu-main > .menu-item > .sub-menu > .menu-item > .sub-menu > .menu-item > a:hover{
background-color:#762023;
color:#ffffff !important;
}
/* Link 3 down hover */
#menu-main .menu-item .sub-menu .menu-item .sub-menu .menu-item .sub-menu .menu-item a:hover{
background-color:#762023;
color:#ffffff !important;
}
Hi Alan,
I am afraid that I am not able to replicate the issue on my end. I guess it might be solved now.
Let me know if I am missing out on something here.
Hey Nelson,
I’m having trouble with getting the padding to the right of the submenu item to disappear. I’ve added padding-right: 0px !important; and tried all combination without getting it gone. How is that done?
I’d like my submenu shorter in widths. The left padding disappears but not the right. Really strange!
Hi Martin, I would need to see a link to check what you mean.
I haven’t been able to change the background of the submenu itself, with css using !important.
I’ve tried targeting:
.et_pb_menu li ul, .et-menu-nav ul.sub-menu, .et_pb_menu .nav li ul and a bunch of combination to override the default white color Divi sets for the submenu using .et_pb_menu .nav li ul.
I’m working with a color contrast toggle so I’m using CSS instead of Divi’s builder. I’m not using the builder/customizer and have not set anything for the sub menu’s background, Divi still sets it to white. Thank you for all that you do!
ps. the workaround I’ve come up so far is setting the submenu items’ background for both normal and hover state.
The background color can be set in the Menu module settings.
Hey is there an easy way to add a horizontal divider/ border between only certain menu items? For example: there are two categories within the submenu but 6 total items and we need to add a subtle division between them like a thin gray line. Appreciate the help!
Hey Brian,
I am not sure that I totally understood what you are trying to achieve but if you want to grab specific Menu Items then please go to WordPress Dashboard > Appearance > Menus and there you can provide Custom Class to the individual Menu Items or Submenu Items and use that to style them as per your liking.
Let me know how it goes. 🙂
Could you please assist with how to increase the gap between the Menu Item and the Submenu. Ideally I am looking to have the submenu absolutely flush against the bottom of my header bar and not overlapping onto it at all.
I have tried adding padding & margin but nothing has come close to working so far. It is such a shame because this feels like the most standard use case and was exactly how the original Divi headers looked.
How it currently looks (as standard) – https://ibb.co/YWCXZKH
How I want it to look – https://ibb.co/99ThDTV
Hey Ross,
Could you please share the URL of the page in order for me to investigate the issue?
Hey there,
Thanks for the code, works great on desktop. However I noticed that there’s a bounding box in the dropdown menu that has a dropshadow on it… How would you go about removing that?
Here’s the code I have (and added all the border codes I could think of to remove it.)
@media (min-width: 150px) {
.pa-hamburger-menu .et_pb_menu__menu {
display: none;
align-items: left;
margin-left: 50px;
float: none;
border: 0;
drop-shadow: none;
-webkit-box-shadow: none;
-moz-box-shadow: none;
box-shadow: none;
}
.pa-hamburger-menu .et_mobile_nav_menu {
display: flex;
float: none;
margin: 0 6px;
align-items: center;
padding-left: 25px;
color: none;
border: 0;
drop-shadow: none;
-webkit-box-shadow: none;
-moz-box-shadow: none;
box-shadow: none;
}
.pa-hamburger-menu .et_mobile_nav_menu li {
list-style-type: none;
}
}
Hey Chris,
It would be great if you share the URL of the website in order for me to investigate the code and fix it for you.
Hi there.
I’m a Freelancer and often use your snippets I love your work. Really helpful.
If you don’t mind please also make something So that in mobile menu a dropdown menu will appear Olny if we click the main menu-item. The menu-item with the dropdown should have a down words arrow So people know that there is a sub-menu if they click this menu item.
For reference please please visit http://www.radprax.de/ in mobile mode.
thanks alot.
I’m not sure what you mean, that is how the menu already works with a click and arrow.
Hey Nelson, Thanks for all your tuts – you are my go to. I only build in DIVI.
Do you have a tutorial on how to change the height of the Divi Mega menu – i have cerated one but it is cutting off the last product as the bottom of the list. Thanks Laeni
Hey Laeni,
Could you please share the URL of the website where the mega menu is present for me to investigate this issue further?
Hi
How do you change the space between your menu and your submenu, in other words how do you make your submenu lower (in your example in this blogpost, what if you want to add a bit of space between the menu text and the blue line of the submenu)?
Thanks
Matt
Hey Matt,
Could you please share the URL of the website for me to investigate this further?
So clear and informative. You are amazing, my friend!
Many thanks!
You’re welcome, Kristin!
Hi Nelson, This is a great tutorial, learned so much from it. However. I wish to add a scroll bar to the sub, submenu, and only the sub submenu. whenever I try adding these in, it adds it to all submenu items and, of course, it should only appear when necessary. Using auto seems to not make the scrollbar appear even when it spills over the content box.
I guess that would be possible, but you would need a height set for the submenu, and then the scrollbar should appear with overflow-x: auto;
I’ve been using your snippets for my main header and those have worked.
However, this one for the dropdown doesn’t. I did the same thing as before and apply the code to my theme optimizer. Am I missing something?
I’m not sure, it’s hard to say without more context. Be sure to note this is for the Menu module, not the default header menu.
Hi Nelson, thank you for all of this instruction. My sub-menu items are quite long so I am interested in widening the sub-menu. I followed the excellent tutorial, learned a lot, but where do I put the CSS? It seems to me that this critical piece of advice is missing from the tutorial. I have tried the Theme Options and Theme Customiser, then the Custom CSS in the menu module but to no avail. Anyone able to assist.
Mike
Hi Michael!
You can add the CSS in the Theme options, and it should work fine. Try checking for any CSS errors in the theme options which might be causing the issue.
I’ve enjoyed and appreciated your most helpful tutorials! After doing our website in Dreamweaver and then coding with Bootstrap years back, and then being “forced” to switch to Divi in 2020, I have benefited much by your Divi expertise! With that background, I find that you speak my “language”! Thanks so much for making the lessons available!
Hi Cliff,
That’s so awesome to hear, thank you for those nice words! I hope you continue to enjoy all our resources!
How to remove arrow from top menu while leaving arrow on sub menu?
I need to remove dropdown arrow from top menu, but when you hover and sub menu appears that has more items then the arrow should stay there.
Here visual example : https://ibb.co/vmxWMPN
Remove arrow from top menu (Services, social media) but leave it in sub menu (Photography)