Require Checkbox Agreement On Form Submission
Depending on where you live and what data you are collecting, it may be necessary for you to receive consent from the user when submitting data through a contact form in Divi. This is actually very easy to implement, as long as you already have a privacy policy integrated and are using Divi. So in this tutorial I will show yo how to add a confirmation checkbox to the Divi Contact Form for agreeing to terms or a privacy policy when submitting a form.
▶️ Please watch the video above to get all the exciting details! 👆
Understanding Why Legal Consent May Be Needed
Many countries and states require business to handle data in a private manner and comply with various privacy regulations. Requiring a checkbox agreement in a contact form can serve many essential purposes. It ensures legal compliance with data protection laws, fosters transparency by informing users about data usage, obtains user consent for data collection and communication preferences, and allows customization of user interactions. It can also reduce spam and educate users about your policies, while promoting clear communication that your company cares about the user’s privacy and trust.
Integrate Legal Policies Into Divi
If you do not yet have legal policies integrated into Divi, you need to act now! You can follow our simple step-by-step tutorial about how to integrate Termageddon legal policies into Divi.
1. Add A Checkbox Field To The Divi Contact Form
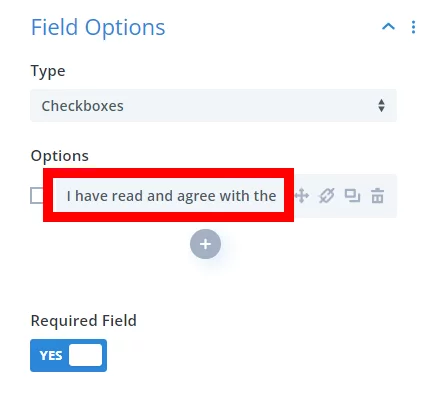
After setting up all the other fields on your form, open the Divi Contact Form module settings and add a new field.
- Add a new field (usually at the bottom)
- Select “Checkboxes” as the field type in the Field Options toggle
- Write the text you want to use as the confirmation agreement
2. Add The Link To The Privacy Policy
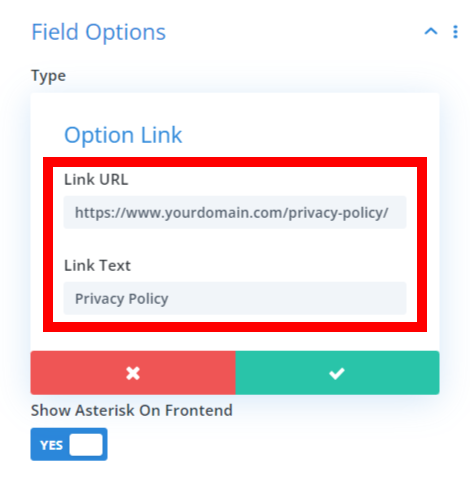
To add the link, click on the icon second icon (between the move and duplicate icons) and this will open up the new window to add the link and link text.
Enter the URL to your privacy policy page in the first field, and write “Privacy Policy” in the second field.
3. View The Result
That’s it! Now just save your changes and exit the builder. What you see on the frontend will look like this:







great idea, will implement, thank you
Sure thing, glad you like it!
Hi Nelson, thank you for your cool tips in this blog.
I have a GDPR field in my contact module but I find optional checkboxes and/or radio buttons in Divi always cause an error in Chrome DevTools because of “Incorrect use of LABEL FOR element”. Is there something I am missing?
“The label’s for attribute refers to a form field by its name, not its id. This might prevent the browser from correctly autofilling the form and accessibility tools from working correctly.
To fix this issue, refer to form fields by their id attribute.”
Thank you 🙂
Hi Isa, I was not aware of that issue with the Divi Contact Form module, but I will check this to see if we can add a feature to our plugins!
Thank you for considering this issue Nelson!
Sorry, I think this is another similar issue for the same module, the select field gets an error for accessibility:
“Select elements do not have associated label elements.”
Can this be fixed too?
Thank you!
Hi Isa!
This is an accessibility issue. Please contact the Elegant themes support for further inspection.