What Are Merge Tags In Divi? Are They The Same As Message Pattern?
The term “merge tags” is sometimes referred to as “variables” and this all depends on the software or developer, as neither term are right or wrong. I have no idea why, but Divi calls their contact form module message area a “Message Pattern,” which is not a very helpful name. However, maybe you are already familiar with that. You can check a blog post on Elegant Themes website to learn more. Oddly enough, they do not mention the term “merge tags” in that blog post. Instead, they consistently refer to merge tags as the message pattern. So please forgive me if I am wrong for insisting that we call them merge tags for the duration of this article.
NOTE: Throughout this tutorial, I’ll be referring to our addon Divi Contact Form Helper a lot, since it adds tremendously more value and many more options to this topic.
How It Works
Available Variables By Default
By default, the Divi Contact Form module allows any field type to be used as variable merge tags. This could be the value from an input field, from a radio button, a checkbox, a textarea, or a select option.
Wrap Field ID In %% Signs
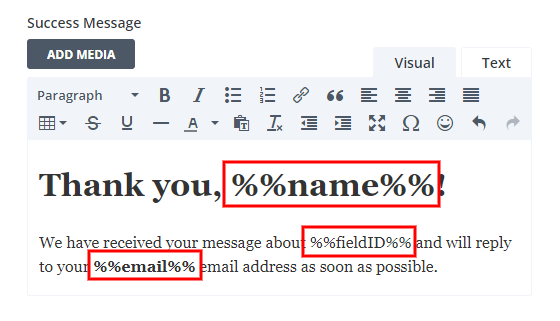
To show the data from the field, you need to always wrap the field ID in sets of two percent signs on each side. For example, if the form field is “email” then you would write %%email%% to dynamically display the value the visitor enters into the field associated with that ID.
Add Optional Labels
You may also want to add labels or descriptive text before or surrounding the merge tag. For example, you may want to write “Email:” in front of the %%email%% so that the final results is like “Email: [email protected]” for easy readability.
Additional Custom Options
If you are using our Divi Contact Form Helper plugin, you also have a wide range of new premium merge tag options. You can check our docs to see the full list of custom merge tags. This includes things like the page name, page URL, entry number, form title, URL parameters, date, time, referrer URL, and more!
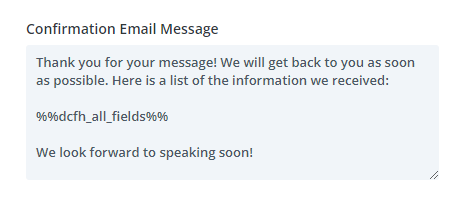
My favorite is the “all fields” %%dcfh_all_fields%% merge tag, because this works dynamically to show the field labels, and will only show the fields and field labels that are actually filled in the form. This is better than writing each one manually as it is extremely faster and also will not show irrelevant fields like if you manually wrote the labels and field IDs.
1. Admin Email Message
The most familiar place to use merge tags in the Divi Contact Form module is in the message sent to the website admin. This is because you can do this by default in Divi without any addons. This is a great way to share the data submitted by the website visitor to the website admin in an organized way.
Here you can either write out each label and field ID as mentioned above, or you can use the all fields merge tag provided only with the Divi Contact Form Helper plugin.

2. Confirmation Email Message
If you are using the Divi Contact Form Helper, you have the amazing feature to send a confirmation email to the person who submitted the form. In this message, you may want to reiterate some of the details that were shared by placing merge tags into the confirmation email message body.

3. Success message
If you are using the Divi Contact Form Helper, you can also take advantage of the additional merge tag features in the success message! I personally love this option the most, as it allows me to personalize the message and mention their name and email. I highly recommend checking our other tutorial on how to personalize the success message to learn more.


4. Subject Lines
Saving the best for last, let’s talk about subject lines. As you probably know, if you are using the Divi Contact Form, all the messages come into your inbox with the same subject line. This causes inboxes to thread the messages together because it looks at their subject line and thinks they are part of the same conversation. The only way that I know of to fix this is with our Divi Contact Form Helper addon. There are two main benefits of our addon in this case:
1. it Enables the use of merge tags in the subject line
The first major benefit is the ability to add merge tags to both the admin email subject line and the confirmation email subject line. This is very helpful for admins to get the name or form title in the subject line, or for the submitter to know their ticket number.

2. It opens up new possibilities with custom merge tags.
If you want to add things like a ticket number or form title or page title to the subject line, then you can use our custom merge tags like %%dcfh_entry_number%% and %%dcfh_contact_form_title%% and %%dcfh_post_title%%.


0 Comments