Secret New Feature!
I recently introduced you to the Divi Display Conditions feature. And while we knew it was great, it was missing a seemingly #1 feature – settings for custom fields. As I watch the Divi changelog closely, I noticed something new appeared in version 4.14.3. I did all the work exploring it for you and am happy to report that this feature is what I was waiting for! In this tutorial, I will introduce it to you and show you how to use this new Divi Display Conditions feature to conditionally hide and how modules based on custom field values!
▶️ Please watch the video above to get all the exciting details! 👆
Enable Custom Fields In Divi
The first step before we can begin using this exciting new feature in Divi is to enable custom fields. Perhaps you already have custom fields set up, that is great! You can skip ahead. I do not want this particular tutorial to become a lesson on using custom fields. If you want a dedicated tutorial on that, you can let me know in the comments. In this tutorial, I’ll quickly explain two types of custom fields.
Built-In Custom Fields
WordPress comes with built-in custom fields by default. However, these are disabled by default, so you may not even know about them! They are also a bit limited in comparison to some plugins like ACF, but they certain work great for basic needs. You can enable these in four basic steps from any page or post.
- In the top right corner, click the three dots menu.
- Click on “Preferences” at the bottom of the panel.
- A popup will appear. Click on “Panels” in the tabs on the left.
- Enable the toggle for “Custom Fields.”
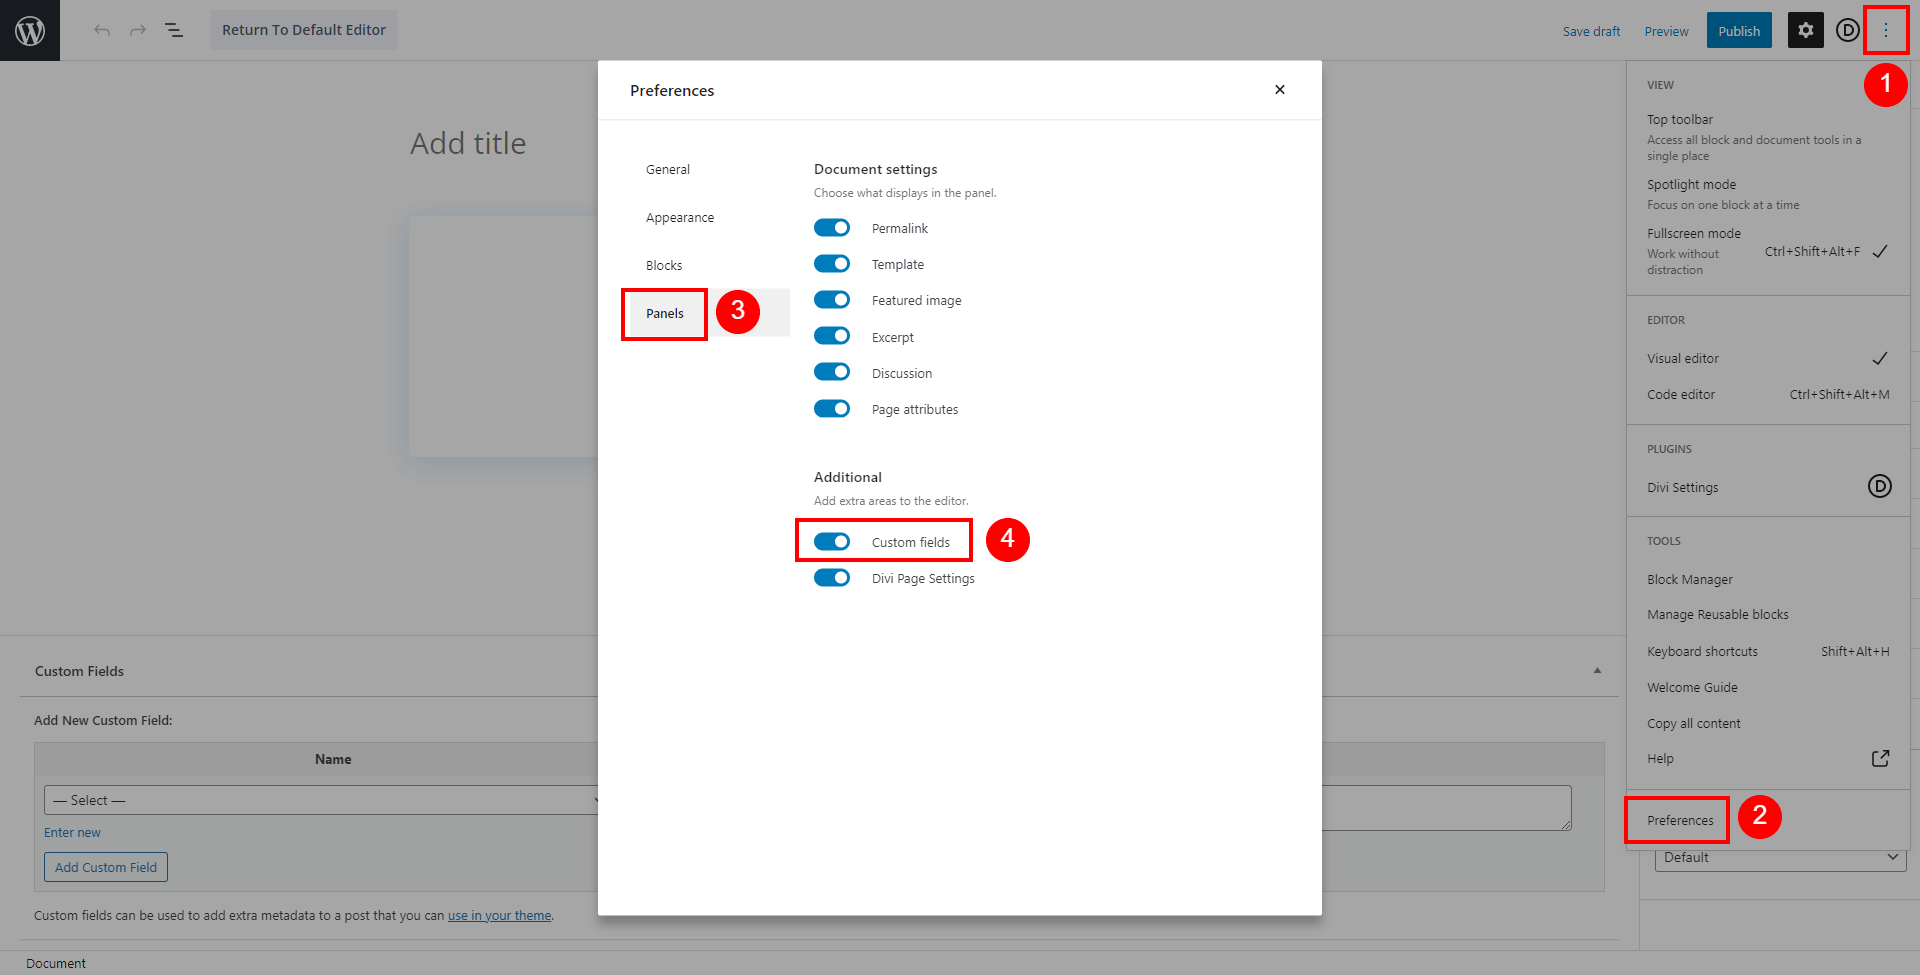
Awesome! Now the custom fields panel will appear below the content editor area on the page like this:
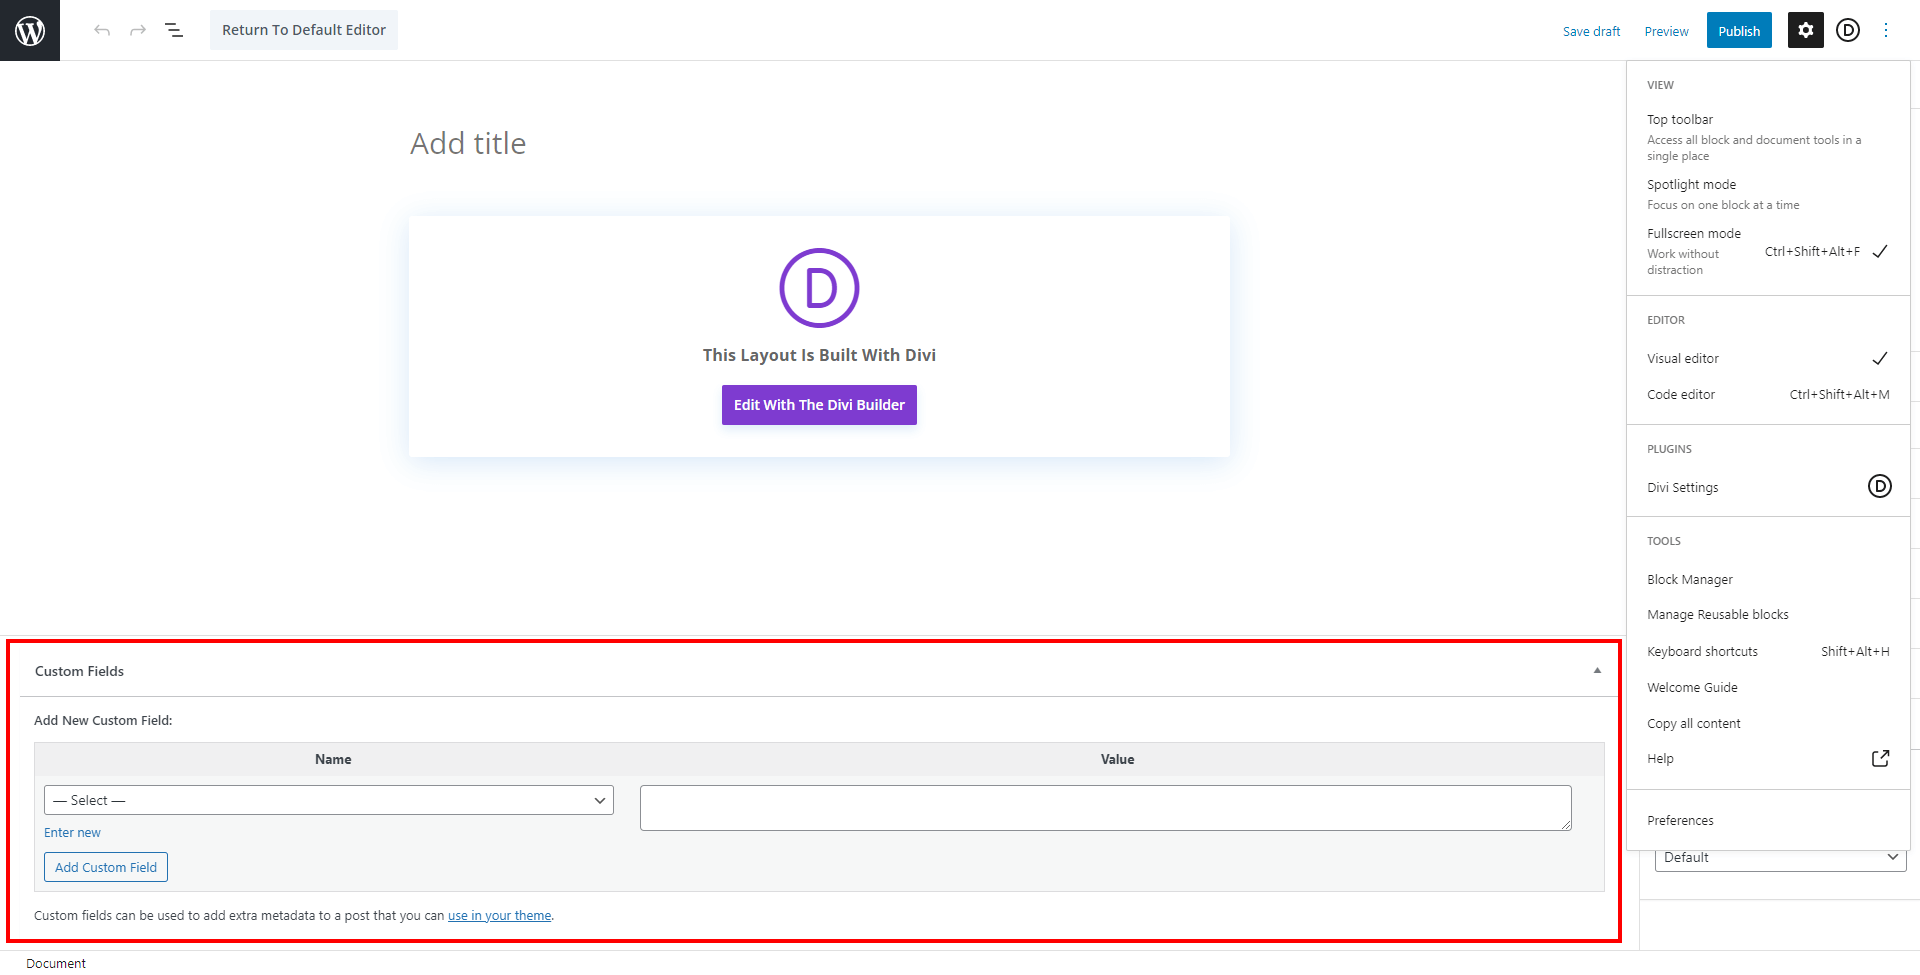
Note that turning this setting on once on any page will enable it on all pages and posts across your site, which is great.
Custom Fields Plugin
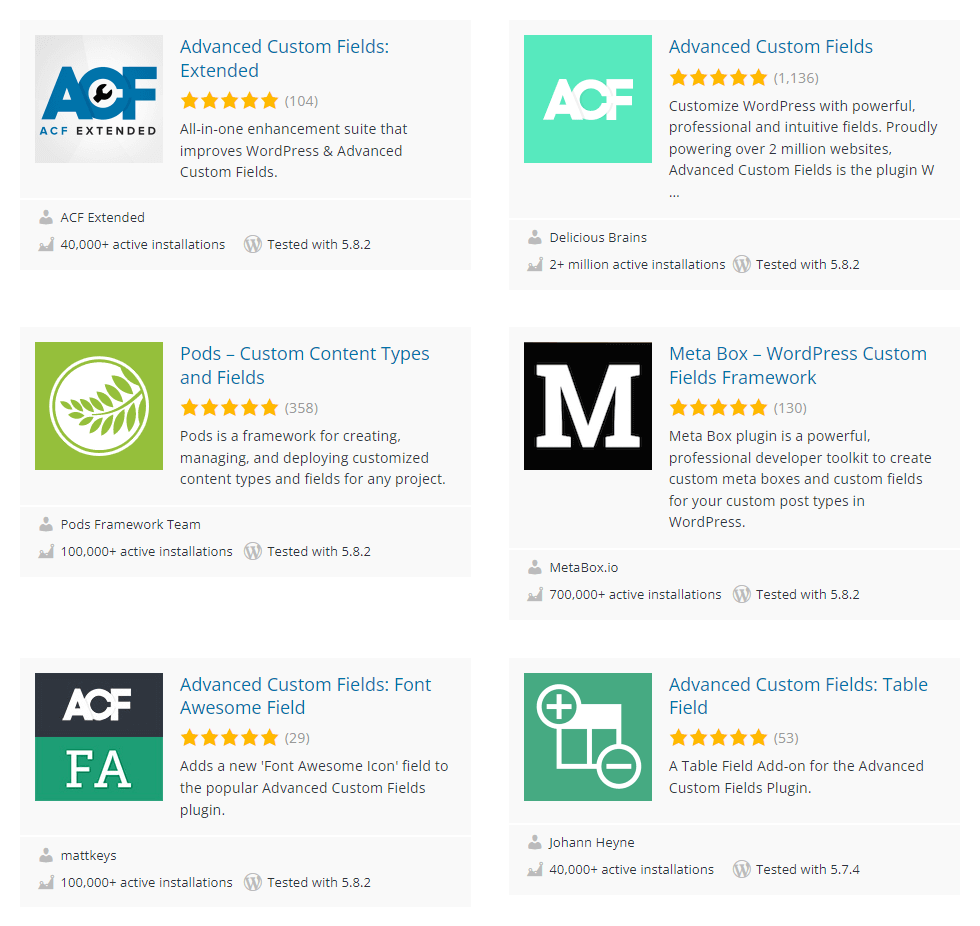
If you need a more robust system of custom fields, you will need to install a custom field plugin. Some popular ones include Advanced Custom Fields, Pods, Meta Box, and many more. In my video accompanying this tutorial I show you some examples using ACF, but it really doesn’t matter what method you use.
Exploring The New Custom Field Display Conditions In Divi
As I mentioned, the Divi 4.14.3 update brought several new Display Condition features (I also have a feeling more are coming). One of those caught my eye, the one called Custom Field. Why? Because it’s the #1 feature that we all expected in the Display Conditions, and was oddly missing. So it’s a big deal!
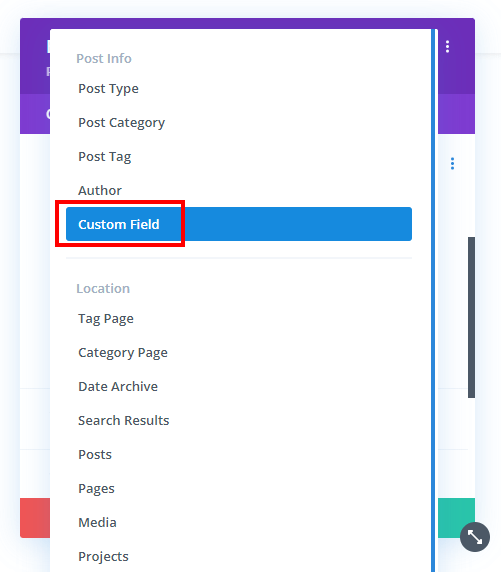
The new Custom Field option is easy to locate as soon as you click to add a new condition. In any section, row, or module, click on the Advanced tab and open the Conditions toggle. Next, click the plus icon to “Add Condition.”
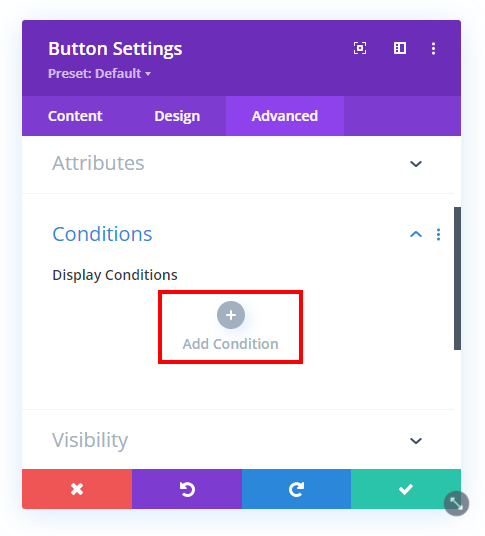
A new panel will appear with lots of choices. We discussed some of these in our original tutorial overview of the new Divi Display Conditions feature. For this tutorial, select the “Custom Field” option.
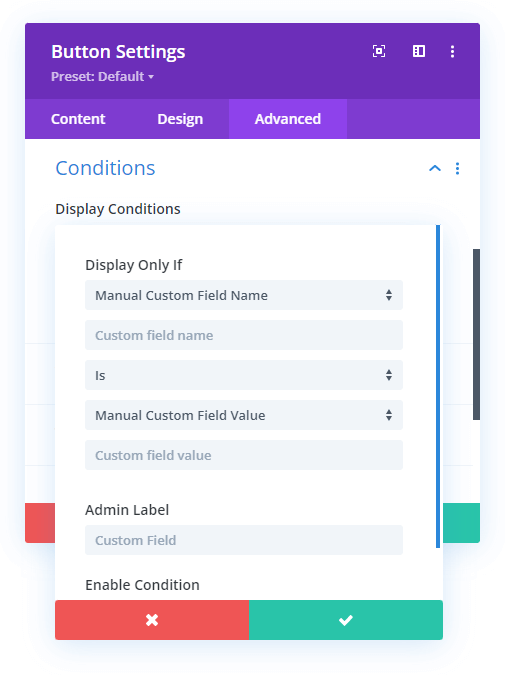
Now you will see the panel appear to narrow down your selection of the specific custom field and value that you are wanting to use.
1. Select Custom Field Name
The first dropdown is on “Manual Custom Field Name” by default. Below that is an input field for you to enter the name. What you do here will depend on if you are suing the default custom fields or not. If you are using the built-in WordPress custom fields, I recommend selecting the actual custom field name in that first dropdown (this way you do not need to type it, and you will be more confident that it is properly selected.) If you use Advanced Custom Fields, for example, you need to get the field name and write/paste that in the input field.
The options that appear in the list when you select the first dropdown is going to be totally different for everyone, depending on what custom fields you have set up. Once you make your selection, you can proceed to choosing the condition.
2. Select Condition
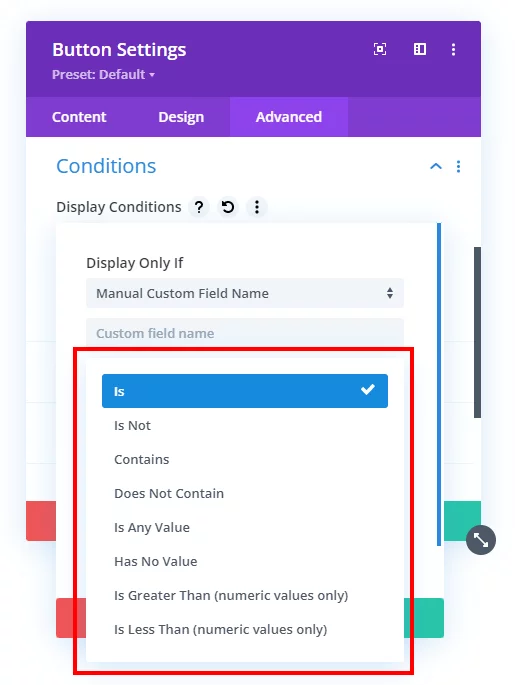
The condition dropdown is set to “Is” by default. But you can certainly change that to whatever fits your situation. Take a look at the available options:
- Is
- Is Not
- Contains
- Does Not Contain
- Is Any Value
- Has No Value
- Is Greater Than
- Is Less Than
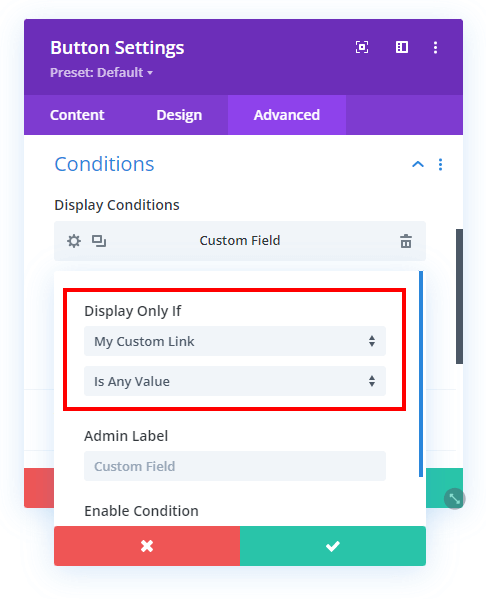
A very common use case would be “Is Any Value” and I explain this more in the video. Basically an example would be if I have a Button module with the URL linked to the custom field with dynamic content, I would only want the button to display if there is actually a link. So I would select “Is Any Value” meaning this button will only show if there is a link present to be clickable.
Notice if I select this option then it does not even need to show the last dropdown (which was for selecting the value) because we chose generically if there is a value or not.
3. Select Custom Field Value
Depending on your choice of condition in step 2, this option will not appear and you can skip this.
If this option is showing, you will need to select the custom field value. This is similar to the name, with a default “Manual Custom Field Value” option and an input field. But unlike the name, for this I do recommend using the input field.
Conclusion & Use Cases
There’s not much else to say, other than to go play around with this for yourself! I’m sure you will find even more ways to use than what I in the video. Be sure to watch that for several real-world use cases on our new family website: Miller Family Adventure.
Tell Us A Creative Use Case!
Let me know in the comments what use cases you are building with this new feature! I know there are a lot of creative ideas out there!






This does seem pretty powerful, but I can’t figure out how to make custom post type ‘Events’ drop off the list when they are ‘past events’. I’m a fairly experienced developer, but new to Divi.
I have a custom field, ‘event_enddate’ (Ymd), which I need to compare to ‘today’s date’. With what you’ve explained here I see how to make ‘event_enddate’ part of the equation, but there does not seem to be a way to add today’s date to compare it to: event_enddate is more than today’s date.
I don’t think there is any way to do that in Divi. Usually they have the basics, beyond that will take custom coding.
So, is your recommendation that I create a listing template with a custom WP_query, and not use Divi on that page?
Which, of course, means I’d need to duplicate the header and footer outside of Divi for that page as well?
I don’t really have a recommendation, as I don’t have experience with what you are trying to do comparing the dates. You would need to write some jQuery instead of using the Divi Conditions.
Nelson, Great tutorial. Is there a way to make page content load depending on button click / link value? For instance, click button A and show A content, click B and see B content? I can’t seem to figure this out. Is like a visitor path determines the content without going to a separate page. Thanks.
You can definitely do that with jQuery, but that would be outside the scope of this tutorial.
Finally a conditions field so that ACF can link and hide an entire module, row or section! I’ve been waiting for this and was searching, searching and found your article. Somehow I didn’t put ‘conditional’ with the fact of linking it to custom fields when I saw this new bit show up on the divi interfaces!!
Now I can do so SO much more.
Yes this is really powerful now!
Did you have any luck using this with ACF fields? I’ve tried the slug, key, etc and I can’t get it to recognize the ACF field.
Turns out that this will be possible with ACF or any custom field plugin (or native CF), but there is a bug with conditional custom fields that Divi is working on.
It has worked fine for me, yes. Not aware of any bugs.
Hi Nelson
Thank you so much for this tutorial and all the others. I really like your work!
I’ve noticed the Gallery on your Adventure page. Would you mind to give me a hint on how that is set up as a gallery from the images uploaded in the custom fields. Did you use a plugin to make the gallery or is it coded or even set up the the conditions function? Hope my question makes sense 🙂
Hey Dorthe,
The gallery is Custom Created using PHP and Advanced Custom Field plugin. If you want to achieve that so here is a hint:
First, inside the field group that you have created using the ACF plugin, create a field of type group and under that add the subfields with type image. If you want to show 10 images, add 10 subfields and set the output as an array of the group field.
After that, you need to create a code to loop through that array to display the images, and this code you need to add under the function that will create it a shortcode and that shortcode you need to place inside the code module and you will have your images.
Please make a tutorial, for all. I understand the Idea, but not to do.
Thanks.
let’s assume i have a row with 3 columns, the first column is a sidebar with links.when a link is clicked, i want the content of that link to display in the second column. is it possible using Divi display conditions
Hey there,
I don’t think we can achieve the functionality using the conditions option. To achieve this the Custom Code is required.
First of all, thanks for the detailed post: it exactly cover what Divi doesn’t say much about.
My question is: does it still work as you described in the post (and the video)?
I do use ACF to add some extra fields to WordPress user profiles so that I can build a nice author page with Divi theme builder. I’m trying to use the condition based on an ACF field to display a Divi module or row in the page, but it just doesn’t work like your video. Using a condition on a “Manual Custom Field Name”, entering the field name from ACF and using the condition “Is Any Value” just display everything all the time, even when the field is empty (really empty).
I’m trying to find out if it’s a different behavior because I’m in the author’s page or if something changed in a later release of Divi (I’m on latest version for both Divi and ACF).
Thanks a lot for all the content you publish!
Hi Pinco, this is a recent post and new feature of Divi, and it works for me. You can contact ET support if it is not working.
As often, a possible answer comes to mind after posting: the “Manual Custom Field Name” option is connected to the “Post” type of content, therefore I suspect it does work, but only on “Post” type of content, not on WordPress users for which such kind of option doesn’t exist in Divi conditions.
Hello, thank you, it helped me a lot.
but I have a query, how can I do it when my custom field is a group? how to get to put the value of sub item of the group.
Hey Joan,
We will definitely look into the query and get back to you as soon as we find a ideal solution.
Hey there, after reading this blog post I was excited to finally have this feature in Divi. But I tried a lot and wrote to the Divi support tree times and finally got a clear answer:
“It is not feasible to do so using any of the available custom field plugins.
This blog was not created by the Divi theme; rather, it was authored by an independent author. [I mentioned your article and that you annaunced this feature as running]
In such case, you may choose to get in touch with the blog’s author for any further information.”
Now I am wondering, if your article leads into a deadend and it would be good to take it offline until the feature really is implemented?
Best wishes, Chris
I have a product with a Buy button. I’d like to change button to Sold for everyone once the client uses WP EasyPay to purchase the product. Is it possible to do this?
I don’t think there is any support for WP EasyPay in the Conditions feature.
Hello Nelson, and thank you for sharing all these pecious tutorials !
Is there a way to hide a WooCommerce “Add to cart button” on an online course page, when a user is already enrolled in this specific course (and of course logged in) ?
I don’t find the way.
Thank you if you know.
Hmm, that sounds more like something handled by a membership site. I think specific things like that will not be found in Divi Conditions.
Hi Nelson! I added custom fields through the ACF plugin which add social link fields in user profiles.
I use dynamic URL links in the Social Media Follow Module. This works to display any author’s social media links/icons. However, all icons will display whether or not they have a value. I tried adding the condition: Manual Custom Field Name (Twitter) Is Any Value. That prevents the twitter icon from displaying whether or not it has a value in their user profile. Any ideas?
I think this issue is because in Divi the conditions are not working for individual items, I noticed this in tabs also. Please report this to Elegant Themes and hopefully they will update it.
Hi Nelson, awesome article. I would like to hide an email optin module based on the language that is selected.
I am using translatepress. They have this code: [trp_language language=”en_US”] This will only be shown when language is en-US [/trp_language].
Could you advise on how to use this shortcake with the custom fields?
Thanks!
I’m not familiar with that scenario, sorry. You can ask Elegant Themes about that.
I formatted a divi builder layout for blog posts to only show restaurant specials if a photo had been added into the custom field since some weeks there is only one special and some weeks there are up to three. Now I want to create a specials page that only shows this weeks specials (just the most recent blog post) but I’m having trouble figuring out how to get it to show the post content from the custom fields especially with them formatted how I set it up on the “All Posts” layout on the divi builder. Would love to hear if you have any suggestions on how to accomplish this.
Hmm not sure on that, it might take custom coding, I don’t think it is possible by default.
Damn, thank you so much for this article!
I’m really advanced with Divi and ACF but did not find this solution for weeks. And the simple reason was that I’m using Divi in German and the translation of this part of the module is so kind of wrong that I wasn’t able to guess the original meaning.
Glad to hear it was helpful!
I know it is not built in but could there be a way to display a module, row, section….depending what they have as a CSS id? I have two forms on 1 page but I only want displayed what they select from a menu ie…. #esp. Thanks! Mark
Sure you could do this as imply as just #idname {display: none;} and when that ID is added then it does not display the element on the frontend. You could also use a class.
Hi there.. bit stuck here:
1. I don’t see the 3 dots at the right top to enable Custom Fields. So what do I do instead to make sure it’s enabled?
2. I tried to nonetheless add a group (yup.. you have groups now.. didn’t see that in your post) and added a text field in there that’s empty. Then I want to change the visibility of a button and make it depending on the value of the text field. When I open up the condition, my new custom text field didn’t show up in there. What am I missing??
Thanks!
These questions would be best asked to Elegant Themes since they are about core Divi.
I’m not understanding how to get the custom field to recognize that the ACF custom field I’m asking it to validate the field data on. What is the proper field name? Is it was is shown in an INSPECTOR focus in a browser, cause that field name is completely different than what I named the field in the ACF module. I’ve tried both and it does nothing to recognize the custom field. I’m simply asking it to NOT SHOW a TEXT MODULE if the custom field says N/A as it’s data. It doesn’t do it.
I don’t have any WP custom fields in use and this wouldn’t help if I can only use the WP custom field. Your comment about it working on a custom plugin like ACF has me puzzled on the proper syntax to make it work. Please help.
Hi Patrick,
You can grab the field name from your ACF field group, it is one of the fields when you create a custom field there in ACF.
I have been just digging in to Custom fields and I love them! Thanks for the tutorial.
Problem. When I go to do conditional display in a layout i do not see any of the ACF fields. on the list of standard WP ones. is this perhaps a bug? BTW if i look up and use the manual value it works fine but the divi interface will not show them to be selected.
Thanks
Hi Rodney, correct in the Conditions specifically the custom fields to not show. They do show in dynamic content, so not sure why not here.