Auto-Updating Dynamic Year Number
It is common to display the number of years a company has been in business on their website, especially on an about page. If you write something like “In Business For 21 Years” it sounds nice, but the next year it immediately becomes outdated, and no one has time to remember to update it each year. The alternative is to write “Since (year)” but that’s not as cool. So in this tutorial I will show you how to make a number value update automatically each year in Divi using a shortcode and snippet.
▶️ Please watch the video above to get all the exciting details! 👆
1. Add The Shortcode
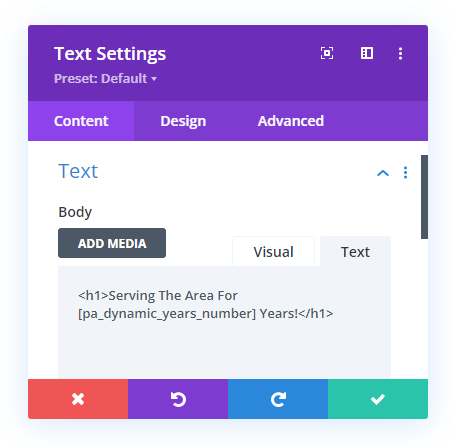
The first step will be to start with a shortcode. The shortcode will be powered by a snippet, which we will talk about in step #2. The shortcode needs to be placed within the HTML of the text wherever you want the dynamic number to appear. Below is the shortcode, so copy that and go to your website and add it to your text.
Be sure to watch the video for this tutorial, it will really help!
Shortcode
[pa_dynamic_years_number] Example
I’ll show you an example of this. It would be the same for a headline or paragraph. Go to the Text module or any other Divi module that supports HTML and click on the “Text” tab, which means HTML. Place the shortcode within the text as shown.

2. Add The PHP Code
The second step now is to add the PHP code that is working behind the scenes and connected to the shortcode. This involves pasting the PHP code snippet below into your website. There are a number places to add this, and it will totally depend on your website and experience.
Where To Paste The PHP Code
1. Divi Assistant
If you are using our Divi Assistant plugin, simply paste the code in the PHP tab in the custom code window in the Divi Visual Builder.
2. Child Theme
If you are using a child theme, paste this code into the functions.php file. If you don't have a child theme, you can generate a child theme directly on your site or download our free child theme.
3. Code Snippet Plugins
Otherwise, install a dedicated code snippet plugin, create a new snippet, and paste this code into the PHP code editor.
If you need help understanding where to paste the code, please check out our complete guide about where to add custom PHP code snippets in Divi.
Snippet
add_shortcode( 'pa_dynamic_years_number', 'pa_dynamic_years_shortcode' );
function pa_dynamic_years_shortcode() {
    $start_date = new DateTime('2000-1-1');
    $current_date = new DateTime();
    $interval = $start_date->diff($current_date);
    return $interval->format('%y');
}
Edit The Date
The only part that you should edit is the date. You can look for 2000-1-1. This is in the YEAR-MONTH-DAY format, so just change the year, month, and date to whatever you want. This is when the number starts counting.
It’s a little hard to show a good screenshot of this one, so be sure to watch the video to get the live demonstration!


Is there a way to make shortcodes work in the Divi Customiz > Footer > Footer Bar – Edit Footer Credits. Thanks
I don’t know the answer to that, but I would highly recommend just switching to the Divi Theme Builder instead. The Customizer will be extinct soon.
Thanks Nelson
This worked a treat. I was able to modify the code and have it calculate. In the future.
Here is the code if anyone wants to try. Basically I wanted it to display next month’s date for a rolling deadline we had on the website.
add_shortcode( ‘pa_dynamic_month_plus_4weeks’, ‘pa_dynamic_month_shortcode’ );
function pa_dynamic_month_shortcode() {
$current_date = new DateTime();
$current_date->modify(‘+4 weeks’);
return $current_date->format(‘F’);
}
Thank you for sharing the code.