
There Are 6 Missing Divi Parallax Background Image Settings
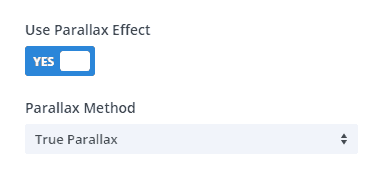
The Settings Are Missing When Parallax Is Turned On
One of Div’s quirks is the section background image settings. They provide lots of options for the background image except when parallax effect is turned on, at which point the settings are not available.
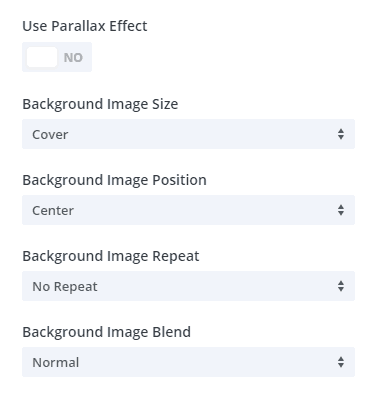
The following options are available when parallax is not turned on:
- Background Color
- Background Gradient Color
- Background Image Size
- Background Image Position
- Background Image Repeat
- Background Image Blend
Parallax Turned Off
Parallax Turned On
How to get these back? CSS to the rescue.
I can’t make the settings appear in Divi, but I can provide you with the CSS classes for each one. Remember, the Divi Builder is simply taking these same CSS properties and making them available in a builder context, so none of this is new or innovative — we are just filling back in the gaps.
Where To Paste The CSS Code
1. Divi Assistant
If you are using our Divi Assistant plugin, simply paste the code in the CSS tab in the custom code window in the Divi Visual Builder.
2. Child Theme
If you are using a child theme, paste this code into the style.css file. If you don't have a child theme, you can generate a child theme directly on your site or download our free child theme.
3. Divi Theme Options Integration
Otherwise, paste this code in your Divi>Theme Options>Custom CSS code box.
If you need help understanding where to paste the code, please check out our complete guide about where to add custom code In Divi.
Background Color (Overlay)
When you have a background image, you wouldn’t want to cover it completely with a color, so I’ll show you using a semi-transparent black overlay. Feel free to adjust this to any other color, but this will work most of the time.
The CSS class used is pa-parallax-background-image-color
/*background image color*/
.pa-parallax-background-image-color .et_parallax_bg:before {
content:"";
display: block;
height: 100%;
position: absolute;
top: 0;
left: 0;
width: 100%;
background-color: rgba(0,0,0,0.6);
}
Background Color
Background Gradient
This is an optional upgrade from the background color, but if you are using gradients on other sections of your site, you may want to use one on your parallax sections. Again, feel free to adjust this to any other colors. You can use this gradient generator tool here to do that.
The CSS class used is pa-parallax-background-image-gradient
/*background image gradient color*/
.pa-parallax-background-image-gradient .et_parallax_bg:before {
content:"";
display: block;
width: 100%;
height: 100%;
position: absolute;
top: 0;
left: 0;
background-image: -webkit-gradient(linear, left top, right bottom, from(rgba(0, 195, 170, 0.70)), to(rgba(122, 87, 209, 0.70)));
background-image: -webkit-linear-gradient(left top, rgba(0, 195, 170, 0.70), rgba(122, 87, 209, 0.70));
background-image: -moz-linear-gradient(left top, rgba(0, 195, 170, 0.70), rgba(122, 87, 209, 0.70));
background-image: -o-linear-gradient(left top, rgba(0, 195, 170, 0.70), rgba(122, 87, 209, 0.70));
background-image: -ms-linear-gradient(left top, rgba(0, 195, 170, 0.70), rgba(122, 87, 209, 0.70));
background-image: linear-gradient(left top, rgba(0, 195, 170, 0.70), rgba(122, 87, 209, 0.70));
}
Background Gradient
Background Image Size
In this example, we left the image on “Cover” and most of this will be fine. There are some times you would want to play around with the other settings, especially when combined with other settings like repeat in the example below with the background pattern.
Here is a list of the standard CSS background size options that are found in non-parallax Divi background image settings
- Cover (default)
- Fit (contain)
- Actual Size
The CSS class used is pa-parallax-background-image-size
/*background image size*/
.pa-parallax-background-image-size .et_parallax_bg {
background-size: cover;
}
Background Image Size
Background Image Position
Most of the time the default center image position will be fine. However, depending on how the image is cropped or how the subject is positioned in the photo, you may want to move the image up, down left, right, or a combination of those.
Here is a list of the standard CSS
- Center (default)
- Left Top
- Top Center
- Top Right
- Center Left
- Bottom Left
- Bottom Center
- Bottom Right
The CSS class used is pa-parallax-background-image-position
/*background image position*/
.pa-parallax-background-image-position .et_parallax_bg {
background-position: center;
}
Background Image Position
Background Image Repeat
I often use the background image repeat option to create a background pattern. Just use a small, seamless pattern and set it as the background image and then use repeat to make the pattern fill the section background.
Here is a list of the standard CSS background repeat options that are found in non-parallax Divi background image settings
- No Repeat (default)
- Repeat
- Repeat X (horizontal)
- Repeat Y (vertical)
- Space
- Round
In this example, we needed to use two CSS background image properties to achieve the desired seamless background pattern. We set the background image size to “initial” and the background image repeat to “repeat.”
The CSS class used is pa-parallax-background-image-repeat
/*background image repeat*/
.pa-parallax-background-image-repeat .et_parallax_bg {
background-repeat: repeat;
background-size: initial;
}
Background Image Repeat
Background Image Blend
This setting is familiar to Photoshop users. Basically, the background blend makes the background image blend with the background color.
Here is a list of the standard CSS blend mode options that are found in non-parallax Divi background image settings.
- Normal
- Multiply
- Screen
- Overlay
- Darken
- Lighten
- Color Dodge
- Color Burn
- Hard Light
- Soft Light
- Difference
- Exclusion
- Hue
- Saturation
- Color
- Luminosity
In this
The CSS class used is pa-parallax-background-image-blend
/*background image blend*/
.pa-parallax-background-image-blend .et_parallax_bg {
background-color: #2cba6c;
background-blend-mode: multiply;
}
Background Image Blend
How to Use The CSS Snippets
Starter Examples
The CSS snippets I gave are to be used a starting point. Most of them will need to be edited to meet your needs. The items you would edit are listed in bullet points for each one.
Add The CSS Classes to the Section
Open the Section settings.
In the Content tab, add your background image and switch “Use Parallax Effect” to “Yes.”
Go to the “Advanced” tab.
Open the “CSS ID & Classes” toggle
Add the CSS class for the effect you need in the “CSS Class” (You can add more than one separated by a space.)
Be sure to


unfortunately, this is not working at all for me.
I added the required class to the section custom CSS ID and classes, and I added the CSS in the divi custom css section, but it is having no effect.
Hi Snake,
You’ll have to give me more details to help, such as a link and the steps that you took.
this is what worked for me in divi 4.0
wouldn’t have figured it out without your help!
.et_parallax_bg_wrap :before {
content:””;
display: block;
height: 100%;
background-image: linear-gradient(180deg,rgba(0,0,0,0.5) 0%,rgba(0,0,0,0) 50%) }
Replace “:before” with “::before”. Then it works. The pseudo class has to be noted with double colons.
It should work fine with one actually.
Hi Nelson, let me suggest you an even faster trick to show the Background Color Overlay + Parallax effect:
1. Paste this into Advanced> Custom CSS> Main Element:
background-attachment: fixed;
2. Deactive “Use Parallax Effect” from Content> Background> Image
It Hope it helps! 😉
Hey Ramon,
That is very cool! Love learning new tricks like that, thanks!
This is the Most amazing trick.
I’m so glad you like it!
Many thanks Nelson. This article addresses exactly what I am trying to achieve. However I’ve tried copying and pasting your exact snippet into CCS Class, but it’s not adding the background image blend:
/*background image blend*/
.pa-parallax-background-image-blend .et_parallax_bg {
background-color: #2cba6c;
background-blend-mode: multiply;
}
Is it correct for me to paste the entire above code into CCS Class or am I doing something wrong?
Hey Neil,
No you just need to add the class, in this case “pa-parallax-background-image-blend” in the Divi module. Then paste the snippet into your Divi Theme Options Custom CSS. You can learn more here:https://www.peeayecreative.com/where-to-add-custom-code-in-divi-css-javascript-php/
I am getting a CSS error stating “expected rbrace” on line 1 (next line after comment line) I can’t work out the error and I copied your code and I have added the css class.
/*background image size*/
.pa-parallax-background-image-size .et_parallax_bg {
“expected rbrace”
background-size: cover;
}
Hi Daniel,
Where are you placing this CSS? In the Divi Theme Options?
Hi Nelson,
Super helpful, as always. Thanks!
I’m wondering if the same concept/code could be used for modules. In particular, i’d like to use it on a slider or fullwidth slider individual slide backgrounds.
Hi Mark,
I haven’t tried, but it certainly should be possible with any parallax background.
Hello ! I think that this is the article that i was looking for ! But i’m 0 in code… i’m getting errors everywhere : “Expected RBRACE.” and ” Unexpected token”}” “. I copied the code then went to “Advanced => CSS ID&Classes => CSS ID : “blank” // CSS class : pa-parallax-background-image-size pa-parallax-background-image-position.
Then in “Custom CSS” I copied the code you share us in the right element (“main element” / “header”…)
I deactivated the Divi “true parrallax” before i done that.
Best regards,
RafaS.
Hi, it sounds like you are simply placing the CSS in the wrong location. You should put the snippets in Divi>Theme Options>Custom CSS, not in the module.
To learn more, you can review this: https://www.peeayecreative.com/where-to-add-custom-code-in-divi-css-javascript-php/
Hi Nelson – I was wondering if it would be possible to add css that would make the background parallax image move horizontally on scroll.
I have the background image in a section
Layered on top of that I have a row with a patterned wave background (just for fun)
Final top layer is a divider module containing a knockout png “mask” ( I will change mask to svg eventually)
I am trying to achieve the effect of water moving horizontally behind the mask. How cool would that be?!
The example is on a staging site, time limited for those of you looking at comments…
Hey Arlene,
I understood what you are trying to achieve but I am not sure that we can achieve it exactly with parallax and CSS. I would suggest you to use a gif of moving water as it will be much more straightforward then this. But if you trying to achieve with Parallax then please enable the parallax effect first and let me know so that I could try some CSS to make it possible.
Thanks for these tips! I found the image placement was more versatile by using % instead of “center” etc.
I added this to the Page’s CSS by clicking on the purple gear at the bottom of the Visual Editor (that way I can use different percentages on different pages for different images).
The 50% centers it horizontally, and the 100% seems to work for my particular image (it places the vertical center at the bottom of the section).
/*background image position*/
.pa-parallax-background-image-position .et_parallax_bg {
background-position: 50% 100% !important;
}
When I turn on CSS parallax it scales up my image. How do I stop that from happening?
It would be physically impossible NOT to scale up, that is in the nature of parallax the way it zoomes.