A Simple Compact Blog List
I recently saw a question in a Divi Facebook group asking how to design a simple list of Divi blog posts. I already have several tutorials about the blog list like Create A Divi Blog List and Create A Divi Blog Sidebar List. But these are different than what the person wanted, so I immediately wanted to create it for fun and to share it with you. So in this tutorial, I will show you how to design a compact list of Divi blog posts using the Divi Blog module and some CSS styling.
▶️ Please watch the video above to get all the exciting details! 👆
1. Set Up And Design The Blog Module
The first step is to set up the blog module design settings. After this, we will add some required CSS, but first, let’s get the settings adjusted. I’ll list each step here.
Content Tab
In the Content toggle, adjust the post count to your preference. I am choosing 5 for this tutorial.
In the Elements toggle, disable everything:
- Add the Divi Blog module to your layout
- Disable “Show Featured Image”
- Disable “Show Author”
- Disable “Show Date”
- Disable “Show Categories”
- Disable “Show Excerpt”
- Disable “Show Pagination”
Design Tab
In the Title Text toggle, adjust the following:
- Set the “Font Weight” to Bold
- Change the H2 “Title Text Size” to 20px Desktop, 18px Tablet, and 16px Phone
- Set the “Title Text Color” to #0070fc on hover
For all of these values, you can change them to fit your branding and preferences. I am simply providing the values used in the video tutorial for you to follow.
2. Add A Custom CSS Class To The Divi Blog Module
The next part of the tutorial is adding the CSS to complete the styling. But first, we need to add a custom CSS class to the Divi Blog module. This will connect the code snippets to the specific Blog module that you are designing, and make sure it does not affect other Blog modules on the site.
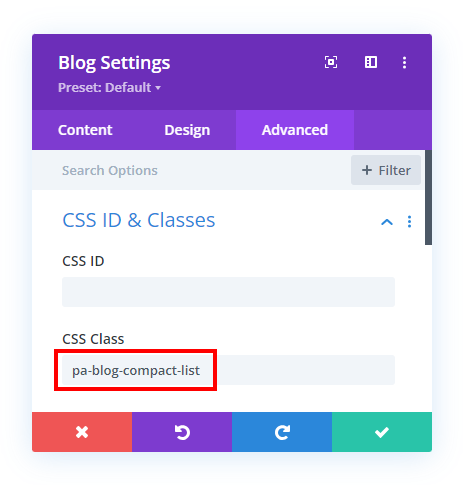
Open the Divi Blog module settings and go to the Advanced tab and open the CSS ID & Classes toggle. From there, copy and paste or write “pa-blog-compact-list” into the CSS Class input field, as shown in the screenshot.

3. Add The CSS Snippet In Divi
The last step is to copy and paste the CSS code snippets below into your Divi website.
Where To Paste The CSS Code
1. Divi Assistant
If you are using our Divi Assistant plugin, simply paste the code in the CSS tab in the custom code window in the Divi Visual Builder.
2. Child Theme
If you are using a child theme, paste this code into the style.css file. If you don't have a child theme, you can generate a child theme directly on your site or download our free child theme.
3. Divi Theme Options Integration
Otherwise, paste this code in your Divi>Theme Options>Custom CSS code box.
If you need help understanding where to paste the code, please check out our complete guide about where to add custom code In Divi.
/*add the border and spacing around the entire blog list*/
.pa-blog-compact-list.et_pb_posts {
	border: 2px solid #f0f3f6;
	border-radius: 10px;
	padding: 30px 30px 20px;
}

/*adjust the spacing and add the border after each blog post*/
.pa-blog-compact-list .et_pb_post:not(:last-child) {
	margin-bottom: 20px;
  padding-bottom: 10px;
  border-bottom: 1px solid #f0f3f6;
}

.pa-blog-compact-list .et_pb_post:last-child {
	margin-bottom: 0px;
}


/*make the title link spread over the entire post to make it clickable*/

.pa-blog-compact-list .entry-title a:before {
	position: absolute;
	display: block;
	content: "";
	width: 100%;
	height: 100%;
	left: 0;
	top: 0;
	z-index: 1;
}


/*add the arrow icon on each blog post*/
.pa-blog-compact-list .entry-title a:after {
	content: "\35";
	font-family: ETModules;
	font-weight: 800;
	font-size: 1em;
	line-height: 1em;
	color: #777b88;
	background-color: #f0f3f6;
	position: absolute;
	top: 2px;
	right: 0px;
	padding: 2px;
	border-radius: 50%;
	width: 1em;
	text-align: center;
}

/*change the icon color on hover*/
.pa-blog-compact-list .entry-title a:hover:after {
	color: #0070fc;
	transition: all ease .3s;
}
Code Explanation
The code used here is pretty simple, and I have added notes as comments within the code for each snippet.
The first part of the code is adding the border and spacing around the entire blog list.
The second part is adjusting the space and adding the border below each individual post.
The third part of the code is making the entire width of the blog post clickable as the link. Otherwise, only the part where the title text is would be clickable.
The fourth part is adding the icon to each blog post link. The styling can be adjusted to your preference, like the color, background color, or other values. You can also adjust the hover color as needed.


Hi Nelson
and thankyou for this fine CSS snippet for “Compact List Of Divi Blog Posts”. I find it very usefull.
Everything looks fine, except the oldest post in the bottom of the list.
This post seems to be missing the padding, in my case 7px.
I am a novice to CSS, so I can not figure out what is wrong.
I use this code placed in the Additional CSS section:
/*adjust the spacing and add the border after each blog post*/
.pa-blog-compact-list .et_pb_post:not(:last-child) {
margin-bottom: 10px;
padding-bottom: 0px;
padding-top: 7px;
padding-left: 7px;
padding-right: 7px;
}
.pa-blog-compact-list .et_pb_post:last-child {
margin-bottom: 0px;
}
/*make the title link spread over the entire post to make it clickable*/
.pa-blog-compact-list .entry-title a:before {
position: absolute;
display: block;
content: “”;
width: 100%;
height: 100%;
left: 0;
top: 0;
z-index: 1;
}
Hi Jan!
The padding seems to be working fine at my end. It seems some other code is causing the issue. Can you share the URL of the page to investigate further?