Subscribe On YouTube

Join other subscribers and enjoy other Divi video tutorials!

How To Make An Inline Divi Contact Form

Nelson Miller Profile Orange
In this tutorial I will show you how to use CSS to make an inline horizontal Divi Contact Form module to use it as an email subscribe form.

▶️ Please watch the video above to get all the exciting details! 👆

1. Set Up And Adjust The Divi Contact Form Fields

Add The Desired Fields

The first step to make your Divi Contact Form module fields inline is to simply add the desired fields. Since this will be an email signup form, you will want to keep it as simple as possible. The fields you would normally use for this are name and email. If you need first and last names separate, be sure to add those fields with their unique field ID.
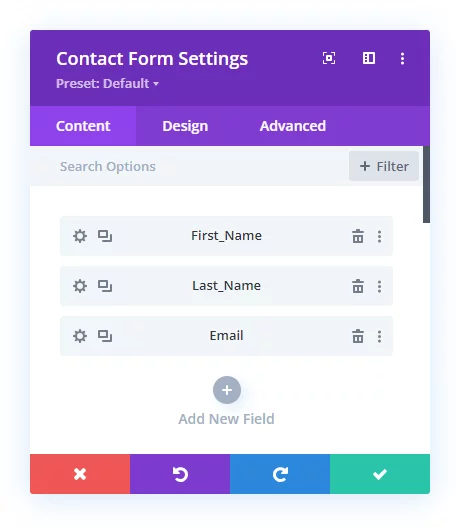
setting up the Divi contact form module fields to be inline

Set Each Field To Fullwidth

For this tutorial to work, you need to set each field to fullwidth. This may seem counterintuitive, but it is necessary to first make each field fill 100% of it’s space, and then later in step #3 the CSS will make each one of those fill 1/4 of the entire space.

So the main thing to do here is open the settings for each field, click the Design tab, open the Layout toggle, and enable the Make Fullwidth setting.
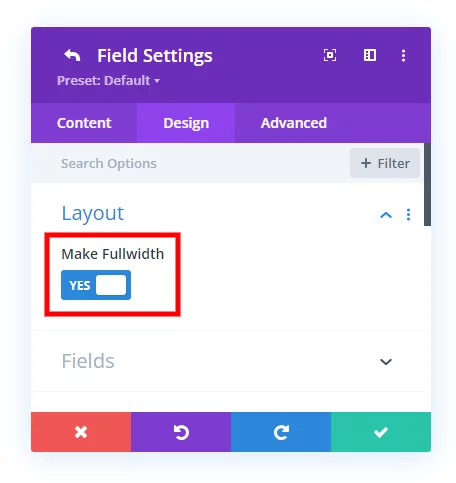
set the Divi contact form field fullwidth to make them inline

At this point, your form will look like this, with each field stacked fullwidth and the button below the fields on the right.

result of making each field fullwidth in the Divi contact form when making them inline

2. Add A custom CSS Class To The Divi Contact Form

Next, we need to add a custom CSS class to the Divi Contact Form module in order to only target this specific module with our code from step #3. Open the module settings and go to the Advanced tab to the CSS ID & Classes toggle and paste the class “pa-inline-contact-form” into the CSS Class field.
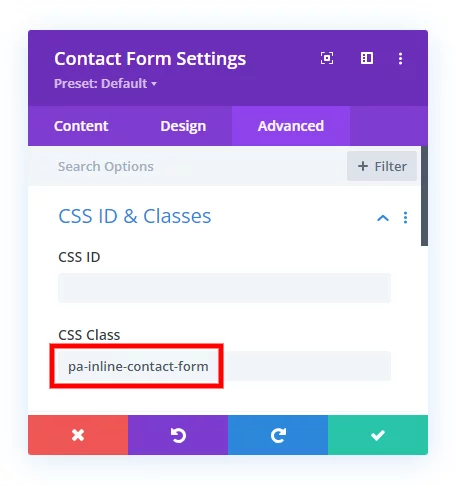
add custom css class to the Divi Contact form module to make the fields inline

3. Add The CSS Code

Now for the part that does the man work, the CSS code. This code is actually pretty simple. This CSS code is designed to style the contact form modules with the class .pa-inline-contact-form added in step #2.

First, it sets the form container to use a flexible layout, ensuring its elements adjust well to different screen sizes. Then, each field in the form is styled to be displayed side by side, which is done by setting a width of 25% and some space between them. Lastly, the submit button container is also styled to be inline and take up a quarter of the width, and the button itself is adjusted to fit the container’s width and positioned correctly. 

Where To Paste The CSS Code

1. Divi Assistant
If you are using our Divi Assistant plugin, simply paste the code in the CSS tab in the custom code window in the Divi Visual Builder.

2. Child Theme
If you are using a child theme, paste this code into the style.css file. If you don't have a child theme, you can generate a child theme directly on your site or download our free child theme.

3. Divi Theme Options Integration
Otherwise, paste this code in your Divi>Theme Options>Custom CSS code box.

If you need help understanding where to paste the code, please check out our complete guide about where to add custom code In Divi.

/* set the contact form container to use flexbox layout */
.pa-inline-contact-form .et_pb_contact_form {
  display: flex;
}

/* style each contact form field */
.pa-inline-contact-form p.et_pb_contact_field {
  display: inline-block;
  padding: 0;
  width: 25%;
  margin-right: 20px;
}

/* style for the container of the submit button */
.pa-inline-contact-form .et_contact_bottom_container {
  display: inline-block;
  width: 25%;
  margin-top: 0;
}

/* style for the submit button */
.pa-inline-contact-form .et_contact_bottom_container .et_pb_contact_submit {
  margin: 0 0 0 0px!important;
  width: 100%;
}

4. View The Result

After adding the CSS code to your site, you can exit the builder and view the result! What you see on the frontend will look like this screenshot:

final result of making the Divi contact form fields inline

In this example, I did not add any design styling, so it looks rather bleak, so feel free to adjust the design of the fields and button to match your site styles.

5. Bonus Tip: Integrate With Zapier Or Pabbly

Now that your contact form is set up with a horizontal inline layout, you are ready for people to signup. By default, since this is not an email option form, you will need some way to add the users to an email marketing system. I use FluentCRM on our sites, and highly recommend it as a very affordable solution and alternative to expensive tools like Mailchimp. You have two main options here:

A. Manually add the user details into your email marketing tool each time a user submits the form
B. Automate the process with a tool like Zapier or Pabbly

The only way I know to do option B is with our Divi Contact Form Helper plugin, which includes integrations for the email parser tools in both Zapier and Pabbly. 

Subscribe For More Things Like This!

At the start of each month, we send out a recap newsletter from the month before with family news, Divi news, our latest tutorials, and product news. Occasionally, if the news is too exciting to wait, we will send out another email separate from the monthly newsletter. That’s what you get when you subscribe, and of course you can unsubscribe if you are no longer interested!

Blog Post Optin
Divi Logo (2)

Shop Our Divi Products

Plugins • Courses • Templates

Visit The Shop

Featured Products

Asset 4

New! Trail Guides

Follow a series of blog posts carefully arranged around a specific topic or goal! Keep track of your progress by marking posts completed, just like a free course!

View Trial Guides

Divi Tutorials On YouTube

Our videos have views! Join subscribers and enjoy over video tutorials!

Visit Our Channel

Leave A Response!

By commenting you agree to our Blog & YouTube Comments Policy

8 Comments

Comments By Members

These comments are highlighted because they were posted by fans who have a membership on this site.

  1. Daniel DeHart <span class="comment-author-role-label"><a href="https://www.peeayecreative.com/product/divi-adventure-club/" class="comment-author-role-link" rel="external nofollow" target="_blank">Divi Adventure Club Member</a></span>

    If I only wanted certain fields to be inline but not the entire module, how would I go about doing that? URL is dandehart.dev/membership/membership-application and I have a form that’s going to be an application but with so many fields it’s super long. How can I make it 2 columns or make some of the fields inline?

    Reply
    • Nelson Lee Miller (aka The Divi Teacher) <span class="comment-author-role-label author-label">Author</span>

      Hi Daniel,
      I believe instead of inline, you are meaning to set the number of columns more than 1 or 2. In divi you can choose 1 or 2 by setting it to fullwidth or not. To make 3 for example you could set 3 of them to fullwedth, then in the CSS of each one set the width to 33%.

      Reply

Comments By Others

    • Hemant Gaba <span class="comment-author-role-label"><a href="https://www.peeayecreative.com/product/divi-adventure-club/" class="comment-author-role-link" rel="external nofollow" target="_blank">Divi Adventure Club Member</a></span>

      Georgi!

      Please go to the Field settings > Advanced > Custom CSS > Main element and add the following code:

      width: 50%;
      position: absolute;
      right: 0;

      If it doesn’t help, please share the page URL for more accurate code.

      Reply
  1. Manas M.

    Enclosing the CSS code within a media query will make it responsive to mobile screens.

    @media screen and (min-width: 768px){} works good for me.

    Reply
  2. Ilana

    Hi Nelson.

    I’ve got a really big form with loads of fields, so I’d like to make them, say 4 fields in a row, but with multiple rows. Have a look here to see what I’m trying to duplicate: https://www.crumbscupcakes.co.za/detail.php?id=28858
    We’re in the process of re-building this site using Divi.

    Would I be able to modify your css to achieve this or should I look for another solution outside of the Divi contact form?

    Thanks for an amazing blog!
    Ilana (FlashStone Media – South Africa)

    Reply
    • Hemant Gaba <span class="comment-author-role-label"><a href="https://www.peeayecreative.com/product/divi-adventure-club/" class="comment-author-role-link" rel="external nofollow" target="_blank">Divi Adventure Club Member</a></span>

      Hi Ilana!

      It seems you have achieved the desired result. All the fields are inline now. Let me know if you need any further assistance.

      Reply

Submit a Comment

Your email address will not be published. Required fields are marked *

Recent Posts

Shopping cart0
There are no products in the cart!
You may be interested in…
$19.00$22.50

Select options This product has multiple variants. The options may be chosen on the product page

$16.50$24.00

Select options This product has multiple variants. The options may be chosen on the product page

$16.50$24.00

Select options This product has multiple variants. The options may be chosen on the product page

$19.00$24.00

Select options This product has multiple variants. The options may be chosen on the product page

$20.50$24.00

Select options This product has multiple variants. The options may be chosen on the product page

Graphic showcasing Divi Assistant features and toolset.
From: $69.00 / year

Select options This product has multiple variants. The options may be chosen on the product page

Divi Search Helper Plugin By Pee Aye Creative
From: $29.00 / year

Select options This product has multiple variants. The options may be chosen on the product page

Continue shopping
0